2.2 Setting up the InfoConnect Administrative Tools
InfoConnect uses the Microsoft Windows Installer application installation and configuration service. The Windows Installer gets installation information from a relational database, which is saved and deployed as a Microsoft MSI file. When you deploy an MSI file to a user workstation, the Windows Installer on the workstation accesses the information in the MSI file to perform the installation.
Use the following tools to customize and deploy InfoConnect. These tools are installed as part of the administrative install image.
2.2.1 About the Tools
Setup program
The Setup program ( setup.exe) is the recommended tool for installing and deploying InfoConnect. This tool uses the primary InfoConnect MSI file to install InfoConnect but it also installs prerequisite software (if needed) and has several other features that provide a smoother deployment than installing directly with the primary InfoConnect MSI file. When the Setup Program installs InfoConnect, it determines whether each workstation has the required .NET Framework and Microsoft Windows Installer version and automatically installs them if necessary. It also automatically uses the correct language for the installation and removes previous versions of InfoConnect. (This is required to install the new version.) If the Visual Basic feature is selected, the Setup Program also installs the Visual Basic core MSI, along with the appropriate Visual Basic language MSI.
NOTE:If you install with MSI directly, you will need to install the .NET Framework and Microsoft Windows Installer version directly and remove any previous versions of InfoConnect. The MSI installer uses English for the installation unless you specify another language on its command line. The InfoConnect MSI does not install Visual Basic. If you install with MSI directly, you must run the Visual Basic core and language MSIs (in the Prerequisites folder) directly.
The Setup program has a command-line interface that you can run from a command line, a batch file, or a deployment tool. You can set command-line options to preset installation parameters and limit user interaction as InfoConnect is installing. You can also suppress installation dialog boxes to provide an unattended installation or use command-line options to prepare InfoConnect for installation by users. In general, any of the MSI command-line options can be used from the Setup program command line.
To see a list of available command-line parameters, enter:
setup.exe /?
Feature Selection
Use the tab of the Setup program to select which features to install. The features available to you depend on your InfoConnect Product. The following table summarizes the features for each of the following:
-
InfoConnect Desktop for Unisys
-
InfoConnect Desktop for Unisys Pro
-
InfoConnect Desktop for Airlines
-
InfoConnect Desktop for Airlines Pro
Features in [brackets] are included in a default installation.
|
Feature |
Unisys |
Unisys Pro |
Airlines |
Airlines Pro |
|
|---|---|---|---|---|---|
|
Unisys Transports |
X |
X |
|||
|
[TCPA], [INT1], MATIP for UTS, CCF |
|
|||
|
Airline Transports |
X |
X |
|||
|
[INT1], [MATIP for ALC], MATIP for UTS, ATSTCP, UDPFRAD (with TCPFRAD), SABRE, Airlines Gateway, PEPGate (with add-on) |
||||
|
3270/5250 |
X |
|
X |
||
|
Compatibility: [Extra!], IBM Personal Communications, [Rumba], OpenText Host Explorer, Jolly Giant QWS |
|
|
|
|
|
[UNIX and OpenVMS] |
X |
|
X |
||
|
Compatibility: [Extra!], Legacy KEA!, Rumba, OpenText Host Explorer |
|
|
|
|
|
HP with NS/VT |
|
X |
|
X |
|
|
Options Pack |
X |
X |
X |
X |
|
|
GraphX, Automation Development Kit, Connectivity Services Development Kit |
|
|
|
|
|
Productivity: [Screen History, Office Tools, Auto Complete, Auto Expand, Spell Check, Recent Typing, Scratch Pad] |
X |
X |
X |
X |
|
|
[Visual Basic for Applications] |
X |
X |
X |
X |
|
|
Quick Launch |
X |
X |
X |
X |
|
|
Web Browser |
X |
X |
X |
X |
|
|
[FTP Client] |
X |
X |
X |
X |
|
|
Utilities: [Kerberos Manager, Key Agent] |
X |
X |
X |
X |
|
The following utilities do not appear in the Setup program feature tree. They are installed as follows:
-
The Database Editor and InfoConnect Manager are installed with all InfoConnect products.
-
T27 Printer Services are installed with both Unisys products.
-
PTR Printing can be added to the Airlines products as an add-on.
-
The Reflection IBM Printer is installed when you install the 3270/5250 feature, which is available with Unisys Pro and Airlines Pro.
Data Location
Use the tab in the Setup program to configure where InfoConnect stores data. This tab includes two options—a user data location and an application data location.
NOTE:The tab is not visible if you are installing InfoConnect Desktop on a system with an earlier version of InfoConnect. After an upgrade, InfoConnect Desktop continues to use your existing data locations.
-
User data
The user data location is used for session documents, customization files (such as themes and keyboard maps), macros, translation tables, Secure Shell configuration, Reflection Certificate Manager configuration, and FTP Client settings.
The default is user-specific: C:\Users\username\Documents\Micro Focus\InfoConnect. You can modify this to use the Public Documents folder, or specify an alternate location of your choice.
-
Application data
The application data location is used for the InfoConnect database, PTR configuration, and trace files.
The default location is shared by all users: C:\Users\Public\Documents\Micro Focus\InfoConnect. You can modify this to a user-specific location in the Documents folder, or specify an alternate location of your choice.
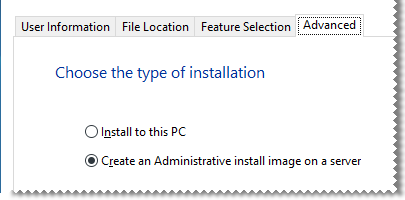
Advanced Tab
The Advanced tab includes options for creating an administrative installation point and for managing the installation log.
Choose the type of Installation
Two choices are available.
-
Use this option to install InfoConnect.
-
Use this option to create an administrative install image, typically on a network server. This network location can be used by deployment tools to access and create packages that are deployed to workstations. Also, end users can perform installations by running setup.exe from this location.
NOTE:An administrative install image is not a working installation of the product. If you want to install all available features on an administrative workstation, select , and use the Feature Selection tab to configure installation of all features.
Set logging options
By default, an installation log file is created and then deleted after installation successfully completes. (This configuration avoids accumulation of large log files after successful installations.) To save a log file for all installations, including successful ones, select , and clear .
The installation log file, which provides details about the installation, is saved in the user's Windows temporary folder (%tmp%) with a generated name that begins with atm and uses a .log extension. To open this directory, launch the menu command and enter %tmp%.
Installation Customization Tool
You can use the Installation Customization Tool (ICT) to customize InfoConnect or customize the way it is installed. The tool lets you create the following files:
-
Companion installer package(MSI). This package contains the customized configuration settings and files that you choose to deploy with the installation (or independently). Companion packages show up as independent entries in the Windows list of installed applications. To customize InfoConnect, see Configure and Automatically Package Workspace Settings.
-
Transform file(MST). This file modifies the default installation to change how InfoConnect is installed (For example, remove a command button in the Windows Uninstall or change a program list). When the transform is deployed along with the InfoConnect MSI file, it changes the default installation settings to the settings specified in the MST file.
This tool is accessed by running setup.exe from the command line with the admin switch ( setup.exe /admin). To simplify working with this tool, you can create a desktop shortcut to the Setup program and add the admin switch on the command line as shown in Set up a Shortcut to the Installation Customization Tool.
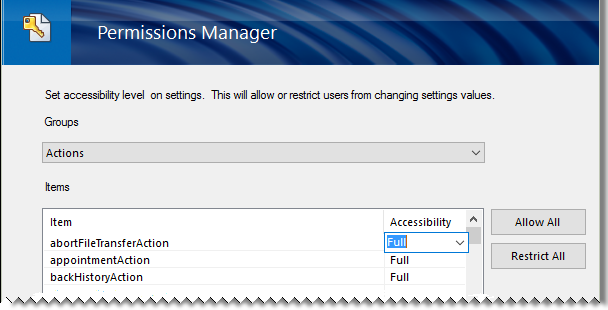
Permissions Manager
Permissions Manager is used to restrict access to InfoConnect Desktop settings and features. It creates special configuration ( .access) files that can be deployed as part of an MSI package. There are different access files for mainframe, AS/400, UNIX/OpenVMS, and application-wide settings.
You can edit .access files by running Permissions Manager as shown in “Lock Down” InfoConnect To Restrict Access to Controls.
2.2.2 Set up an Environment for Deployment Using InfoConnect Administrative Tools
If you plan to use the InfoConnect administrative tools to customize session documents, the InfoConnect workspace, or the way that InfoConnect is installed, you’ll need to set up an environment that you can use to access these administrative tools.
NOTE:There are two types of InfoConnect installations. The Administrative install image installs the files required for installation but does not install any values in the registry required to open and run InfoConnect. You cannot run InfoConnect from an Administrative installation image. The workstation (or PC) installation enters the values in the registry required to run the product.
Create an Administrative Installation Point
You create an administrative installation point by installing an administrative install image of InfoConnect on a network share (typically on a file server). An administrative install image is a source image of the application, similar to an image on a CDROM. It includes all the files required to install InfoConnect as well as the administrative tools used for customization.
Use this procedure to create an administrative installation point on a networked file server. This places all of the administrative tools and installation files you need to customize and install InfoConnect to a single location.
NOTE:Micro Focus recommends to create an administrative installation point before you install InfoConnect on a workstation. This allows you to use the administrative installation point for the workstation installation. If you are setting up the administrative point and the workstation installation on a single workstation for testing purposes, you must perform the administrative installation first.
To create an administrative installation point
-
Download the InfoConnect installation files.
-
Create a network share on a network file server.
-
From the root directory of the installation files, double-click setup.exe.
This starts the Setup program.
-
Click and accept the license.
-
From the tab, click .
-
Click .
The tab is selected.
-
Browse to the network share you want to use for the administrative install image.
CAUTION:Important! Be sure to specify a UNC path for the network share. For example: \\share_name\administrative_install_point
-
Click .
-
The next step in preparing a test environment is to install InfoConnect on a workstation.
NOTE:Administrative install images are typically created in a file server folder but you can create them in any folder on a local hard drive. This is useful for testing purposes.
If you prefer to install InfoConnect on your workstation first, you cannot use the installation program graphical interface to create the administrative install image. Instead, you must install it from the command line as follows:
path_to_setup_file \setup.exe /install /admin TARGETDIR= UNC_path_to_administrative_installation_point
Install InfoConnect on a Workstation
After you create an administrative installation point, you'll need to install InfoConnect on a workstation so that you can open and run InfoConnect. If you plan to customize InfoConnect, you will use this installation to create custom configuration files.
To install InfoConnect on a workstation
-
On the workstation, navigate to the network share where you have created the administrative installation point, and double-click setup.exe.
-
From the Setup program, click , and then accept a license.
-
The following steps are optional:
-
To personalize the installation, click the tab and enter the name, organization, and Volume Purchase Agreement (VPA) number, if you have one. (VPA numbers, which are issued by Micro Focus, are used by customer support to expedite service requests.)
-
To change the default installation folder or the default user data directory, click the tab and browse to the folder you want to use.
-
To select which features, components, or languages are installed, click the tab. The default installation does not include all features and components.
-
-
Click .
Set up a Shortcut to the Installation Customization Tool
The Installation Customization Tool is designed to be opened from a command line. However, you can create a desktop shortcut that opens this tool. This will save time when you are working with the tool.
NOTE:To start the Installation Customization Tool from a command line, change to the administrative installation point and enter:
<path_to_setup> \setup.exe /admin
To create a shortcut that opens the Installation Customization Tool
-
On your administrative installation point, right-click the setup.exe file, and choose .
-
Right-click the shortcut and choose .
-
In the box, add the /admin option to the end of the command line. For example:
\\ myServer\adminInstallPoint \setup.exe /admin
CAUTION:Make sure that the path in the box conforms to the Uniform Naming Convention (UNC) format and does not include drive letters. Drive letters can cause problems if you try to use the shortcut on other workstations.
-
Rename the shortcut and save it on the desktops of your workstation and the server you use for your administrative installation point.
-
To start the Installation Customization Tool, double-click the shortcut, and then in the dialog box, choose which mode you want to open.