6.4 Migrating from iPrint Appliance 3.x to 4.1
You must apply the Migration Enabler patch to the 3.x server before upgrading to the 4.1 server. This patch installs the files to make the base infrastructure changes. Follow the steps to apply the patch and proceed with the upgrade:
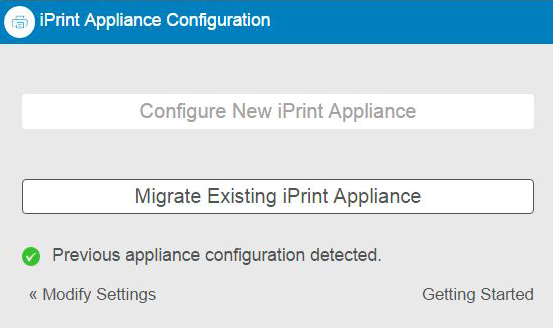
6.4.2 Migration Process
-
Shut down the earlier appliance.
-
Deploy a new iPrint Appliance with any virtualization software that can run the .ovf, .vhd , or .xen file formats.
-
Attach the secondary disk of the earlier version of the appliance. This disk includes the backed up configuration file (iprintconfig.zip) of the earlier appliance that was generated in Step 6.
-
Power on the appliance.
-
On the Console tab, enter the root and vaadmin password for the new appliance.
The iPrint Appliance installation is now complete. The new appliance is configured with the same IP and network settings.
-
On a Web browser, use either the host name or the IP Address to access the Management Console. For example, https://10.0.0.1:9443 or http://iprint.example.com/admin.
Ignore the security certificate warning, and continue to the iPrint Appliance Management Console. To avoid the security warning prompt every time you access the iPrint Appliance Management Console, you can add the certificate to the trusted certificates list on your browser.
-
Specify vaadmin or root as the user name.
-
Specify the password, then click .
-
Click .
-
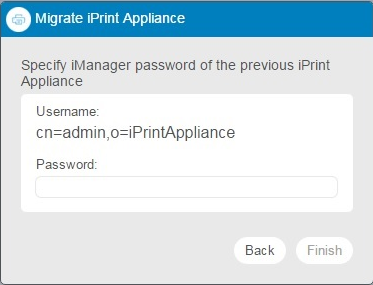
The iManager user name field is pre-populated and not editable. Specify the iManager password that was used to configure the earlier version of the iPrint Appliance. This password will be used to log in to the iManager for managing the print environment.
-
Click .
The time taken to complete the configuration depends on the size of the earlier version configuration file. On successful migration, the appliance reboots the VM.
The configuration file of the previous appliance is renamed as previous_iprintconfig.zip.