Using the Security Proxy Server
The Security Proxy Server provides token-based access control and encrypted network traffic to and from user workstations. See How the Security Proxy Works.
This article walks through the steps configure and deploy secure sessions using the Security Proxy.
Steps at a glance
1. Install the Security Proxy Server
2. Configure and Start the Security Proxy Server
3. Import the Security Proxy certificates
1. Install the Security Proxy Server
Use the automated installer to install and configure the Security Proxy Server. The Security Proxy can be installed on a different machine. Refer to the MSS Installation Guide for detailed steps.
Note
If you are not able to use the automated installer, contact Support for guidance.
Be sure to check the Security Proxy Server’s System Requirements and the Performance and Scaling Requirements.
Next step: 2. Configure and Start the Security Proxy Server.
2. Configure and Start the Security Proxy Server
The Security Proxy Server must be configured to establish trust with the MSS. Use the Security Proxy Wizard to manage your Security Proxy settings and certificates.
Specifically, the Security Proxy Wizard:
- generates or imports the certificate used to authenticate the Security Proxy Server.
- sets up a server.properties file that contains information about each security proxy connection.
- imports the certificate from the Administrative Server -- if you are using authorization to determine access levels.
Note
If you installed the Security Proxy using the automated installer, the Security Proxy Server is configured and started. Skip to 3. Import the Security Proxy certificates.
You can run the Security Proxy Wizard later to change settings or manage certificates.
Continue with the steps in these sections:
Using the Security Proxy Wizard
-
Start the Security Proxy Wizard, according to where you installed the product.
On Windows: run
[MssServerInstall]\securityproxy\bin\SecurityProxyServerWizard.exeOn Linux or UNIX:
-
The Security Proxy Wizard requires an X11 window to display its graphical interface. Use the console of an X window or an X session, and open a terminal window.
-
Run the executable:
[MssServerInstall]/securityproxy/bin/SecurityProxyServerWizard
-
-
The wizard opens with the Status tab in focus. Choose whether to open an existing
server.propertiesfile or to create a new one for this Security Proxy server.Refer to the Help on each tab for more information.
-
On the Trusted Certificates tab, Import the Management and Security Server certificate.
-
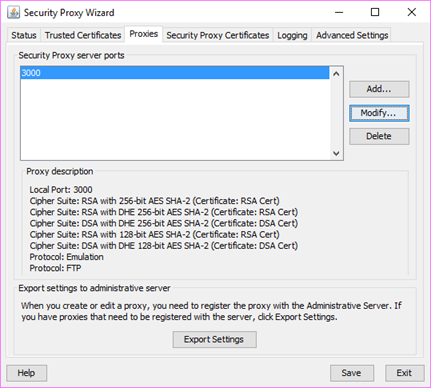
On the Proxies tab, Add or Modify a proxy.
-
On the Security Proxy Certificates tab, Generate or Import a security proxy certificate.
-
Return to the Proxies tab and click Export Settings to export the settings to the MSS Administrative Server.
Specify or accept the default MSS Administrative Server, Port, and Context. Click Export.
-
To verify that the
server.propertiesis configured, return to the Status tab. -
Click Exit to close the wizard and save your settings. You may need to restart the Security Proxy service.
To make changes to the Security Proxy settings later, simply re-run the Security Proxy Wizard.
Next step: Start the Security Proxy Server
Start the Security Proxy Server
If the automated installer was used to install the Security Proxy on the same machine as the Administrative Server, the Security Proxy Server has been started. Continue with 3. Import the Security Proxy certificates.
If a non-automated installation method was used, you must start the Security Proxy Server.
After a server.properties file is configured for the Security Proxy Server, start the Security Proxy Server:
-
On Windows
Run:
[MssServerInstall]\securityproxy\bin\MssSecurityProxy.exeTo start or stop the service, open Windows Control Panel > Administrative Tools > Services, and select Security Proxy.
Note
When the automated installter is used, you can choose to install the servlet runner as a Windows service, in which case the servlet runner starts automatically.
-
On UNIX and Linux
For UNIX and Linux platforms, you can start and stop the service at run level changes using the method that is appropriate to your platform. Use
-startand-stopparameters for the security proxy.Or, run:
[MssServerInstall]/securityproxy/bin/MssSecurityProxyNote
When the automated installer is used, a link to the services is created in
/etc/init.d -
Command line options
You can use these commands on all platforms to start and stop the Security Proxy:
securityproxy -startsecurityproxy -stopsecurityproxy -status
To install as a service:
-
Change to your MSS install directory.
-
Then use a parameter.
-
On Windows:
MssSecurityProxy.exe installMssSecurityProxy.exe start -
On Linux or UNIX:
Use the daemon appropriate to your platform for installing or uninstalling the servlet runner as a service.
MssSecurityProxy startNote
The administrator must configure init scripts to start the Security Proxy server on startup.
-
If you do not use FIPS-Approved Mode, continue with 3. Import the Security Proxy certificates.
Using FIPS-Approved Mode
When the Security Proxy and terminal sessions are configured to run in FIPS-approved mode, all connections are made using security protocols and algorithms that meet FIPS 140-2 standards.
The current cryptomodules require a manual edit to the Security Proxy properties file to run in FIPS-approved mode.
If you are upgrading from a version that used fipsMode=approved, the new property is not automatically enabled and must be manually configured.
To configure the Security Proxy to run in FIPS-approved mode:
-
Open
mss\securityproxy\conf\server.properties. -
In the
FIPS 140-2 Modesection, add or set thefipsApprovedMode=setting toon:fipsApprovedMode=on -
Restart the Security Proxy server.
Next step: 3. Import the Security Proxy certificates.
3. Import the Security Proxy certificates
Once the Security Proxy is installed and configured, open MSS to import the Security Proxy settings.
-
Open the MSS Administrative Console > Configure Settings - Security Proxy panel.
-
Click +IMPORT and enter the required information. See Help for assistance.
-
To delete a Security Proxy server, check its box, and click DELETE.
Next step: 4. Create Secure Sessions.
4. Create Secure Sessions
After the trust relationship is set between the Management and Security Server and Security Proxy, you can create secure sessions for your users.
-
In the MSS Administrative Console, open Manage Sessions, and click +ADD.
-
Select your Product (and Session type, if needed), and enter a Session name.
-
LAUNCH the session.
-
As administrator, open the Connection Setup (or Connection Settings) dialog. You may need to Disconnect first.
Note: The dialog labels vary, depending on your emulator product. Refer to the product documentation for details.
a. Click the option to Use TLS security.
b. Select a range or an individual TLS version: TLSv1.3 or TLSv1.2. A new configuration of the Security Proxy server, created by the MSS installer, enables both TLSv1.3 and TLSv1.2. The default settings allows a TLS connection, depending on the capabilities of the host or server to which you are connecting.
Note
Saved settings for TLSv1.1 and TLSv1 are honored but cannot be set for new installations.
c. Check Use Security proxy.
d. Select a Security proxy server and a Proxy port for this session.
e. Enter the Destination host and the Destination port.
f. If you check End-to-end encryption, the connection between the Security Proxy and the host will use TLS. Otherwise, that connection is not encrypted.
g. Click OK. Close the session, and click Save/Exit to send the settings to the Management and Security Server.
Next step: 5. Assign Secure Sessions.
5. Assign Secure Sessions
Now you can enable user access to the secure sessions.
-
In the MSS Administrative Console, open Assign Access.
-
Search for and click the user or group who should have access to the secure session.
-
Check the Session that is configured to use the Security Proxy.
-
Click APPLY.
-
Deploy sessions to users.
Next step: 6. Run Reports. After the sessions have been opened and used, you can Run Reports to view the activity.
6. Run Reports
In the Administrative Console, open Run Reports - Security Proxy to view the activity from your Security Proxy servers. See the Run Reports - Security Proxy Server Reports Help for more information.
Notes about Upgrading
When you upgrade Management and Security Server, note these requirements for the Security Proxy.
Match the version
The <major>.<minor> version of the Security Proxy must be the same as Management and Security Server.
Be sure to download the upgraded Security Proxy activation file and run it with the automated installer. Or, install the activation file and activate the server. Refer to the MSS Installation Guide.
Synchronize the upgrade
If the Security Proxy is installed when you upgrade Management and Security Server, (including updates and service packs), complete these steps to be sure the Security Proxy server is synchronized with the MSS Administrative Server.
After you upgrade:
-
Open the Security Proxy Wizard (from the Start menu).
-
On the Proxies tab, review the configuration for each port, and click Save.
Note the Cipher Suites and Certificates:
-
Multiple cipher suites of the same key type can use the same certificate.
-
MSS automatically selects the certificate to use with the associated cipher suite. The selection is based on longest expiration date and other properties. For example:
-
-
To select a different certificate for a particular port:
a. Click the Proxies tab > Modify.
b. Note (or change) the selected cipher suites.
c. Select an RSA certificate or DSA certificate for that type of cipher suite. Click OK.
d. On the Proxies tab, click Save.
e. Click Export > Settings > Export to send the settings to the MSS Administrative Server.
Resources
- Support Resources
- MSS Installation Guide
- Security Proxy Wizard (Open from the Start menu)
- MSS Administrative Console - Help:
How the Security Proxy Server works
The Security Proxy provides token-based access control and encrypted network traffic to and from user workstations.
The following diagram highlights the Security Proxy (steps 5 and 6) in the context of the overall Management and Security Server set up.

-
User connects to the Administrative Server.
-
User authenticates to a directory server (LDAP/Active Directory) or other identity management system (optional).
-
The directory server provides user and group identity (optional).
-
The Administrative Server sends an emulation session to the authorized client.
...............................
-
When the Security Proxy Server is configured for use by a session, the emulation client makes a TLS connection to Security Proxy and sends it a signed session token.
-
The Security Proxy Server validates the session token and establishes a connection to the specified host:port. The security proxy encrypts the data before forwarding it back to the user.
Note
The connection between the Security Proxy and the host is not encrypted — unless End to end encryption is selected in the session configuration.
...............................
-
When no Security Proxy is present or a session is not configured to use it, the authorized user connects directly to the host.