10.3 Using OES File Access Rights Management (NFARM)
NFARM is a shell extension that enables eDirectory or Active Directory users on Windows and Mac workstation to perform Salvage and Purge operations. In addition,
-
Allows the eDirectory users on Windows workstation (without Client for Open Enterprise Server) to manage the password expiry.
-
Enables Windows Active Directory administrators to manage the access rights and quotas of AD users or groups on OES Storage Services (NSS) resources.
NOTE:The Micro Focus Open Enterprise Server download page offers the NFARM management service only if the server has the CIFS pattern installed.
Accessing and Installing NFARM
Go to OES Welcome page (http://<OES server IP Address or the host name>/welcome/client-software.html) and download the matching version of NFARM.
-
Windows: NFARM installer for Windows (32-bit or 64-bit)
-
Mac: NFARM installer for Mac
For more information on support matrix, prerequisites and installing NFARM, see NFARM (OES File Access Rights Management) in the OES 2018 SP3: NSS AD Administration Guide.
By installing NFARM on a workstation, the following features are available:
10.3.1 Salvage and Purge on Windows
The Salvage and Purge utility for Windows lets you recover or delete the files and directories permanently from the NSS file system. The files that have been purged cannot be recovered.
This tool gets automatically installed when you install NFARM (NFARM installer for Windows).
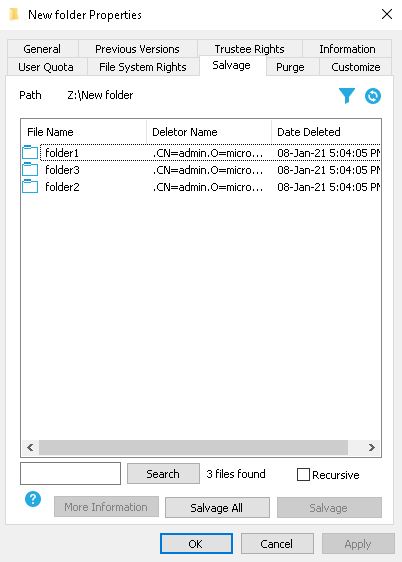
Salvaging Files
The salvage utility for Windows lets you recover the deleted files and directories from the NSS file system.
To salvage:
-
Right-click a Windows mapped network drive or folder, then click or .

-
The following tabs are displayed:
-
Filter
 : Set attributes to filter and display the data to be salvaged.
 -
Clear Filter
 : Clear filter and displays the data to be salvaged.
 -
Recursive: Salvage all data from the folder and subfolders.
-
-
Select the salvageable files, then click . The selected files are salvaged. To salvage all files, click .
HINT:
-
To select all files: Select the first file, then press CTRL+SHIFT+END.
-
To select multiple files: Press and hold the CTRL key, then click the files of your choice.
-
To select a series of files: Press and hold the SHIFT key, then click the first file and the last files.
-
To refresh: Click
 (refresh) to display the latest list of salvageable files and folders.
 -
To sort: Click the column heading to sort the files and folders. The
 icon indicates descending order and the
  icon indicates ascending order.
-
-
While salvaging, if a file already exists with the same name, you are prompted to rename it.
-
To see the attributes of the selected files, click . The attributes include: File name, Deletor Name, Date Deleted, Creator Name, Date Created, Modifier Name, Date Modified, Archiver Name, Date Archived, Date Accessed, and File Size.
The dialog box also includes and . Follow the same procedure provided in Step 2 to perform the salvage operation.
NOTE:To salvage the deleted files from a sub-directory, ensure to salvage the sub-directory and then salvage the files in the sub-directory.
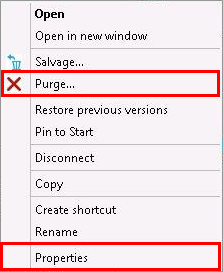
Purging Files
The purge utility for Windows lets you delete files and folders permanently from the NSS file system. Purging is an irreversible action. The files that have been purged cannot be recovered.
To purge:
-
Right-click a Windows mapped network drive or folder, then click or .
-
The following tabs are displayed:

-
Filter
: Set attributes to filter and display the data to be salvaged. -
Clear Filter
: Clear filter and displays the data to be salvaged. -
Recursive: Salvage all data from the folder and subfolders.
-
-
Select the files to be purged, then click . The selected files are purged. To purge all files, click .
HINT:
-
To select all files: Select the first file, then press CTRL+SHIFT+END.
-
To select multiple files: Press and hold the CTRL key, then click the files of your choice.
-
To select a series of files: Press and hold the SHIFT key, then click the first file and the last files.
-
To refresh: Click
(refresh) to display the latest list of purgeable files and folders. -
To sort: Click the column heading to sort the files and folders. The
icon indicates descending order and the icon indicates ascending order.
-
-
To see the attributes of the selected files, click . The attributes include: File name, Deletor Name, Date Deleted, Creator Name, Date Created, Modifier Name, Date Modified, Archiver Name, Date Archived, Date Accessed, and File Size.
The dialog box also includes and . Follow the same procedure provided in Step 2 to perform the purge operation.
NOTE:The Recursive option is not provided in the GUI. By default, the NSS file system purges the data recursively.
10.3.2 Salvage and Purge on Mac
The Salvage and Purge utility for Mac allows the eDirectory and Active Directory users to recover or permanently delete files and directories from the NSS file system. Purging is an irreversible action. The files that have been purged cannot be recovered.
This tool gets automatically installed when you install NFARM (NFARM installer for Mac).
-
Go to > > to map an OES network drive.
IMPORTANT:For eDirectory users, ensure to select the check box before connecting to a server.
-
On Mac workstation, run the following command:
pluginkit -a /Applications/SalvagePurge.app/Contents/Plugins/FinderSyncContextMenu.appex
This command registers the Salvage and Purge application with the Finder extension.
-
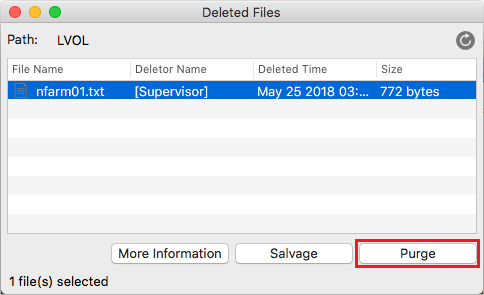
Right-click a OES mapped drive, then click .

A new window is displayed with the list of deleted files. The deleted file attributes include: File Name, Deletor Name, Deleted Time, and Size.
-
Perform salvage or purge operation.
-
To Salvage:
-
Select the salvageable files, then click . The selected files are salvaged.

-
While salvaging, if a file already exists with the same name, you are prompted to rename it.
NOTE:To salvage the deleted files from a sub-directory, ensure to salvage the sub-directory and then salvage the files in the sub-directory.
-
-
To Purge:
-
Select the files to be purged, then click .
-
A confirmation dialog box is displayed, click . The selected files are purged.
-
HINT:
-
To select all files: Select the first file, then press COMMAND+A.
-
To select multiple files: Press and hold the ALT key, then click the files of your choice.
-
To select a series of files: Select the first file, press and hold the SHIFT key, and then click the last file.
-
To refresh: Click
 (refresh) to display the latest list of salvageable or purgeable files and folders.
-
-
Click to view all the attributes of the selected files. It includes File Name, Deletor Name, Deleted Time, Creator Name, Created Time, Modifier Name, Modified Time, Archiver Name, Archived Time, Accessed Time, and Size.
The dialog box also includes and . Follow the same procedure provided in Step 4 to perform the salvage or purge operation.
10.3.3 Password Expiry Notification on Windows
The password expiry notification feature allows the eDirectory users to change the password directly from their client device. If the eDirectory password is due to expire and the user maps to a network drive using their eDirectory credentials from the Windows computer (without Client for Open Enterprise Server), a password expiry notification is displayed.
NFARM must be installed on the workstation for password expiry notification feature to be available.
The password expiry notification is configured by the registry entry PCNotifyConf in HKEY_LOCAL_MACHINE\SYSTEM\CurrentControlSet\Control\NetworkProvider\Notifyees key. This key is created by the installation of NFARM with the default value as 10 days and can be modified based on the requirement. For example, if the value is configured as 20 days, the password expiry notification is displayed 20 days before the expiry time, 5 days before the expiry time, 3 days before the expiry time, 1 day before the expiry time, and last day of the password expiry time.
Notifying Users Before Password Expires
When the user maps a network drive using the eDirectory credentials, and the password of eDirectory user is due to expire (for example, the password expires in 5 days), the password expiry notification is displayed as follows:
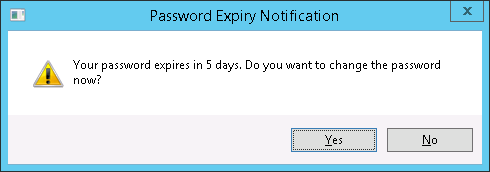
If the user clicks , a Change Password dialog box is displayed. Specify the old password and new password, then click Change Password.
Displaying Grace Logins After Password Expires
If the user maps a network drive after the password expires, they are provided with additional grace logins.
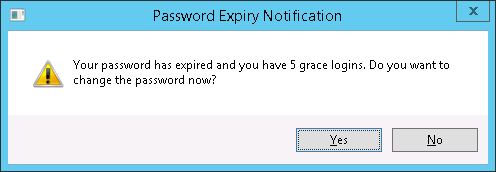
If the user clicks , a Change Password dialog box is displayed. Specify the old password and new password, then click Change Password.
If the user fails to change the password within the provided grace logins they would not be able to map to a network drive.