3.4 Installation Boot Medium
A boot medium is required to invoke the installation process by loading a kernel and an initrd that contains the installation logic.
As with repositories a wide range of media is available. Servers can be booted from Floppy, CD, DVD, USB devices, over the network (PXE) or from a local hard drive. In our experience smaller environments typically use images or physical media for installations via remote management connections such as ILO boards whereas PXE tends to be preferred in larger environments.
Both methods are explained in detail in this section.
3.4.1 Custom Boot ISO
The standard installation medium is an ISO image of the OES or SLES DVD provided by Micro Focus or SUSE.
However, we favour a customized boot image with nested boot menus for the following reasons:
-
Multiple versions of OES and SLES can be installed from one single boot image.
-
The image requires only a small number of kernels, initrds and some boot loader files. This allows to reduce the image size to just a couple hundred MB depending on the number of OES and SLES releases and service packs that need to be supported.
-
Customized menus can be created to initiate unattended installations using pre-defined boot options reflecting different installation requirements.
-
Background images can be included to reflect corporate identity
The boot medium for our solution supports BIOS and UEFI systems and can be built from a working directory (/data/boot_cd_build) representing the root of the boot image.
In this working directory the stage files for the grub boot loader used to boot systems with BIOS and the file menu.lst that defines the first level of the nested grub menu structure for grub need to reside in the directory .../boot/grub. The files required by grub2 used to boot systems with UEFI must be located in .../boot/x86_64.
The file message along with the grub configuration files that define the other levels of the nested menu structure for BIOS systems need to be located in the directory .../grub. The grub2 configuration files defining the menus for UEFI systems must be placed in .../EFI.
Finally, for each target platform the kernel (linux) and the corresponding initrd are required on the boot medium. Typically they have to be copied from the /boot/<architecture>/loader directory on the original boot media shipped by Micro Focus or SUSE to the directory .../kernel/<product><version><sp>, for example to .../kernel/oes2018sp2.
When you copy these two files make sure to preserve the timestamps. Note that for OES2018 the kernel and the initrd from the OES2018 Install media must be used. An OES2018 installation using a pure SLES12 kernel and/or initrd will not succeed.
Table 3-1, Directory Structure of AutoYaST Boot Medium summarizes the directory structure of the working directory from which the Installation Boot Medium is created.
Table 3-1 Directory Structure of AutoYaST Boot Medium
|
Directory |
Content |
|---|---|
|
/boot/EFI |
Configuration files required by grub2. grub.cfg corresponds to main.lst used for grub and defines the first level of the grub2 menu structure; see Figure 3-5. |
|
/boot/EFI/locale |
Locale files copied from /EFI/BOOT/locale/ of a current SLES15 ISO. |
|
/boot/grub |
stage1, iso9660_stage1_5, stage2 These files need to be copied from a system using a current version of grub. menu.lst Grub configuration file defining the first level of the grub menu structure; see Figure 3-2. |
|
/boot/x86_64/grub2-efi |
Fonts, images and theme.txt required by grub2 copied from /boot/x86_64/grub2-efi/ of a SLES15 ISO. |
|
/grub |
message (optional). This file can be used to customize the language and the background image. main.lst Grub configuration file defining the second level of the grub menu structure; see Figure 3-3. <product><version><sp>.lst For example: oes2018sp2.lst Grub configuration file defining the third level of the grub menu structure; see Figure 3-4. These files contain the predefined boot options to invoke an AutoYaST installation or upgrade for the specified version and support pack of a product. |
|
/kernel/<product> <version><sp> |
initrd and linux from directory /boot/<architecture>/loader on the original <product><version><sp> installation medium for the specified version and support pack of a product (copy both files with -p!). |
Table 3-2, linuxrc Boot Options lists the most important linuxrc boot options that are used by our solution to control the installation process. For a complete list of the available linuxrc boot options, please refer to linuxrc Parameter Reference.
Table 3-2 linuxrc Boot Options
|
Parameter |
Value and Meaning |
|---|---|
|
autoupgrade |
This parameter can be used to initiate an automatic upgrade using AutoYaST. Its value must be 1 and autoyast must point to a valid control file for the upgrade. |
|
autoyast (mandatory) |
URL to AutoYaST control file or directory. For example: http://<IP-Address>/xml/default |
|
domain (optional) |
Suffix search list for DNS. |
|
info (optional) |
Specifies a file to read more options from as URL. This is useful if not all options fit on the command line (some linuxrc versions have a limitation of 255 chars). |
|
install (mandatory) |
URL to installation repository. For example: http://<IP-Address>/oes2018sp2 |
|
kernel (mandatory) |
Path to the kernel image of the target installation system on the boot medium such as kernel /kernel/oes2018sp1/linux |
|
nameserver (optional) |
Space or comma separated list of DNS servers; required if you want to use DNS names instead of IP addresses. |
|
netsetup (optional, mandatory for our solution) |
Used to setup a static network configuration in the pre-installation system to gain network access to repositories and/or special metadata files. Otherwise DHCP is used. A value of 1 initiates a dialogue to specify IP address, net mask, gateway, DNS name server and DNS search path. |
|
netmask, gateway, nameserver |
Values for these parameters can be pre-defined at the boot prompt in full or only partly. These values will be displayed in the dialog windows where they can be modified. |
|
netwait |
Delay after activating the network interface in seconds. |
|
self_update |
URL to a repository providing installer updates. Available from SLES12 SP3 onwards. Do notuse this option with OES! |
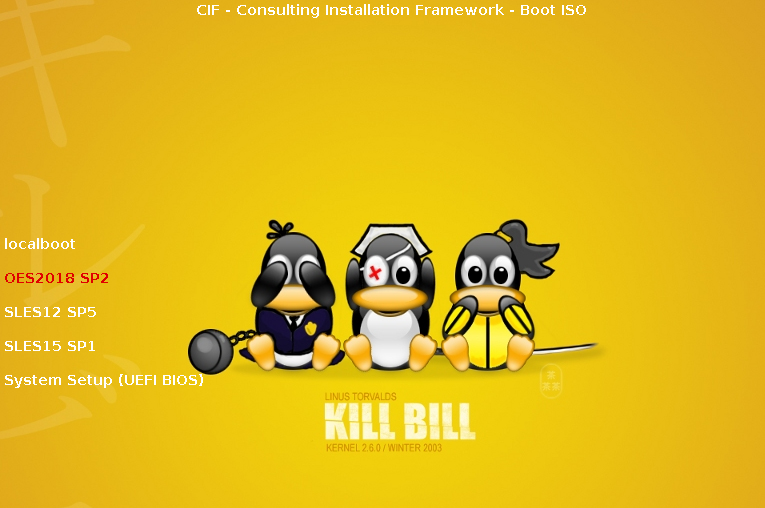
There are many ways how to organize the menu structure of a customized boot image. Here we illustrate one example that supports the installation of and the upgrade to OES2018 SP2, SLES12 SP5, and SLES15 SP1 of systems with traditional BIOS.
The first level of the menu hierarchy for BIOS systems only provides the selections and . To prevent loops in the installation process is the default selection so that the system being installed will boot from the hard disk when it reaches stage2.
Figure 3-2 Customized Boot Image for BIOS Systems With Nested Menus - Level 1

This is implemented in the grub configuration file .../boot/grub/menu.lst:
# autoinst level 1
color white/blue black/light-gray
default 0
timeout 60
root (cd)
gfxmenu /grub/message

### localboot
title localboot
    rootnoverify (hd0)
    chainloader +1

### network
title network installation
    configfile /grub/main.lst
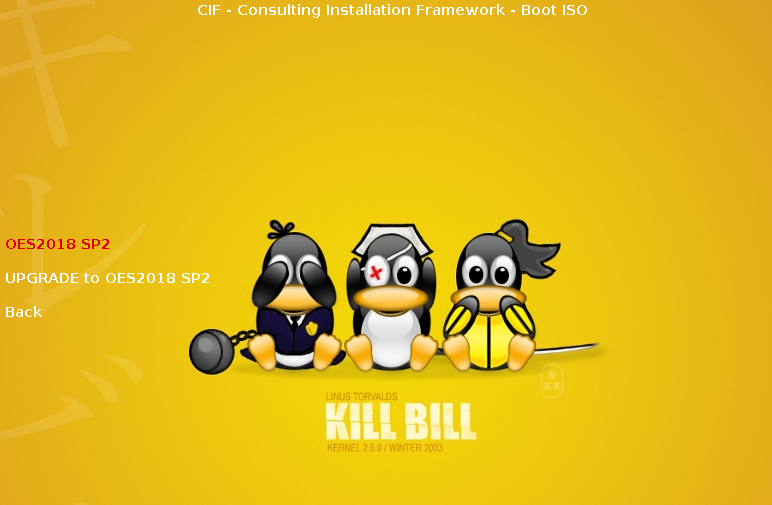
The second level of the menu structure allows the selection of the release and support pack of the product to be installed.
Figure 3-3 Customized Boot Image for BIOS Systems With Nested Menus - Level 2

The grub menu file .../grub/main.lst to implement this level of the boot selection menu looks as follows:
# autoinst level 2
color white/blue black/light-gray
default 0
timeout 60
root (cd)
gfxmenu /grub/message

### OES2018 SP2
title OES2018 SP2
        configfile /grub/oes2018sp2.lst

### SLES12 SP5
title SLES12 SP5
        configfile /grub/sles12sp5.lst

### SLES15 SP1
title SLES15 SP1
        configfile /grub/sles15sp1.lst

### back
title back
        configfile /boot/grub/menu.lst
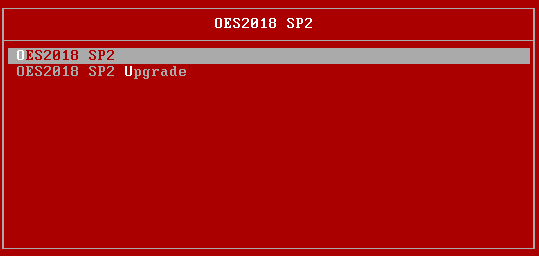
The third and final level of the boot menu structure determines how exactly the installation is going to happen. This example provides options for a new installation and for an upgrade of an existing system to OES2018 SP2:
Figure 3-4 Customized Boot Image for BIOS Systems With Nested Menus - Level 3
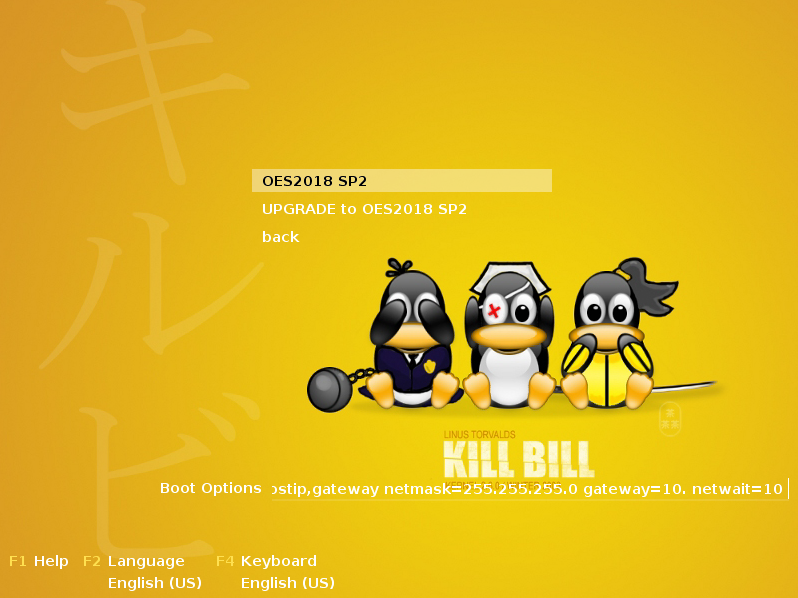
For OES2018 SP2 the final level of the boot selection menu is implemented through the grub menu file .../grub/oes2018sp2.lst:
# autoinst level 3
color white/blue black/light-gray
default 0
timeout 30
root (cd)
gfxmenu /grub/message

### oes2018sp2
title OES2018 SP2
        kernel /kernel/oes2018sp2/linux autoyast=http://<IP address of your AutoYaST server>/xml/default-<IP address of your AutoYaST server> install=http://<IP address of your AutoYaST server>/oes2018sp2 netsetup=hostip,gateway netmask=255.255.255.0 gateway=10. netwait=10
        initrd=/kernel/oes2018sp2/initrd

### upgrade to oes2018sp2
title UPGRADE to OES2018 SP2
        kernel /kernel/oes2018sp2/linux autoupgrade=1 autoyast=http://<IP address of your AutoYaST server>/upgrade/autoupgrade-oes2018sp2_ZCM.xml install=http://<IP address of your AutoYaST server>/oes2018sp2 netsetup=hostip,gateway netmask=255.255.255.0 gateway=10. netwait=10
        initrd=/kernel/oes2018sp2/initrd

### back
title back
        configfile /grub/main.lst
The menu system to install UEFI based systems only has two levels that look slightly different than the screens for BIOS systems. The first level provides the selections and the releases and support packs of the products that can be installed. Again is the default selection to prevent loops when the system being installed boots into stage2.
Figure 3-5 Customized Boot Image for UEFI Systems With Nested Menus - Level 1
This level of the boot menus structure for UEFI systems is provided by the grub2 configuration file .../EFI/grub.cfg. Only the part defining the menu structure is shown here:
:
menuentry "localboot" {
set my_os=localboot
echo "booting from local disk..."
insmod part_gpt
insmod part_msdos
insmod btrfs
if search --no-floppy --file /efi/boot/fallback.efi --set; then
for os in opensuse sles caasp ; do
if [ -f /efi/$os/grub.efi ] ; then
chainloader /efi/$os/grub.efi
fi
done
fi
}
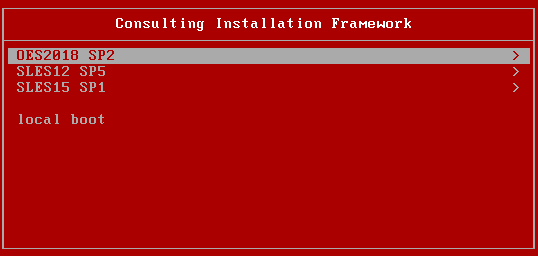
submenu "OES2018 SP2" {
configfile /EFI/CIF_oes2018sp2.cfg
}
submenu "SLES12 SP5" {
configfile /EFI/CIF_sles12sp5.cfg
}
submenu "SLES15 SP1" {
configfile /EFI/CIF_sles15sp1.cfg
}
:
The second level of the boot menu in this example also provides the options for a new installation and for an upgrade of an existing system:
Figure 3-6 Customized Boot Image for UEFI Systems With Nested Menus - Level 2
The above menu is implemented in the file .../EFI/CIF_oes2018sp2.cfg. It uses variables for the IP address of the AutoYaST server, the repository server and the gateway defined in lines 2-4. This example assumes that the AutoYaST server is also your repository server (ISO_SERVER).
# autoinst level 2
set AY_SERVER="<IP of your AutoYaST server>"
set ISO_SERVER="${AY_SERVER}"
set GATEWAY="<IP of your gateway>"

set my_os="oes2018sp2"
set display_os="OES2018 SP2"

        menuentry "$display_os" {
          echo "CIF - Consulting Installation Framework - Boot ISO"
          echo ""
          echo "AutoYaST Server:    ${AY_SERVER}"
          echo "ISO Server:         ${ISO_SERVER}"
          echo "Gateway:            ${GATEWAY}"
          echo ""
          echo "Installing ${display_os} . . ."
          echo ""
          echo "loading $display_os kernel ..."
          linuxefi /kernel/$my_os/linux autoyast=http://"${AY_SERVER}"/xml/default-"${AY_SERVER}" install=http://"${ISO_SERVER}"/"${my_os}" netsetup=hostip,gateway netmask=255.255.255.0 gateway=${GATEWAY}netwait=10
          echo "loading $display_os initrd ..."
          initrdefi /kernel/$my_os/initrd
        }

        menuentry "UPGRADE to $display_os" {
          echo "CIF - Consulting Installation Framework - Boot ISO"
          echo ""
          echo "AutoYaST Server:    ${AY_SERVER}"
          echo "ISO Server:         ${ISO_SERVER}"
          echo "Gateway:            ${GATEWAY}"
          echo ""
          echo "Upgrading to ${display_os} . . ."
          echo ""
          echo "loading $display_os kernel ..."
          linuxefi /kernel/$my_os/linux autoupgrade=1
autoyast=http://"${AY_SERVER}"/upgrade/"${my_os}"-"${AY_SERVER}".xml
install=http://"${ISO_SERVER}"/"${my_os}" netsetup=hostip,gateway
netmask=255.255.255.0 gateway=${GATEWAY} netwait=10
          echo "loading $display_os initrd ..."
          initrdefi /kernel/$my_os/initrd
        }
        menuentry 'Back' {
          configfile /EFI/grub.cfg
        }
Independent of whether the system being installed is booted from BIOS or UEFI the actual installation is triggered by the boot options of the kernel command line for the selection you chose.
We only have demonstrated the basics of how to design the menu structure of an Installation Boot Medium here. This can be expanded in many ways. For instance, the system is not limited to three levels of menus and customers have been very creative in how they use the menu structure.
One possibility that could be implemented is the choice of the repository that will be used for the installation. For instance you could provide one option to use a remote repository when installing systems in your main location or in branch offices with high bandwidth WAN connections to the AutoYaST server. For locations with a low bandwidth connection a selection to install using a local repository might be more appropriate.
Another option could be to set the location specific boot options in different grub configuration files and to provide separate selections for each location. The design possibilities for the boot menus are endless.
Finally, when the required kernels and initrds, the boot binaries, and the configuration files for grub and grub2 are prepared, the boot image must be created using xorrisio.
To simplify the creation of the Installation Boot Medium we provide the script create-ay-iso.sh available at the CIF download site. This script allows to specify the following command line parameters:
Table 3-3 Command Line Parameters for create-ay-iso.sh
|
Parameter |
Value and Meaning |
|---|---|
|
--name |
Name of the iso file that is created. Default: autoyast-cif.iso NOTE:the default name of the iso file is derived from a variable CUSTOMER that is set in line 77 of the script. |
|
--workdir |
Directory where the directories boot, grub, and kernel are located. Default: /data/boot_cd_build |
|
--isodir |
Output directory where the ISO file is created. Default: /data/isos |
|
--debug |
Optional: increases verbosity. |
The size of the resulting image file autoyast-<Customer>.iso, that will be stored in the path provided to the parameter –-isodir depends on the number of products, versions and support packs that the boot image needs to support. The kernels and corresponding initrds consume the most space, but the size of such a custom Installation Boot Medium is always far smaller than the size of the original boot media.
3.4.2 Network Boot Environment
A network boot environment consists of a DHCP server and a TFTP server. Depending on the solution a proxyDHCP server might also be required.
We first will describe how to use your ZCM Primary Server to provide a network boot environment for BIOS and UEFI systems assuming that DHCP is provided by other servers and that you have configured your routers to forward DHCP and TFTP requests to your DHCP and TFTP servers. We will also explain how to use your AutoYaST server as TFTP server.
Sample PXE configuration files for all configurations are available at the CIF download site.
PXE Boot for BIOS Systems Using a ZCM Primary Server
Every ZCM Primary Server has the pattern novell-tftp installed and the Novell TFTP server is active by default. novell-tftp uses the base directory /srv/tftp.
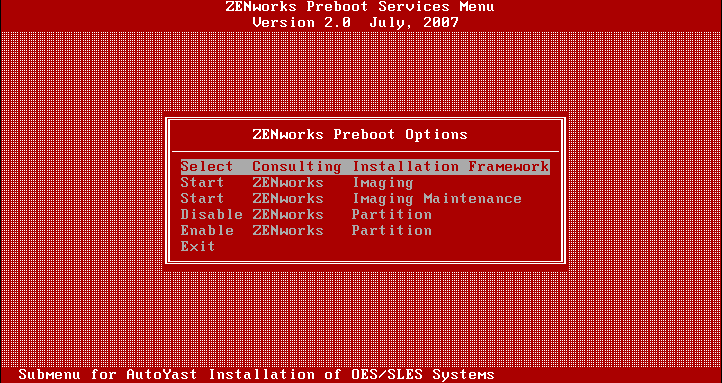
The DHCP options required for network boot need to be supplied by the Novell Proxy DHCP server (novell-proxydhcp) that needs to be activated and started on one server (please refer to Preparing a Preboot Services Imaging Server in the ZENworks Preboot Services and Imaging Reference for further details).
The kernel and initrd of the installation systems that CIF shall support need to copied to the directory /srv/tftp/kernel.
The first step in extending the Novell TFTP server configuration to support the installation of OES servers and SLES servers using the Consulting Installation Framework is to add a corresponding entry to the main menu, that is defined in /srv/tftp/pxemenu.txt.
Figure 3-7 PXE Main Menu for BIOS Systems on ZCM Primary Server
  :
[Main]
MenuTitle = ZENworks Preboot Options
option = submenu ; "Select  Consulting Installation Framework" ; "Submenu for AutoYast Installation of OES/SLES Systems" ; SUBMenu_CIF
option = execute ; "Start   ZENworks   Imaging" ; "ZENworks Imaging in Automated Mode";
  pxelinux.0 ; z_auto.cfg
  :
The section [SUBMenu_CIF] in this file defines a sub-menu with one entry for each of the supported releases.
Figure 3-8 CIF Sub Menu for BIOS Systems on ZCM Primary Server
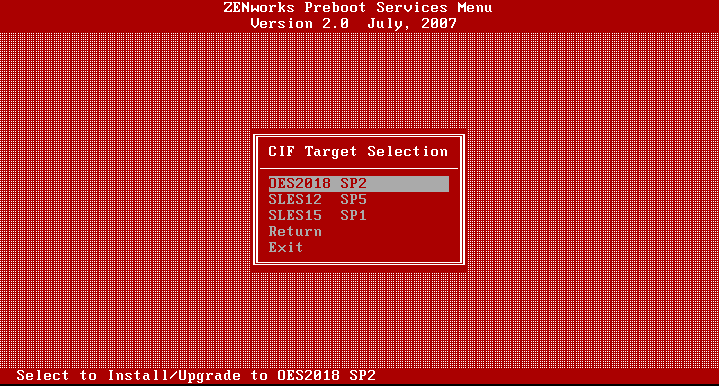
[SUBMenu_CIF]
MenuTitle = CIF Target Selection
option = submenu ;  "OES2018 SP2"; "Select to Install/Upgrade to OES2018 SP2" ;
SUBMenu_CIF_OES2018SP2
option = submenu ;  "SLES12  SP5"; "Select to Install/Upgrade to SLES12  SP5" ;
SUBMenu_CIF_SLES12SP5
option = submenu ;  "SLES15  SP1"; "Select to Install/Upgrade to SLES15  SP1" ;
SUBMenu_CIF_SLES15SP1
option = return ; "Return" ; "Return to main menu"
option = exit ; "Exit" ; "Boot to local hard drive"
Each selection in this sub-menu allows to either install the selected release or to upgrade an existing system to the selected release.
Figure 3-9 OES2018 SP2 Options for BIOS Systems on ZCM Primary Server
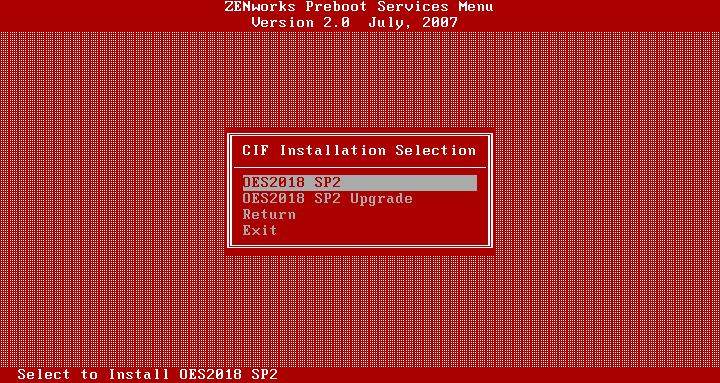
[SUBMenu_CIF_OES2018SP2]
MenuTitle = CIF Installation Selection
option = execute ; "OES2018 SP2" ; "Select to Install OES2018 SP2" ;
        pxelinux.0 ; CIF_oes2018sp2.cfg
option = execute ; "OES2018 SP2 Upgrade" ; "Select to Upgrade to OES2018 SP2" ;
        pxelinux.0 ; CIF_oes2018sp_upgrade.cfg
option = return ; "Return" ; "Return to main menu"
option = exit ; "Exit" ; "Boot to local hard drive"
These options execute configuration files that load the kernel and the initrd of the installation system of the selected release and pass the defined boot options to it. For instance, if you select the installation of OES2018 SP2 /srv/tftp/CIF_oes2018sp2.cfg is processed.
#====================== WARNING! ======================#
#  Consulting Installation Framework PXE Configuration
#
#  DO NOT EDIT THIS FILE!
#
#  Modifying this file is unsupported and can have
#  unpredictable results on ZENworks Preboot Services
#======================================================#
ZENWORKSAPPEND 1
DEFAULT OES2018SP2
LABEL  OES2018SP2
       kernel kernel/oes2018sp2/linux
        append autoyast=http://<IP of your AutoYaST server>/xml/default-<IP of your AutoYaST server> install=http://<IP of your ISO server>/oes2018sp2 netsetup=hostip,gateway netmask=255.255.255.0 gateway=<IP of your gateway> netwait=10 initrd=kernel/oes2018sp2/initrd
These files are similar to the grub configuration files for BIOS systems on the Custom Boot ISO discussed in the previous section with two distinct differences: the boot options are defined on the append line and the initrd is part of this line as well.
The ownership of pxemenu.txt, of all configuration files and of the kernels and initrds underneath /srv/tftp/kernel need to be changed to zenworks:zenworks.
When an installation is initiated over PXE once it has processed the PXE configuration file the installation will proceed just as if the system being installed would have been booted from the Custom Boot ISO.
PXE Boot for UEFI Systems Using a ZCM Primary Server
For a ZCM Primary Server to support PXE boot for UEFI systems /boot/x86_64/grub2-efi/ from a current SLES15 ISO needs to be copied to /srv/tftp/boot/x86_64/grub2-efi and /EFI/BOOT/locale/ needs to be copied to /srv/tftp/efi/x86_64/locale. The ownership of the copied files needs to be set to zenworks:zenworks and a relative symbolic link kernel pointing to /srv/tftp/kernel needs to be created in /srv/tftp/efi/x86_64.
The option to select the Consulting Installation Framework needs to be added to PXE main menu for UEFI systems:
Figure 3-10 PXE Main Menu for UEFI Systems on ZCM Primary Server
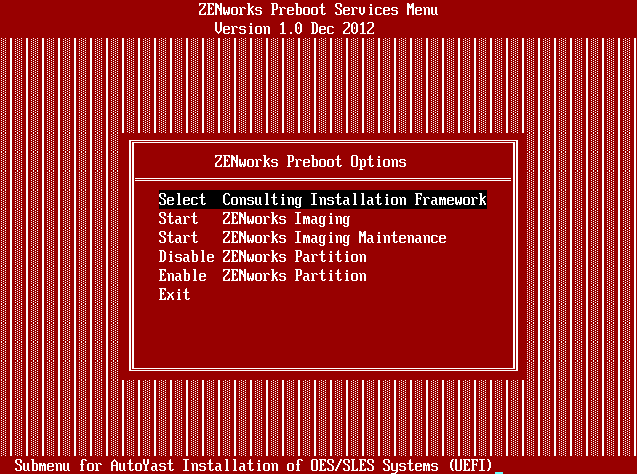
This is defined in /srv/tftp/efi/x86_64/pxemenu.txt.
   :
[Main]
MenuTitle = ZENworks Preboot Options
option = "execute;Select  Consulting Installation Framework;Submenu for AutoYast Installation of OES/SLES Systems (UEFI);efi/x86_64/bootx64.efi;efi/grub.cfg"
option = "execute;Start   ZENworks Imaging;ZENworks Imaging in Automated Mode;efi/x86_64/bootx64.efi;efi/x86_64/z_auto.conf"
option = "execute;Start   ZENworks Imaging Maintenance;ZENworks Imaging Linux Session in Interactive Mode;efi/x86_64/bootx64.efi;efi/x86_64/z_maint.conf"
option = "execute;Disable ZENworks Partition;Disable Existing ZENworks partition; efi/x86_64/bootx64.efi;efi/x86_64/z_zpdis.conf"
option = "execute;Enable  ZENworks Partition;Re-enable Existing ZENworks partition; efi/x86_64/bootx64.efi;efi/x86_64/z_zpen.conf"
option = "exit;Exit;Boot to local hard drive"
In general PXE uses the same grub2 configuration files that are used by the Custom Boot ISO. The main configuration file grub.cfg and the configuration files that implement the sub-menus need to be copied to /srv/tftp/efi. To be able to use the configuration files from your AutoYaST server without modification you need to create a symbolic link /srv/tftp/EFI pointing to the directory efi. The ownership of all grub2 configuration files needs also to be set to zenworks:zenworks.
PXE Boot for BIOS Systems Using the AutoYaST Server
The first step to use your AutoYaST server as PXE server is to install the tftp package. tftp uses the base directory /srv/tftpboot.
Next you need to install the package tftpboot-installation-SLE-OS_VERSION-ARCHITECTURE. Replace OS_VERSION with the version and ARCHITECTURE with the architecture of your SUSE Linux Enterprise Server installation, for example SLE-15-SP1-x86_64.
This package copies all files required to boot a SLE-OS_VERSION-ARCHITECTURE server to /usr/share/tftpboot-installation/SLE-OS_VERSION-ARCHITECTURE. You then need to copy the boot image pxelinux.0 and its configuration directory pxelinux.cfg from /usr/share/tftpboot-installation/SLE-OS_VERSION-ARCHITECTURE/net to /srv/tftpboot/net.
Next you need to copy the kernels and initrds for all releases that the CIF shall support to /srv/tftpboot/kernel.
NOTE:As the TFTP server runs chrooted in /srv/tftpboot you cannot use a symbolic link to point to /data/boot_cd_build/kernel here!
Linking /data/boot_cd_build/kernel to /srv/tftpboot/kernel however will work.
Finally the files menu.c32 and chain.c32 need to be copied from /usr/share/syslinux to /srv/tftpboot/net. They are required to use a menu system with the PXE server and to have the ability to boot a local installation.
A SLES based TFTP server is configured through /srv/tftpboot/pxelinux.cfg/default.
# activate menu system
UI menu.c32
PROMPT 0

# menu color settings
MENU COLOR border     37;41
MENU COLOR disabled   37;41
MENU COLOR hotkey   1;37;41
MENU COLOR hotsel   1;37;47
MENU COLOR sel        31;47
MENU COLOR title    1;37;41
MENU COLOR unsel      37;41

# do not allow user to specify command line options
ALLOWOPTIONS 0

# menu system
MENU TITLE Consulting Installation Framework

# OES2018 SP2 options
MENU BEGIN
  MENU TITLE OES2018 SP2
  LABEL OES2018 SP2
  MENU LABEL ^OES2018 SP2
  MENU INCLUDE pxelinux.cfg/CIF_oes2018sp2.cfg
  MENU CLEAR

  LABEL OES2018 SP2 Upgrade
  MENU LABEL OES2018 SP2 ^Upgrade
  MENU INCLUDE pxelinux.cfg/CIF_oes2018sp2_upgrade.cfg
  MENU CLEAR
MENU END

  :
# Boot to local hard drive
MENU SEPARATOR
LABEL  local boot
KERNEL chain.c32
APPEND hd0 0
MENU CLEAR
The first part of this configuration file activates the simple menu system, defines the menu colors, and prevents users from entering command line options. The menu system comes next before the last six lines implement the option to boot from local disk.
The main menu allows the selection of the supported products and releases or to boot from the local disk.
Figure 3-11 PXE Main Menu for BIOS Systems on AutoYaST Server
The menu system consists of a sub-menu (enclosed in MENU BEGIN … MENU END) for each product. The options for the installation/upgrade of each product use the MENU LABEL directive to implement a selection hotkey (preceded by ^) and to include a configuration file with a KERNEL and APPEND statement.
Figure 3-12 OES2018 SP2 Options for BIOS Systems on AutoYaST Server
Basically this are the same configuration files used for PXE on a ZCM Primary Server however, the lines with the directives ZENWORKSAPPEND, DEFAULT, and LABEL need to be removed.
#====================== WARNING! ======================#
#  Consulting Installation Framework PXE Configuration
#
#  DO NOT EDIT THIS FILE!
#======================================================#

        kernel kernel/oes2018sp2/linux
        append autoyast=http://<IP of your AutoYaST server>/xml/default-<IP of your AutoYaST server> install=http://<IP of your ISO server/oes2018sp2 netsetup=hostip,gateway netmask=255.255.255.0 gateway=<IP of your gateway>
netwait=10 initrd=kernel/oes2018sp2/initrd
PXE Boot for UEFI Systems Using the AutoYaST Server
PXE boot for UEFI systems on the AutoYaST server requires almost the same preparation as for the ZCM Primary Server. /boot/x86_64/grub2-efi/ from a current SLES15 ISO needs to be copied to /srv/tftpboot/boot/x86_64/grub2-efi and /EFI/BOOT/locale/ needs to be copied to /srv/tftpboot/EFI/locale. In addition /usr/share/tftpboot-installation/SLE-15-SP1-x86_64/EFI/BOOT/grub.efi needs to be copied to srv/tftpboot/EFI.
A relative symbolic link kernel pointing to /srv/tftpboot/kernel needs to be created in /srv/tftpboot/net.
PXE boot for UEFI systems uses the same grub2 configuration files as the boot ISO. The main configuration file grub.cfg and the configuration files that implement the sub-menus need to be placed in /srv/tftpboot/EFI.