9.5 Configuring an Application in Azure to Represent PlateSpin Migrate
PlateSpin Migrate uses the Microsoft Azure API to automate workload migrations to Azure. You need to create an Azure application ID for PlateSpin Migrate to use when it uses the Azure API for replicating and migrating workloads to your Azure account.
When you register an application, Azure creates a central identity for it in Azure Active Directory and assigns it an Application ID. The registration stores basic information that Migrate uses to authenticate to and use Azure APIs. It also records delegated permissions that Migrate needs when it accesses the APIs on behalf of the Contributor user for the subscription.
NOTE:For more information about application registration and permissions. see the following Microsoft resources:
-
“Register Application” in Use Resource Manager Authentication API to Access Subscriptions in the Azure Resource Manager documentation
-
Quick Start: Register an Application with the Microsoft Identity Platform in the Azure Active Directory documentation
9.5.1 Registering an Application in Azure
To register an application in Azure for PlateSpin Migrate to use:
-
Go to the appropriate Azure Portal and log in to your Azure account as a user with rights necessary to create and manage applications.
Azure portals:
-
In the Portal sidebar, select , then in the left pane under , select .
-
Register PlateSpin Migrate for your account:
-
On the App registrations page, click in the command bar.
-
On the page, provide the following information:
Register an application
Name
Specify friendly name for the application, such as PlateSpin Migrate Integration.
The name must be unique in your Azure Active Directory. This is the name that appears in the Applications list.
Supported account types
Select .
This option enables the application for user accounts in your default directory in Azure Active Directory.
Redirect URI
Specify , then leave the field empty.
-
Read the Microsoft Platform Policies, then click .
The working pane opens to the Overview page of the newly registered application.
-
-
On the Overview page of the new application, copy the value to the clipboard and paste it in a text document where you can access it when you set up the target cloud platforms for subscriptions in this account.
An Application (client) ID is a value in the format of: abc12b34-c5df-6e78-f9a0-bc123456d789.
You must provide the Application (client) ID when you add a Microsoft Azure Location as a migration target in PlateSpin Migrate.
-
Configure Authentication settings for the application that you registered in Step 3.
The Public Client setting allows the Migrate server to authenticate programmatically to Azure when it uses the Azure APIs.
-
Continuing on the Overview page of the new application, in the left pane under , select .
To access the Overview page: In the Portal sidebar, select , select > , then under , select the application by its name.
-
On the Authentication page, scroll down to > .

-
Click to treat the application as a public client.
-
In the command bar, click .
-
Dismiss the confirmation message for the updated Authentication settings.
-
In the left pane, click to return to the Overview page for the application.
-
-
Configure API permissions for the application that you registered in Step 3.
-
Continuing on the Overview page for the new application, in the left pane under , select . You can also click on the Overview page.
To access the Overview page: In the Portal sidebar, select , select > , then under , select the application by its name.
-
Microsoft Graph: Modify this default permission to add the User.ReadBasic.All permission.
User.Read grants permission to read the profile of the signed-in user. User.ReadBasic.All constrains application access to a limited set of properties known as the basic profile (display name, given name, mail, photo, surname, and user principal name).
-
On the API Permissions page, click .
Its current permission type is Delegated and the permission granted is User.Read.
-
On the Request API Permissions page under , scroll to the section and select .
-
On the bottom of the page, click .
-
Dismiss the confirmation message for the updated permissions.
-
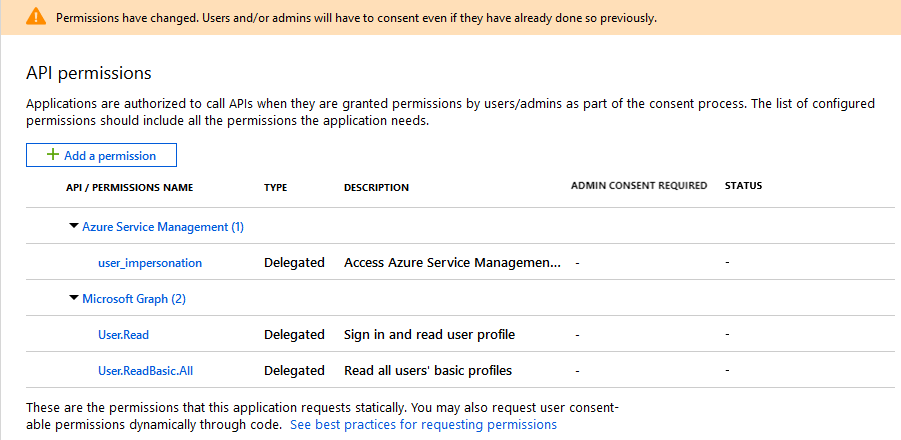
On the API Permissions page, visually verify that Microsoft Graph now has Delegated permissions for User.Read and UserReadBasic.All.
-
-
Azure Service Management: Add a new API permission for Azure Service Management.
Migrate uses the Azure Resource Manager Authentication API to access subscriptions, which requires the following permissions for the registered application: Azure Service Management, Delegated Permissions, and user_impersonation.
-
On the API Permissions page, click .
-
On the Request API Permissions page, provide the following information:
Request API Permissions
API Category
Select .
API
Select .
Type of Permissions
Select .
When PlateSpin Migrate accesses Azure APIs, the permissions are delegated to an authorized Contributor User that PlateSpin Migrate logs in as to perform migration actions. See Section 9.6, Configuring a Contributor User for PlateSpin Migrate to Use.
Permissions
Select .
-
At the bottom of the page, click .
-
Dismiss the confirmation message for the newly added permissions.
-
On the API Permissions page, visually verify that Azure Service Management is listed in the API permissions list with Delegated permissions for user_impersonation.
Although permissions are configured, they are not yet effective for the application. An Azure global administrator must grant admin consent for the permissions in the Default Directory to ensure that consent is not required when PlateSpin Migrate accesses Azure APIs.
-
-
-
[Azure Global Administrator rights for the Default Directory are required for this step.] Grant admin consent for the Default Directory for the requested permissions.
Do one of the following:
-
If you have admin rights, you can grant consent now from the API Permissions page. Continue with Grant Admin Consent from App Registrations.

-
If you are not currently logged in as a user with admin rights, the option to grant admin consent is disabled on the API Permissions page.

Use either of these methods to grant consent:
-
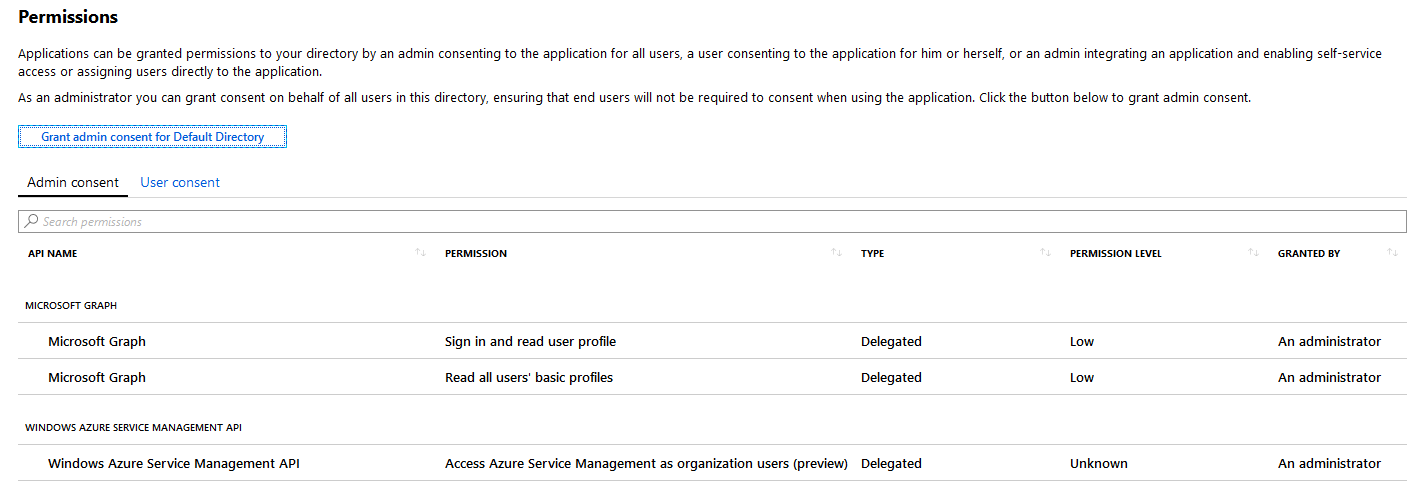
You can log in as a user with rights from the application Permissions page in Enterprise Applications. Continue with Grant Admin Consent from Enterprise Applications.
-
You can log out of the portal and log in as a user with the administrator rights, then return to the API Permissions page to grant consent. Continue with Grant Admin Consent from App Registrations.
-
-
9.5.2 Granting Admin Consent for Application Permissions
A user with Azure Global Administrator rights for the Default Directory must grant consent for the permissions you request for the registered application that PlateSpin Migrate will use. The consent on behalf of all users will ensure that consent is not required when PlateSpin Migrate accesses Azure APIs. After consent is granted, the application is ready for use by PlateSpin Migrate.
IMPORTANT:Ensure that you are logged in with an Azure user account that has Global Administrator rights for the Default Directory where the application will be used.
Grant Admin Consent from App Registrations
To grant admin consent from App Registrations:
-
In the Portal sidebar, select , select > , then under , select the application by its name.
-
Under Manage, select .
-
On the API Permissions page for the application, click .
-
When you are prompted to grant consent for the requested permissions for all accounts in the Default Directory, click .
-
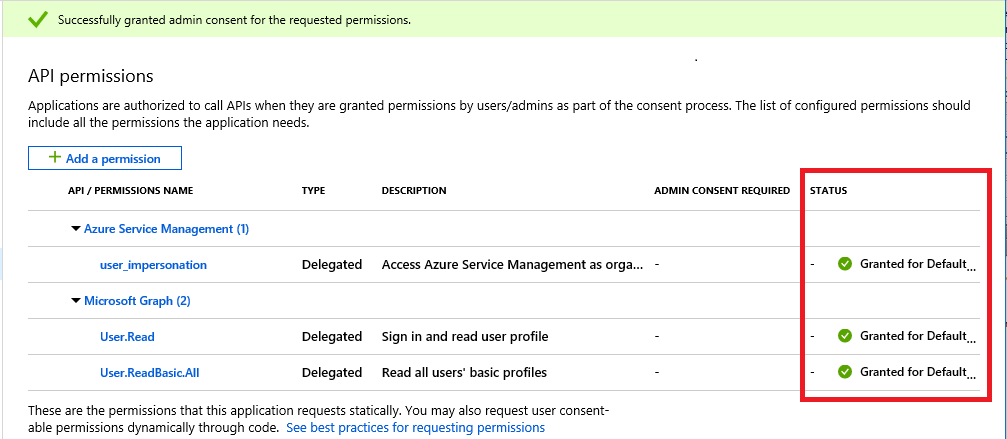
Dismiss the confirmation message that you successfully granted admin consent for the requested permissions.
-
On the API Permissions page, visually verify that the Status shows that the permissions are Granted for Default Directory.
-
Continue with Section 9.5.3, Verifying Admin Consent for the Application.
Grant Admin Consent from Enterprise Applications
-
In the Portal sidebar, select , then In the left pane under , select .
-
On the Enterprise applications - All applications page, locate and select the new application for PlateSpin Migrate that was created in Step 3 of Section 9.5.1, Registering an Application in Azure.
-
In the left pane under , select .
Initially, there are no permissions listed in the section for the application.
-
Click .
A separate browser window opens for the authentication and permission flow for the selected application.
-
When you are prompted to sign in to administer the application, sign in using an Azure global administrator account that has rights to grant admin consent for the Default Directory.
-
After authentication succeeds, the dialog prompts you to consent to the requested application permissions. Click , then wait for the browser to refresh its content.
-
After the permissions are successfully granted, close the pop-up browser window.
-
Continue with Section 9.5.3, Verifying Admin Consent for the Application.
9.5.3 Verifying Admin Consent for the Application
To verify the application and its permissions:
-
In Portal sidebar, select , then select > .
-
Locate and select the new application that you created in Step 3.
-
Under , click .
-
Verify that required permissions are listed in the section and that consent is granted for the Default Directory.
The permissions should match the permissions you configured in Step 6 of Section 9.5.1, Registering an Application in Azure.