3.1 Requirements for Deploying Advanced Edition
You must meet the following requirements before deploying Advanced Edition:
-
Hardware Requirements: Ensure that your setup meets the hardware requirements listed in NetIQ SecureLogin System Requirements.
-
Azure Kubernetes Environment Requirements: See Azure Kubernetes Environment Requirements.
-
The Windows device joined to Azure Active directory. For information about how to join a device to Azure Active Directory, see Microsoft Documentation.
NOTE:Deploying Advanced Edition is supported only on an Azure AD joined Windows 10 device.
-
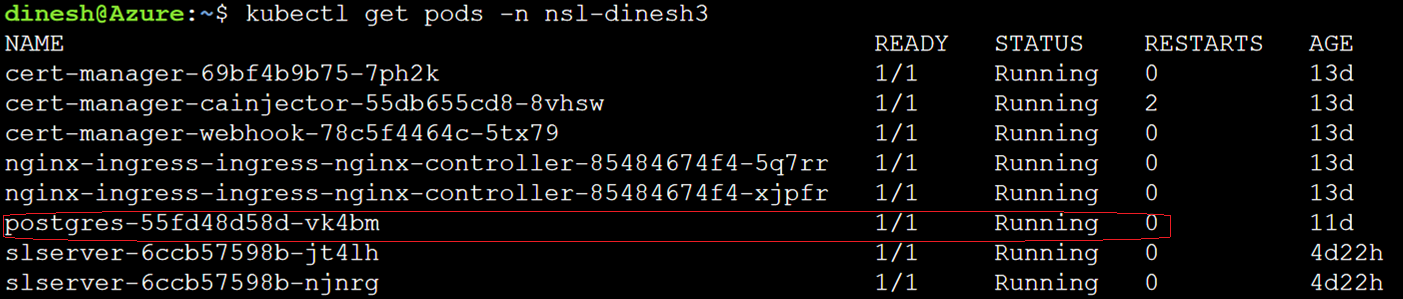
PostgreSQL v10 or later installed.
Run the following command to list the PostgreSQL pod. The status must be Running.
kubectl get pods -n <Namespace>
IMPORTANT:Ensure that PostgreSQL is installed and configured before installing Advanced Edition. It can be installed on the same AKS cluster on which you will deploy Advanced Edition or on a different AKS cluster.
Also, you must create the database name. Run the following command:
To connect to the database: psql "host=<your_host> port=<your_port> dbname=<your_database> user=<your_username> password=<your_password> sslmode=require"
To create the database: CREATE DATABASE <DB-name>;
The DB name must be in lowercase. For example, securelogin_top_db.
NOTE:Ensure that the PostgreSQL server supports the SSL connection.
-
The users role assignment is configured. See Enabling Role-based Access and Token Validation.
Azure Kubernetes Environment Requirements
Perform the following steps to set up an Azure Kubernetes environment to install Advanced Edition:
-
Create a Resource group.
For information about creating a Resource group, see Create Resource Groups.
-
Deploy an AKS cluster (v1.19 or later) and connect to the cluster.
NOTE:The OS type of the Node pool must be Linux.
NOTE:Make a note of the region. You will need this information while Installing Advanced Edition on Azure Kubernetes Services.
Run the following command to configure kubectl to connect to your Kubernetes cluster:
az aks get-credentials
The following command downloads credentials and configures the Kubernetes CLI to use them:
az aks get-credentials --resource-group myResourceGroup --name myAKSCluster
Run the following command to verify the connection to your cluster to return a list of the cluster nodes:
kubectl get nodes
The status of cluster nodes must be ready as shown in the following snippet:

For information about deploying AKS cluster, see Deploy an AKS cluster. For information about using AKS, see Best practices for using AKS.
-
Create a Namespace.
On Cloud Shell, run command kubectl create namespace <name-of-the-namespace>.
NOTE:Wherever applicable, use the same namespace.
-
Create an Ingress Controller as load balancer.
Ingress manages the external access to the Advanced Edition services in a Kubernetes cluster. To make the Ingress resources work, you need an Ingress controller. Advanced Edition uses the NGINX Ingress controller.
For information about creating an Ingress Controller, see Create an Ingress Controller.
NOTE:The following conditions must be true while creating the ingress controller:
-
Use the namespace that you created in Step 3.
-
DNS label must be in lowercase. Foe example, nsl-demo
Run the following command to list Ingress Controller pods:
kubectl get pods -n <Namespace>
The number of pods depends on the number of replica count configured during its deployment. For example, if the replica count is 2, you will see two pods with status Running.

-
-
Install Certificate Manager and CA Cluster Issuer. For more information, see Install a Certificate Manager.
Run this command to list Certificate Manager pods. It lists different components of Certificate Manager (cert-manager, cert-manager-cainjector, and cert-manager-webhook) with status Running.
kubectl get pods -n <Namespace>

Certificate Manager requires an issuer or cluster issuer resource to issue certificates. Perform the following steps to create a CA cluster issuer:
-
Create the cluster-issuer.yaml file and add the following content:
apiVersion: cert-manager.io/v1 kind: ClusterIssuer metadata: name: letsencrypt spec: acme: server: https://acme-v02.api.letsencrypt.org/directory email: john.doe@example.com privateKeySecretRef: name: letsencrypt solvers: - http01: ingress: class: nginx podTemplate: spec: nodeSelector: "kubernetes.io/os": linuxNOTE:Ensure that the email ID is valid as the certificate expiration notifications will be sent to the same address.
-
Run the following command to create the cluster-issuer:
kubectl apply -f cluster-issuer.yaml -n <namespace>
Run the following command to list cluster-issuer. It lists the cluster-issuer with name letsencrypt.
kubectl get clusterissuer -n <Namespace>

NOTE:To use your certificate instead of the default one, see Using Your CA Signed Certificate.
-
-
Create an Azure Container Registry (ACR).
ACR is a private Docker registry in Azure. You can store and manage Advanced Edition container images and related artifacts in ACR. For information about creating ACR, see Create an ACR.
Enabling Role-based Access and Token Validation
Before you deploy Advanced Edition, you must define roles for users, such as admin and user roles. You can then assign a user to a particular job function or set of permissions to control access. The role assignment enables you to control who can access what content and functionality.
For example, an administrator can view the details of other users. However, a user cannot view the details of another user.
Perform the following steps to enable role-based access and token validation:
-
Log in to the Microsoft Azure portal.
-
Register an application with Azure AD and create a service principal.
A service principal is an identity created for use with applications, hosted services, and automated tools to access Azure resources.
Registering the application establishes a trust relationship between your app and the Microsoft identity platform.
For more information, see Register an application with Azure AD and create a service principal.
NOTE:While registering an application with Azure AD:
-
Select for .
-
Ignore the .
-
Create a new application secret and make a note of the Application (client ID), Client secret, and Directory (tenant) ID. You will need this information while Configuring Identity Store.
-
-
Under the client application, select .
-
In , specify api://{clientID}.
-
Click and create a scope named All.
-
In , select .
-
Specify the display name as All.
-
Set to .
-
-
-
Select and click .
-
Select > and .
-
Select .
-
Click .
-
-
Select and add the permissions as follows:
-
Click > > .
-
Select and and then click .
The following permissions are added by default:
-
: It is added when you register an application.
-
: It is added when you configure an optional claim. See Step 4.
NOTE:A global admin or an admin with rights to grant consent can approve these permissions.
-
-
Click > > your client application > > and then click .
-
-
Under your tenant, select > .
-
In , click > , select all three suggested redirect URIs, and click .
-
In , select .
-
In > > , select .
-
Click .
-
-
Select and create admin and user roles.
To create the admin role:
-
Click and specify the following details:
-
: Specify Admin.
-
: Select Both (Users/Groups + Applications).
-
: Specify admin.
-
: Specify a detailed description of the app role.
-
: Select the option.
-
-
Click .
To create the user role:
-
Click and specify the following details:
-
: Specify User.
-
: Select Both (Users/Groups + Applications).
-
: Specify user.
-
: Specify a detailed description of the app role.
-
: Select the option.
-
-
Click .
-
-
To set the token issuer to https://login.microsoftonline.com/{tenantID}/v2.0, perform the following steps:
-
Under your tenant, select > .
-
change the accessTokenAcceptedVersion param in the manifest JSON to 2:
"id": "b7b06474-8d47-429d-81e9-85090044c1b8", "acceptMappedClaims": null, "accessTokenAcceptedVersion": 2, "addIns": [], -
Click .
-
-
Under your tenant, select
-
Select your client application > .
-
Assign roles (User or Admin) to the users and groups as required.
-