Inserting an XML Verification Function
All parsing and verification functions must be specified before the
Web API calls that initiate the parsing/verification of response data. Multiple
parse/verification functions can be specified before each Web API call.
Note: The order in which parsing/verification functions are inserted
into a test script is not relevant.
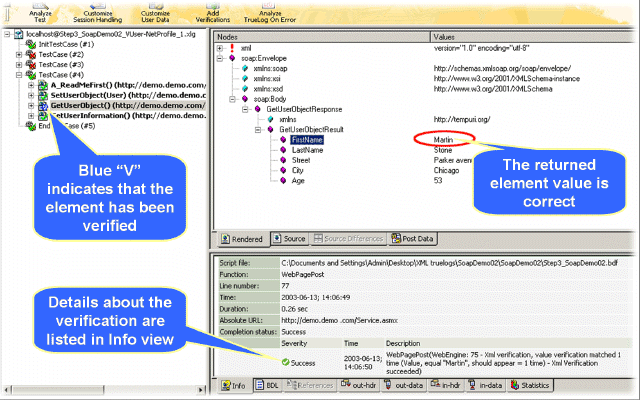
- Select and right-click an XML element or attribute on the Rendered page and choose Verify Element Value. Alternative: When verifying an attribute, the context menu instead offers the Verify Attribute Value command. The Insert XML Verification Function dialog box opens. The selected element value is pre-loaded into the value edit box and the value option button is selected.
-
To verify against a parameter, click the
parameter option button.
In addition to being able to verify against a constant value,
you can also verify against either an existing parameter or a new parameter.
- Click [...].
- If a parameter already exists, you can browse to and select the parameter.
- If no parameters exist, click [...]. The Parameter Wizard opens enabling you to create a new parameter.
-
Specify the frequency by which the selected element is to appear:
- Select exactly, at least, or at most from the occurs list box.
- Enter a number in the time(s) field.
Note: The settings on this dialog are automatically set to values that guarantee a successful verification for the current page. Only in cases in which you want to make the verification more tolerant should these settings be changed (for example, by changing exactly 2 times to at least 1 time, or by making a verification case-insensitive). - Check the exact XPath query check box if the element is to be verified only in the specified XPath.
- Specify whether or not the verification is to be applied as a script-wide rule and/or case sensitive by checking the appropriate check boxes. A pre-loaded result variable name appears in the Result variable name text box; edit this name as required.
- In the Severity portion of the dialog, specify the severity that is to be raised if the verification returns a negative result (Error, Warning, Informational, or Custom).
- Click OK to add the function to your test script. XML attribute verification is identical to XML element verification, except that an attribute name must also be specified.
-
Initiate a Try Script run to confirm that your script
customization runs accurately.