Sample Visual Test: Using Decision Logic to Verify a Control Selection - Part 2 Details
Sample Visual Test
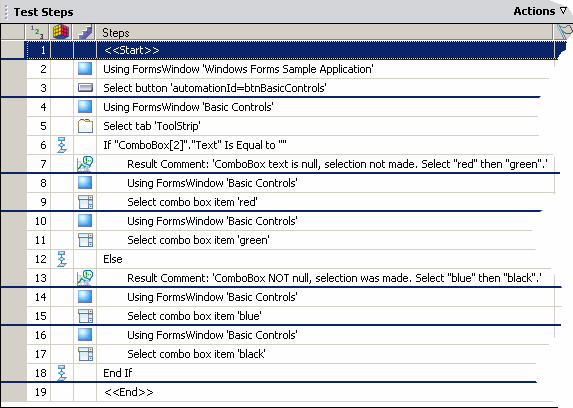
The following shows the sample visual test steps in the Test Steps pane based on the test scenario and highlights the progression of steps in the test.
Step Details
Details of the visual test by steps is as follows:
Step 1: The <<Start>> step.
Step 2: A screen step that indicates the automation step that follows plays back using the specified recorded screen. When selecting the step in the Test Steps pane, the associated screen appears in the Screen Preview.
Step 3: A recorded step that clicks a Button control in the test application. Clicking the button displays a set of controls in various tabs. The Toolstrip tab contains the control being tested.
Steps 4-5: Recorded steps access and select the Toolstrip tab that contains the ComboBox control being tested.
Step 6: The If step that starts the decision logic, part of decision logic created by the tester after recording the test. The logic icon indicates that this step is a decision logic step.
The decision logic evaluates the content of the ComboBox control's Text property. If no value has been set for the control, the Text property should be Nothing or blank. The visual test executes one set of steps if the value is Nothing or blank, and a different set of steps if the value is not Nothing or blank.
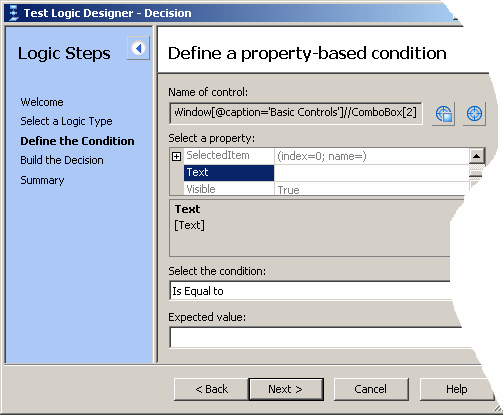
- Selects a Logic Type to based on the property of a control.
- Uses the define a property-based condition page of the
Test Logic designer to do the following:
- Identify the name of the control using the application under test.
- Select Text in the Select a property List of the Test Logic designer.
- Ensure that the condition evaluates to is Equal to and the Expected Value field is blank, as shown in the following graphic.
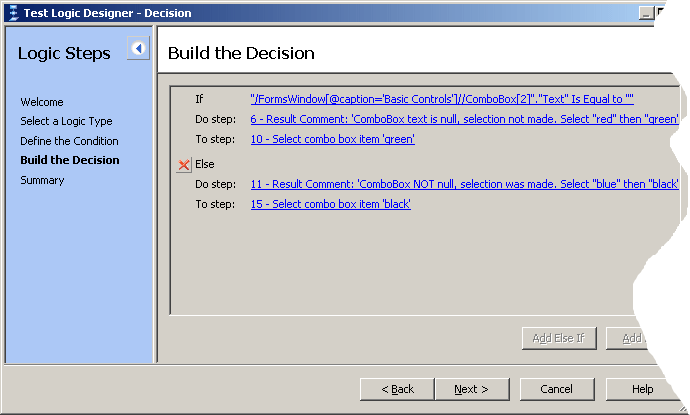
- Uses the Build the Decision page of the Test Logic Designer to specify the sequence of steps to run when depending on the conditional logic result. In this scenario, the user chooses to execute steps 6 through 10 of the result is true. The user then clicks Add Else to add the If step to the decision logic and chooses to execute steps 11 through 15 if the result is false, as shown in the following graphic.
Step 7: A Result Comment step created by the tester. The step executes if the decision logic evaluates to true. If executed, the step sends a message to the test results indicating that the ComboBox contains no text and therefore has not been previously selected. It also indicates that available values in the control will be selected in subsequent steps.
Steps 8-11: These steps access and select different available ComboBox items if the decision logic evaluates to true. These steps first select red then green in the ComboBox.
Step 12: The Else step in the decision logic. The decision logic creates this step if Add Else is built into the logic. The Else step indicates that steps between it and the End If step in the decision logic are played back when the condition of the If step in the decision logic is not met.
Step 13: Another Result Comment step created by the tester. The step sends a message to the test results indicating that the ComboBox text is not Nothing and that available items will be selected.
Steps 14-17: These steps access and select different available ComboBox items if the decision logic evaluates to false. These steps first select blue then black in the ComboBox.
Step 18: An End If step created as part of the decision logic for the visual test. This step closes the If...Else logic.
Step 19: The <<End>> step. Concludes visual test playback.