Reviewing the Recorded Test Steps
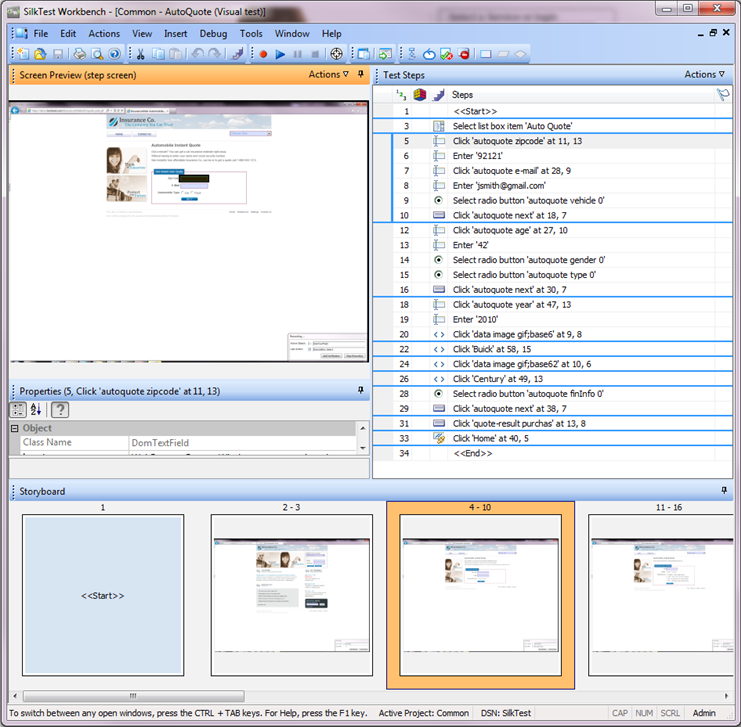
Once you have recorded your visual test and saved it, the visual test displays in the Visual Navigator. The four panes of the Visual Navigator provide a comprehensive view of the visual test.
Steps in the Test Steps pane represent the screens accessed during recording and the actions performed while completing the quote in the Web application.
Your recorded steps should be similar to the steps in the following graphic.
| Column | Description |
|---|---|
|
|
Represents the sequential order in which steps are recorded and played back. Steps display in this sequential order by default. Any steps that have breakpoints added for debugging display a breakpoint in the column next to this column. If you change the view from the default view (Steps and Screens) to the Screens only or the Steps only view, the numbering scheme sequentially skips the steps or screens to indicate the gap in the recording sequence. |
|
|
Displays icons representing the type of logic for the step, if the step contains logic. |
|
|
Displays icons representing the type of action being executed in the step. |
| Steps | Describes the action being taken for the step. |
|
|
Displays the Assigned Flag icon. The Assigned Flag icon indicates that the associated step is flagged to appear in the Test Steps pane and optionally on the Start Screen of the assigned user. Additionally, you can move your pointer over the icon to display a ToolTip containing the flag description, modified date, and assigned date. |
|
|
Displays a user-defined step description. This column does not display in the default view, but can be shown by clicking Actions from the Test Steps pane title bar and then . To create a step description, select a step. In the Properties pane, update the Step description property. A Step Description icon appears in this column indicating that the step has a description. Either move your pointer over the icon to display a ToolTip containing the description or select the step and read the description in the Properties pane. |
-
The Screen Preview shows the state of the application before Auto Quote is selected.
-
The Properties pane shows the properties for the selected step.
-
The thumbnail representing the group of steps related to selecting the Auto Quote list item is highlighted in the Storyboard.
Scroll through the steps in the visual test and select various steps to view the updated information in the other panes.