The Visual Studio editor provides a variety of features to boost your performance when writing COBOL code:
- AutoCorrect
- The AutoCorrect feature enables you to automatically correct your common typing mistakes. In the IDE preferences, you specify a list of words that you sometimes mistype, and the correct spellings for them. When you type the misspelled versions in the editor, AutoCorrect automatically corrects them.
Configure AutoCorrect from
Tools > Options > Text Editor > Micro Focus COBOL > AutoCorrect.
- Bookmark Window
- Shows the bookmarks added to source code in your solution. Choose
View > Bookmark Window to display the window.
- Bookmarks
- To add a bookmark, position the cursor on a line in the code and choose
Edit > Bookmarks > Toggle Bookmark.
- Background Syntax Checking
- The COBOL code is checked in the background, as you type it. Any errors are underlined with wavy red lines. You can turn this setting off or on the
Miscellaneous page in
Tools > Options > Text Editor > Micro Focus COBOL.
Generally, we recommend that you leave Background Syntax Checking turned on as a number of IDE features rely on it and are not available when it is disabled. You might consider turning it off only when editing exceptionally large files. See
Known Issues and Restrictions for more information about which IDE features are not available in that scenario.
-
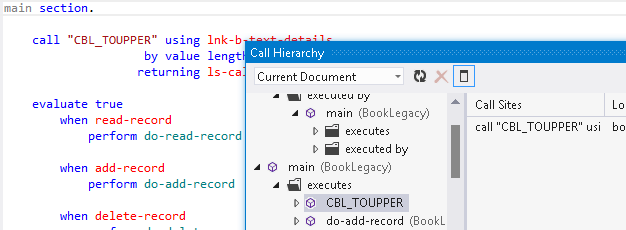
Call Hierarchy Window
- From the editor, you open the call hierarchy window for
If the window is not visible, click
View > Call Hierarchy to open it.
-
Class View Window
- Shows an outline of the classes used in your solution and their members. To display the window choose
View > Class View. This applies to managed projects only.
- COBOL Margins
- The editor provides colorized margins for fixed and variable COBOL source code. You can specify whether to display or hide the margins from the
Miscellaneous page in
Tools > Options > Text Editor >
Micro Focus
COBOL. You can change the color of the margins and the margin text from
Tools > Options > Environment > Fonts and Colors and then the
COBOL Margin and
COBOL Margin Text settings. The margins are automatically updated according to your preferences if the background parse is turned on.
- COBOL Reserved Words
- To configure the case of the COBOL reserved words used in the code snippets for COBOL choose
Tools > Options > Text Editor > Micro Focus COBOL > Formatting and set the case in the
Case Format for Reserved Words field.
-
Code Definition Window
- If you position the cursor on an object in the source code, the
Code Definition Window automatically displays the section of the code implementing the objects referenced on that line. To display the window choose
View > Code Definition Window.
- Code Snippets
- Insert the code constructs for elements of the COBOL language, for example for classes, methods and delegates in .NET COBOL or . To insert a snippet choose
Edit > IntelliSense > Insert Snippet, or right-click in the editor and select
Insert Snippet, or type the shortcut for the particular snippet (for example,
class-id,
method-id) and press
Tab. This inserts an outline of the syntax for you to fill in. Snippets are available in both native and managed code.
- To configure the case in which the code snippets are displayed choose
Tools > Options > Text Editor > Micro Focus COBOL > Formatting and set the case in the
Case Format for Identifiers field.
- Comments
-
- End-of-line comments - start end-of-line comments in the code using
*>.
- Comment out a line of code - for fixed or variable source format of code, enter
* in column 7 or, for FREE source format of code, enter
* in column 1 to comment out an entire line.
- XML documentation comments - in managed COBOL, type
*>> to create Visual Studio-style XML documentation comments.
- Task List comments - to create Task List comments, type the declaration of a comment immediately followed by any of the following phrases - TODO, HACK or UNDONE. To see the comments, check the
Task List window (click
View > Task List to show the window). The window shows all comments added in the files that have been opened in the editor and such that are part of any copybooks referenced by these files.
To define other tokens as Task List comments or to change the priority of the comments, go to
Tools > Options > Environment > Task List.
To configure whether the IDE should display the Task List comments in the
Task List window, go to
Tools > Options > Text Editor > Micro Focus COBOL > Advanced and specify a preference for the
Show Comment Tasks option.
- Editing Single Files
- This only applies to native COBOL. The recommended way to work with
Visual COBOL is to include all source files in a project because this enables full support for the IDE editing, compiling and debugging features. There is limited support in the IDE for single files, such that are not part of a project and
Visual COBOL provides a path to create projects for these files in order to enable full editor, build and debug functionality. To create a project from a single file, right-click in the editor and click
Create COBOL Project.
To edit a single file, first open it in the editor using
File > Open > File. Alternatively, double-click the file in Windows Explorer or start it from a command prompt. You can edit the file in the usual way. Note, however, that background syntax checking is not available for single files so no errors are reported as you type. You need to recompile in order for the IDE to check your code and report any issues.
When starting the IDE from the command line, also set the COBCPY environment variable to point to the folders where the IDE should search for copybooks.
To specify the locations of any copybooks used in the single file when the copybooks are not in the same location, set the COPYPATH Compiler directive in the IDE on the
Single File Compile page in
Tools > Options > Micro Focus > COBOL as COPYPATH(<location1>;<location2>;...). You then need to recompile the file.
To specify non-default locations of copybooks, when opening the file from the command line also specify the COBCPY environment variable as an argument at the command line and set it to point to the folders where the IDE should search for the copybooks.
Follow the
Single COBOL Files Support
link at the end of this topic for information about the level of support for single files.
- Editor Zoom
- Zoom in or out the text in the COBOL editor by pressing CTRL and scrolling with the mouse.
-
Errors Window
- Shows the errors, warning and messages created when editing or compiling. Double-click on an item in the errors list to position the cursor on the line of code that causes the error. You can get help on the error by pointing to the relevant error number and pressing
F1.
- Expanded Copybook View
- To show the contents of a copybook inline in the place where the COPY statement is, right-click the line for the COPY statement in the editor, and click
Show "copybookname". Or, to show all copybooks that are referenced in the file, right-click in the editor, and click
Show all copybooks.
- Exploring a project
- You can improve the navigation of a project by using one of the following features:
- Use the Virtual View in Solution Explorer to group logically the files that make up the project by file type. Click
 to toggle the view on or off. When Virtual View is on you can also create your own virtual folders to group files of your choice.
- You can use solution folders to group the projects in your solution - right-click the solution in Solution Explorer and click
Add > New Solution Folder, then use drag and drop to move projects to that folder. The solution folder does not exist on the disk and only helps you group projects.
- Extract to Copybook
- Make a selection in the editor that includes the lines of code you want to move into a copybook, right-click the selection and click
Extract to Copybook. This enables you to create a new copybook in your project that includes the entire lines of code from your selection. In the editor, the selected code is replaced by a COPY statement that refers the new copybook.
- Find in Files
- Click
Edit > Find and Replace > Find in Files (or press
CTRL+SHIFT+F).
To search in all copybooks - the ones that are part of the project as well as the ones that are found in the paths defined on the
Copybook Paths tab in the project properties - set the search scope in the
Find and Replace dialog to
COBOL Project Copybook Paths.
This search in the COBOL program currently opened in the editor and in any copybooks referenced by that program, select the
Current COBOL Program option.
- Find All References
- In the editor, right-click a COBOL data item, a section or a paragraph name in the code and select
Find All References. A list of all places in the solution that contain the reference to the item is displayed in the
Find Symbol Results window. Double-clicking on an item in the list positions the cursor on the line of code that includes the element. The default shortcut for invoking
Find All References is
Shift+F12. See
General Visual Studio IDE Issues for information about the limitations when using
Find All References.
-
Find Symbol Results Window
- To display the window, click
View > Find Results > Find Symbols Results. Displays the results of
Find All References command in the editor. Double-click an item in the list to position the cursor on the line that includes the referenced item.
- Format Document/Format Selection
- Changes the case of the source file currently opened in the editor or of a selection as specified on the
Formatting page in
Tools > Options > Text Editor > Micro Focus COBOL. To format the file or a selection of code, click
Edit > Advanced > Format Document or
Edit > Advanced > Format Selection.
- Go To Definition (F12)
- Pointing to a variable in the editor and pressing
F12 positions the cursor on the definition of that variable.
- Performing Go To Definition on a copybook name opens the copybook in the editor.
- Go To Previous Method / Go To Next Method
- Use the
Go To Previous Method and the
Go To Next Method editor context menu commands to navigate easier in native Object-Oriented and managed COBOL code.
-
Go To Procedure Division
- The
Go To Procedure Division ,
 , is available from the
Edit menu and on the
COBOL toolbar. If the toolbar is hidden, to display it, click
Tools > Customize > Toolbars and click
COBOL. Click
to move the cursor following these rules:
, is available from the
Edit menu and on the
COBOL toolbar. If the toolbar is hidden, to display it, click
Tools > Customize > Toolbars and click
COBOL. Click
to move the cursor following these rules:
- For procedural programs, the cursor moves to the first line of the Procedure Division of the COBOL source.
- For Object-Oriented programs, if the cursor is inside a class and before the method definitions, the command moves it to the first line of the Procedure Division of the first method.
If the cursor is inside the methods declarations but outside a method, the command moves it to the first line of the Procedure Division of the preceding method.
If the cursor is after a class, the command moves it to the first line of the Procedure Division of the last method of the class.
- If the cursor is in a copybook file which you opened from Solution Explorer, the command moves it to the first line of the Procedure Division of the first COBOL source that includes the copybook. If the copybook file was opened from a particular COBOL file, the command moves it the first line of the Procedure Division of that COBOL file.
-
Go To Location
- The text field on the COBOL toolbar (click
Tools > Customize > Toolbars and click
COBOL, if this is hidden) enables you to locate the definition of a variable or an expression. Type a variable name or an expression in the field, then either click
Edit > Go To Location or click
 (Enter a COBOL Term and Go To Definition) in the COBOL toolbar. This is equivalent to pointing to the variable in the editor and pressing
F12.
(Enter a COBOL Term and Go To Definition) in the COBOL toolbar. This is equivalent to pointing to the variable in the editor and pressing
F12.
To return to where you were in the code, click
 (Navigate Backwards).
- IntelliSense
- Provides writing assistance in the editor. In both native and managed COBOL, provides suggestions for COBOL words or snippets when you press
Ctrl + Spacebar or start typing in the editor. In .NET COBOL, IntelliSense also displays lists of the namespaces, types, members and parameters that are available when you type an object name followed by a space, dot, double colon or an opening bracket.
-
Navigate To
- Choose
Edit > Navigate To. Enables you to search for symbols and filenames and navigate to different locations of the current solution. Double-click an item in the result to view the definition in the code.
- Note that for managed projects
Navigate To search works only if at least one of the COBOL source programs has been opened in the IDE. For native projects,
Navigate To search works only for the COBOL source programs that have been opened once in the IDE.
-
Navigation Bar
- The navigation bar at the top of the COBOL editor displays lists of the objects and procedures used in the current program as well as the Procedure Division, any sections, paragraphs, and group level data definitions and enables you to position the cursor on any of them.
- Navigation using the Home and End keys
-
Pressing
Home repeatedly first moves the cursor immediately before the first non-white space in the current area, then at the beginning of the area, or to the first non-white space in the preceding area.
Pressing
End repeatedly first moves the cursor immediately after the last non-white space in the current area, and then at the start of the following area. You can change this default behavior from the
Tools > Options > Text Editor > Micro Focus COBOL > Margins page.
- Object Browser
- The Visual Studio Object Browser window (click
View > Object Browser) enables you to explore the objects in your .NET COBOL applications. Click a node in the left pane of the Object Browser window to see its members. Click a member in the pane in the top right corner to view the member's definition as provided by its XML documentation comment in the code. Double-click a class or a class member in the Object Browser to navigate to the definition of that class or member in the source files.
- Outlining
- Enables you to hide portions of the code. Choose
Edit > Outlining > Toggle Outlining Expansion.
- Override Class Members Wizard
- A user interface that facilitates you in overriding the members of an inherited class. To invoke the wizard, right-click inside a class in the editor and choose
Override Class Members. The wizard displays the members that you can override and which class they belong to. Select the members you want to override and click
OK. This adds the selected methods with the
override modifier at the end of the class . Works with managed code only.
- Project Details Window
- Displays a full list of the files in your project or solution with file details such as the file type, the COBOL dialect, number of errors in the files.
- To open the window, select your project or solution in Solution Explorer and click
Projects > Project Details Window.
- References
- Enable you to add references to .NET assemblies, COM objects, projects and files. To add a reference choose
Project >
projectProperties, open the
References tab and click
Add > Reference or
Add > Web Reference. This applies to managed projects only.
- Ruler
- The horizontal ruler is turned off by default. To enable it, click
Tools > Options > Text Editor > Micro Focus COBOL, and then click
Margins. Check
Show the ruler. Check
Mainframe style if you wish the ruler to indicate areas A and B of the code.
- Smart Edit Mode
- The Smart edit mode controls the word wrapping and the indentation in the different COBOL areas. You can configure this from
Tools > Options > Text Editor > Micro Focus COBOL, and on the
Margins and
Tabs pages.
- Smart Tags
- Smart tags are a feature of the Visual Studio editor that helps you implement different constructs of code more easily. The indication for a smart tag (
 ) appears underneath at the beginning of the declaration of a construct that is not fully implemented. When you place the cursor over the tag, the
 icon appears. Click the arrow in the icon and select an action from the drop-down list. This adds the required construct to your code.
- Syntax Colorizing
- Colorizes the members of the COBOL language, for example data items, statements, comments, level 78 words, in different colors. To configure the colors for the COBOL language, choose
Tools > Options > Environment and click
Fonts and Colors. The items related to COBOL are prefixed with "COBOL".
- Syntax Help
- In the editor, point to a COBOL reserved word and press
F1 to display the syntax Help for that word.
- Task List Comments
- Task List comments - to create Task List comments, type the declaration of a comment immediately followed by any of the following phrases - TODO, HACK or UNDONE. To see the comments, check the
Task List window (click
View > Task List to show the window). The window shows all comments added in the files that have been opened in the editor and such that are part of any copybooks referenced by these files.
To define other tokens as Task List comments or to change the priority of the comments, go to
Tools > Options > Environment > Task List.
- Viewing Copybooks With Replaced Values
- For copybooks which your code modifies with COPY… REPLACING statements, you can open the copybooks from the editor and view their code with the replaced variables. In the COBOL editor, right-click the line which has the COPY… REPLACING statement, and click
Open
copybook with replaced values. The copybooks opens in a separate tab in the editor in read-only view and shows the replaced variables.
- WCF Service References
- Enable you to add and use WCF services in client applications. WCF Service References automatically set the details that are needed to invoke the service like the service address, the binding, the service name and contract.
- To add a service reference, select your project in Solution Explorer and click
Project > Add Service Reference. Click
Discover to locate the available WCF services.
- XML Documentation Comments
- Insert XML documentation comments immediately before all your classes and methods to provide a description of what they do. Start each line of the documentation comment with
*>>. When you type code IntelliSense shows the classes and methods you can use, the definitions are displayed as tool-tips for your classes and methods.


