Continuous Delivery Workflow
The following diagram summarizes the steps involved in a continuous delivery process. Although the process comprises a number of different activities with integration provided between each activity, you do not have to adopt every activity in the process before you can benefit from significant gains in terms of efficiency, effectiveness, and quality. Instead, you might choose to implement this process one activity at a time, taking advantage of the benefits provided by each activity as you add and integrate it with the others.
Note that because continuous delivery is effectively an extension of the continuous integration process, the first five steps in this diagram are the same as the steps in the diagram presented in Continuous Integration Workflow.
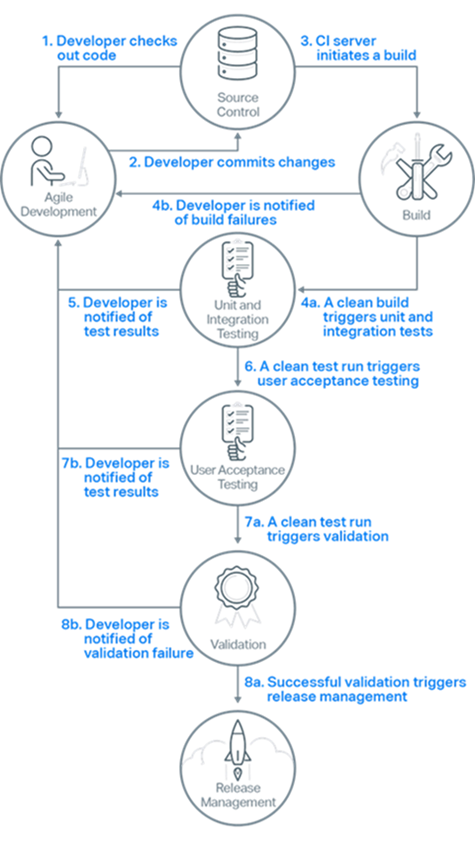
where the numbered steps are as follows:
- Developers check out code into their private workspaces. They then make their changes and test them locally.
- When done, developers check in their changes into the source control repository.
- The CI server monitors the source control repository and when it detects a change it triggers a build of the relevant sources.
- After a successful build, the CI server performs some or all of the following activities:
- makes deployable artefacts available for testing
- assigns a build label to the version of the code that was just built
- notifies the relevant team members that a successful build occurred
- triggers unit and integration testing
At this point, the changes that were checked in at step 2 have been successfully built and a build label has been applied to the source code that was used for the build, meaning that the build could be recreated if necessary.
In the event of a build failure, the CI server sends notifications to the relevant developers who restart the process from step 1 to make the changes necessary to resolve the build errors.
- After the unit and integration testing has taken place, the relevant team members are notified of the test results.
At this point, the changes that were checked in at step 2 have been successfully built and tested, all with little or no manual intervention.
- After the unit and integration testing has completed successfully, the CI server triggers the running of more comprehensive, automated acceptance tests.
- If the acceptance tests all pass, a decision is made whether or not to release.
If the acceptance tests result in failures, the CI server sends notifications to the relevant developers who restart the process from step 1 to make the changes necessary to resolve the test failures.
- If the validation decision is to release, release management is triggered. This results in the built package being released
or deployed to the appropriate environment.
If the validation decision is not to release, the relevant team members are notified and development work continues as normal.
For information on using Jenkins to perform the CI server tasks in the above list, see Using Visual COBOL with Jenkins.