Writing COBOL and PL/I Code Efficiently
- COBOL dialect
- Code snippets
- Comments in COBOL code
- Exploring your COBOL code
- File encoding
- Formatting COBOL
- Navigate to
- Outline view
- Rename data items
COBOL dialect
When the COBOL Language Server is enabled, it automatically sets the source format and the COBOL dialect for your source code. If it is not possible to automatically determine these, the Language Server sets a default Fixed source format and a Micro Focus dialect.
If the COBOL Language Server is disabled or stopped, the editor applies the default source format and dialect from the extension setting in Visual Studio Code. However, if a specific source format or dialect has been set for the active document, Visual Studio Code applies those instead.
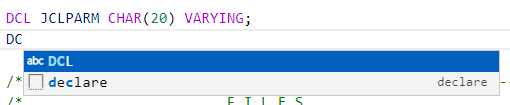
Code snippets
Insert the code constructs for elements of the PL/I or the COBOL language, for example for classes, methods and delegates in .NET COBOL. Snippets are also available for EXEC CICS and EXEC DLI statements.
To insert a code snippet:
- Display a drop-down list of suggested code snippets in your code in one of the following ways:
- Start typing in the
Visual Studio Code editor in your COBOL
or PL/Ifile.
To insert EXEC CICS constructs, start typing cics. For EXEC DLI constructs, start typing dli.
- Alternatively, press CTRL+Space to open the drop-down list with the available code snippets.
The snippets in the drop-down list are prefixed by a square icon.
- Start typing in the
Visual Studio Code editor in your COBOL
or PL/Ifile.
- Use the arrow buttons to select the snippet you want to use from the list, then press
Enter to insert the code.
Commenting out lines of code in COBOL files
- Open a COBOL file in the editor and either click on a line you want to comment, or select a few lines to comment out.
- Click
View > Command Palette, and select
Add COBOL line comment or
Toggle COBOL line comment.
- For fixed and variable source format code, this inserts an * in column 7 of the lines you have selected which comments out the code in areas A and AB.
- For free source format code, this inserts *> at the start of the code on the selected lines.
To remove the line comments, use the Remove COBOL line comment command from the Command Palette.
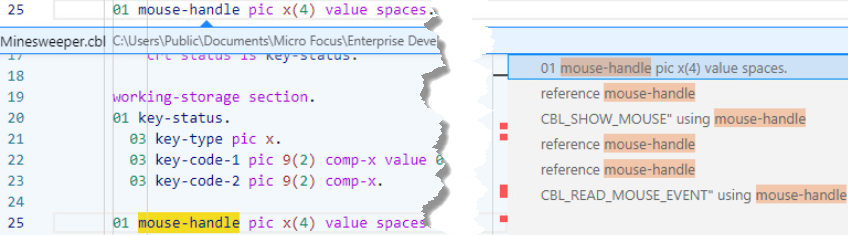
Exploring your COBOL code
Right-click an item in your COBOL and click:
- Go to Definition - positions the cursor on the line where the data item is first defined.
- Go to References - shows a pop-up window with a list of the references. Click on any reference in the list on the right-hand side to navigate
to its location in the code.
- Peek > Peek Call Hierarchy - opens a pop-up window with the list of call hierarchy
- Peek > Peek Definition - opens a pop-up window with the line of code where the data item is defined.
- Peek > Peek References - opens a pop-up window with a list of the occurrences of the data item in the code.
- Find All References - opens the REFERENCES panel and shows a list of the available references. Click on any reference in the list to navigate
to its location in the code.
Note: This command does not work for symbols defined in copybooks that are referenced using COPY... REPLACING.
- Show Call Hierarchy - show the list of call hierarchy in the REFERENCES panel.
File encodings
Visual Studio Code uses UTF8 by default when opening or creating files. To change the encoding used for COBOL files you can add the required encoding to the settings.json file as follows:
{
    "[cobol]": {
        "files.encoding": "utf8bom"
    }
}
When utf8bom is set, the Compiler will recognise the file encoding as UTF8.
Format COBOL code
To apply COBOL formatting to your program:
- Right-click in the COBOL editor, and click
Format Document.
This applies consistent formatting and indentation to your sources.
You can use .editorConfig files either in the workspace folder or in a folder higher up to specify any required formatting settings for your sources. See Sharing Code Style Settings with an EditorConfig File in the Visual COBOL or the Enterprise Developer docs.
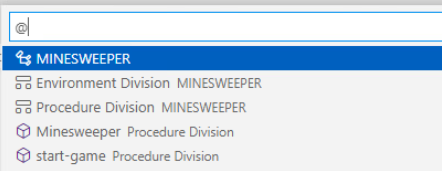
Navigate to
Press CTRL+P and type one of the following symbols in the widget:
- @ - lists items in the document outline such as methods, data items, classes only in the current document. Click on an item in the list to navigate to its location in the code.
- # - lists the symbols in the entire workspace. Divisions and sections are not displayed. Click on an item in the list to navigate to its location in the code.
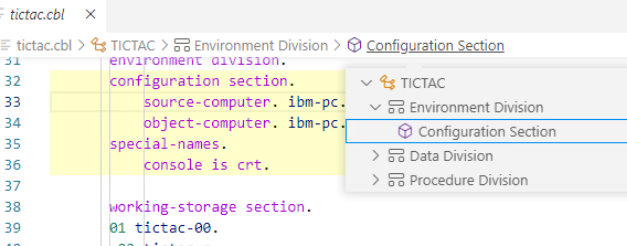
Outline and breadcrumb navigation
Click on sections, paragraphs or methods in the OUTLINE section to navigate easily the code in larger files:
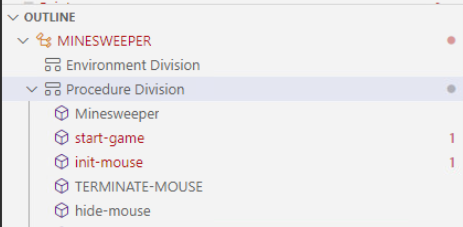
Clicking an item either in the code or in the OUTLINE section shows that item in the breadcrumb at the top of the editor. You can click on items in the breadcrumb to open the navigation panel as well:
Rename data items
To rename a data item:
- Right-click an item in your code, and click
Rename Symbol
This renames all occurrences of the symbol across the files in your workspace, including in copybooks.
Note: Rename only works for files that have been opened and parsed. It does not work for symbols defined in copybooks that are referenced using COPY... REPLACING.