11.2 Deploying Access Manager Containers on On-Premises Linux Servers
You must have the following details to install Access Manager containers:
-
Name of the namespace
-
Release name
-
IP address of the worker node where you will install Administration Console
-
Name of the worker node where you will install Administration Console
Run command kubectl get nodes -o wide to view the name, IP address, status, and additional information of the available nodes. You need these details to run the helm install command.
NOTE:In this release, only a fresh installation of Access Manager is supported. You cannot upgrade from a previous version of Access Manager.
Procedure to Install Access Manager:
NOTE:During the installation, Access Manager creates the following directories for data persistence. These directories get created in the corresponding worker node in which you install the particular Access Manager component. The default location of these directories is /mnt.
-
eDirectory: <release-name>-am-edir
-
Administration Console: <release-name>-am-ac
-
Identity Server: <release-name>-am-idp
-
Access Gateway: <release-name>-am-ag
NOTE:If you decide not to install all Access Manager components, you can specify the details in the values.yaml file before running the helm chart.
For example, if you do not want to install Access Gateway, then specify enabled: false under Access Gateway in the values.yaml file. In this scenario, only Administration Console and Identity Server will get installed.
Similarly, if you do not want to install Identity Server, then specify enabled: false under Identity Server in the values.yaml file. In this scenario, only Administration Console and Access Gateway will get installed.
NOTE:If the node contains multiple IP addresses, Kubernetes schedules the Identity Server and Access Gateway pods in the primary IP address. Therefore, you must ensure that the IP address you want to schedule these pods is the primary interface.
-
Create a namespace under which you will deploy Access Manager.
kubectl create namespace <name-of-the-namespace>
NOTE:Creating a namespace is not mandatory. However, it is recommended to create one to deploy Access Manager. For more information about namespace, see Kubernetes Keywords and Their Usage in Access Manager.
-
Download the Access Manager helm chart (AM_50_HelmChart-1.0.1.tgz) to the Master node from Micro Focus Downloads.
-
Unzip the Access Manager helm chart by using the following command:
tar -xzvf AM_50_HelmChart-1.0.1.tgz
-
Run the helm chart by using one of the following approaches:
-
Approach 1: Specify the required values in the helm install command and run the command. In this approach, you specify the elements and the values after the --set string. The --set string overrides any value configured in the access-manager/values.yaml file.
-
Approach 2: Specify the required values in the access-manager/values.yaml file and run the helm install command.
NOTE:Ensure that you execute the helm install command from the location where you have extracted the helm chart, which contains the access-manager directory.
Approach 1
Run the following command to install Access Manager:
helm install --namespace <name-of-the-namespace> <release-name> access-manager --set global.amconfig.primaryAcIp=<primary-administration-console-IP> --set global.amsecret.adminName=<administrator-username> --set global.amsecret.adminPassword=<administrator-password> --set am-ac.primary.node=<name-of-the-primary-administration-console-node> --set am-ac.secondary.enabled=false
Drafting a Sample Command
Let us consider that the values of the command’s elements are as follows:
Element
Value
Name of the Namespace
development
Release name
my-deployment
NOTE:You must use the following RegEx, which the Helm package manager enforces while assigning a release name:
[a-z0-9]([-a-z0-9]*[a-z0-9])?(\.[a-z0-9]([-a-z0-9]*[a-z0-9])?)*
Primary Administration Console IP
10.10.10.11
You can run the kubectl get nodes -o wide command to view the IP addresses of the worker nodes, and then choose a node to install Administration Console. You must always install Administration Console in one of the worker nodes, not in the master node.
Name of the Primary Administration Console node
kubew1
kubectl get nodes -o wide command also displays the corresponding name of the node in which you have decided to install Administration Console.
Administrator Username
admin
Administrator Password
password
IMPORTANT:Ensure that the administrator username and password meet the Conditions for Creating Administrator Username and Password.
Then the command will look as follows:
helm install --namespace development my-deployment access-manager --set global.amconfig.primaryAcIp=10.10.10.11 --set global.amsecret.adminName=admin --set global.amsecret.adminPassword=password --set am-ac.primary.node=kubew1 --set am-ac.secondary.enabled=false
(Optional) To install Secondary Administration Console, change --set am-ac.secondary.enabled=false to true, and append the following string to the command:
--set global.amconfig.secondaryAcIp=<secondary-administration-console-IP> --set am-ac.secondary.node=<name-of-the-administration-console-node> --set am-ac.secondary.enabled=true
(Optional) If you host the docker images on a separate repository, then append the following string to the command:
--set global.image.repository=<path-of-the-Access-Manager-docker-images-repository>
(Optional) If you use a private registry, then you must also specify the registry’s username and password. Append the following string to the command:
--set global.image.pullSecrets.name=<registry-username> --set global.image.pullSecrets.password=<registry-password>
Approach 2
Configure the values and run the helm chart:
-
Open the access-manager/values.yaml file.
-
Specify the following details:
Element
Value
repository
(Optional)
Path of the Access Manager Docker images
pullPolicy: IfNotPresent
(Optional)
If you are using a private registry, then replace pullPolicy: IfNotPresent with pullPolicy: Always
pullSecrets
(Optional)
If you are using a private registry, then specify the registry’s username and password
primaryAcIp
IP address of the worker node where you will install primary Administration Console
You can run the kubectl get nodes -o wide command to view the IP addresses of the worker nodes, and then choose a node to install Administration Console. You must always install Administration Console in one of the worker nodes, not in the master node.
adminName
Administrator Username
adminPassword
Administrator Password
node
Name of the Administration Console worker node
The kubectl get nodes -o wide command also displays the corresponding name of the node in which you have decided to install Administration Console.
IMPORTANT:Ensure that the administrator username and password meet the Conditions for Creating Administrator Username and Password.
NOTE:To install Secondary Administration Console along with the Primary Administration Console, specify enabled: true under Secondary Administration Console.
-
Run the following command to install Access Manager:
helm install --namespace <name-of-the-namespace> <release-name> access-manager
NOTE:You must use the following RegEx, which the Helm package manager enforces while assigning a release name:
[a-z0-9]([-a-z0-9]*[a-z0-9])?(\.[a-z0-9]([-a-z0-9]*[a-z0-9])?)*
-
-
After you run the helm chart in Step 4, you get a message that Access Manager is installed. However, the Access Manager pods are not yet deployed. The deployment of pods takes about 10 minutes.
Check the progress of the pods deployment by running the following command:
kubectl get statefulset,pods --namespace <name-of-the-namespace>
An output similar to the following is displayed:
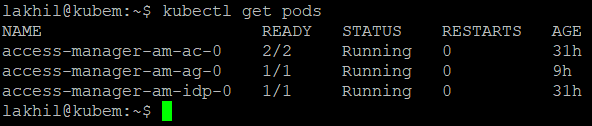
The following table describes the output:
Title
Description
Name
Name of the Access Manager pods
Ready
This column displays the deployment status of the Access Manager containers in the pod.
Explanation of the status:
0/2 - None of the containers in the pod is deployed
1/2 - One out of two containers is deployed
2/2 - Two out of two containers are deployed
Status
After the containers are pulled from the repository, and the configuration starts, the status changes to Running. However, it does not mean that the pods deployment is complete. Check the Ready column to verify the deployment status.
Restarts
Number of time that the pod has restarted
Age
Amount of time that the pod is alive
If the deployment does not complete in 10 minutes, proceed to Checking the Status of Access Manager Resources or Troubleshooting Access Manager Container Deployment.
Proceed to Step 6 if the deployment is complete.
-
Log in to Administration Console. (URL: https://<administration-console-IP>:2443/nps)
-
After installing Access Manager, you must create cluster configurations. See Configuring Identity Servers Clusters and Access Gateways Clusters.