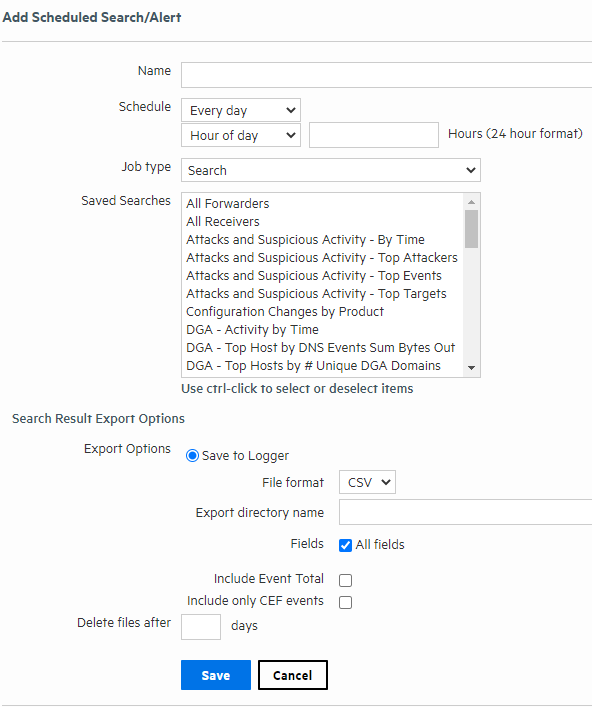
Click Add. A screen like the following is displayed.
Enter the following parameters:
|
Parameter |
Description |
|---|---|
|
Name |
A name for this Scheduled Search. |
|
Schedule |
Set when and how often you want the job to run. For details about these options, see Scheduling Date and Time Options. |
|
Job Type |
Select Search to schedule a Saved Search. Select Alert to schedule a Saved Search Alert. |
|
Saved Searches |
Select from the list of saved searches. If none of the saved searches suits your needs, click the Saved Searches page to define a new search. Then come back to this page to schedule it. For more information about defining a Saved Search query, see Saved Searches. You can use Ctrl+click to select and remove items from the list. Note: When multiple saved searches are specified in one scheduled search job, the resulting file contains the number of hits for each saved search and not the actual events. Note: You can only select one Saved Search for each Alert you configure. Note: Aggregation operators such as chart and top cannot be included in the search query for Scheduled Alerts. Saved searches that contain aggregation operators are not displayed in the selection list after you specify searches you have created for Saved Search Alerts. |
|
Parameter |
Description |
|---|---|
|
Export Options |
Select one of these options:
Tip: The Logger Appliance supports mounting through the user interface. Software Logger uses its filesystem, which can contain remote locations mounted through the operating system. |
|
File Format |
Select a format for the exported search results.
|
|
Remote Location |
This field is only available on the Logger Appliance. Use the drop down to select an existing Remote File System location. If there are none, a link to the Remote File System location page is displayed. |
|
Export Directory Name |
For the Logger Appliance, select the directory where the search results will be exported from the pull-down menu. For Software Logger, enter the directory path in this field, which can be a path to a local directory or to a mount point on the machine on which Software Logger is installed. By default, all saved searches are stored in Tip: To group your searches in folders, indicate a subdirectory in which to store them. If a directory of the specified name does not exist, it is created. If a directory of the specified name exists and the Overwrite box is not checked, an error is generated. If the Overwrite box is checked, the existing directory contents are overwritten. |
|
Title |
(Optional) Enter a title to appear at top of the PDF file. If no title is specified, the default “Untitled” is used. Tip: This field becomes available when you select the PDF output format and select All Fields. |
|
Fields |
A list of event fields that will be included in the exported file. By default, all listed fields are included. Deselect All Fields to the view and edit the list of fields. Click Clear to remove the listed fields. |
|
Chart Type (for PDF only) |
Type of chart to include in the PDF file. You can select from: Column, Bar, Donut, Area, Line, Stacked Column, Stacked Bar. Note: This option overrides the Chart Type displayed on the Search Results screen. (If the search query includes an operator that creates a chart, this field is meaningful; otherwise, it is ignored.) |
|
Chart Result Limit (for PDF only) |
The maximum number of unique values to include on the chart. The default is 10. (If the search query includes an operator that creates a chart, this field is meaningful; otherwise, it is ignored.) If the configured Chart Result Limit is less than the number of unique values for a query, the top values equal to the Chart Result Limit are plotted. That is, if the Chart Result Limit is 5 and 7 unique values are found, the top 5 values will be plotted. |
|
Include Event Total |
Check this box to include an event count with the Saved Search, or a total when more than one Saved Search is specified. |
|
Include only CEF Events |
Check this box to include only Common Event Format (CEF) events. Uncheck the box to include all events in the output. For more information about CEF, refer to the document "ArcSight CEF." For a downloadable a copy of this guide, search for “ArcSight Common Event Format (CEF) Guide” in the Micro Focus Security Community. |
|
Delete Files After |
Specify how many days to keep the saved search results. |
|
Parameter |
Description |
|---|---|
|
Match count |
Number of events that should be matched in Threshold number of seconds for an alert to be triggered. |
|
Threshold (sec) |
Number of seconds within which the “Match count” events should be matched for an alert to be triggered. |
|
Notification destinations are optional. If none is specified, a notification is not sent. |
|
|
Email address(es) |
(Optional) A comma-separated list of email addresses to which the alert will be sent |
|
SNMP destination |
(Optional) An SNMP destination to which the alert will be sent. For more information, see SNMP Destinations. |
|
Syslog destination |
(Optional) A syslog server address to which the alert will be sent. For more information, see Syslog Destinations. |
|
ESM Destination |
(Optional) An ArcSight Manager address to which the alert will be sent. For more information, see Sending Notifications to ESM Destinations. |
|
Transformation Hub Destination |
(Optional) A Transformation Hub address to which the alert will be sent. For more information, see Transformation Hub Destinations. |
Once a Scheduled Search is created, enable it as described in To enable or disable a Scheduled Search or Alert.