Getting Started
Next Steps for Databridge Client
After the installation is complete, you can start using Databridge Client. If you're using Databridge Client for the first time, we recommend that you run it from the Administrative Console. If you plan on using encryption for the communication between the Databridge Client and the Databridge Server on the MCP follow the instruction in the next section.
Using TLS with Databridge
There are several steps to configure data encryption for use with Databridge Clients, outlined below. A Databridge Server can support only one type of connection. If configured to use TLS, then only TLS connections are supported. Likewise, if TLS is not configured, only unencrypted connections are supported.
MCP configuration
Using Security Center MCP Cryptographic Services Manager, create a new key in Trusted Keys -> Other Keys. Fill out the form and create a certificate request to submit to a certificate authority to obtain a certificate. When the certificate has been obtained, install it into the newly created key. Note that the Application and Service entries are concatenated to form a key container id. Thus, if the application is DATABRIDGE and the service is SSLKEY, then the key container will be DATABRIDGE_SSLKEY. Note that the trusted key usercode must be that of the Databridge install.
Edit the DATA/SERVER/CONTROL file located in the Databridge usercode and uncomment the KeyContainer parameter and set it equal the key container created above. Using the example key container from above, the parameter in DATA/SERVER/CONTROL should be:
KEYCONTAINER = “DATABRIDGE_SSLKEY”
The Databridge Server must be restarted for it to use the KeyContainer.
Client configuration
To configure a client to use TLS, the enable encryption parameter must be set to true. The server certificate requires either the CAFile or CAPath parameters to be verified. CAFile is the full path to a file that can be used to verify the server certificate and CAPath references a directory where the server certificate can be verified.
If you're upgrading and want to start using the Client Configurator to customize your relational database, see Switch from User Scripts to the Client Configurator.
If you're upgrading and plan to run the Client from a command line, use your existing Client configuration file. See Appendix C in the Databridge Client Administrator's Guide for information about configuration parameters.
Start and Stop the Client Manager
Start the Service (Windows)
If you checked the "Start Client Manager Service" checkbox, the Client Manager will open on its own. If not, use the following procedure to start the service in Windows.
To start the Client Manager
-
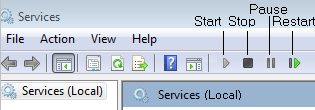
From the Start menu, open your Control Panel, click Administrative Tools, then double-click Services.
-
In the Services window, find and double-click Databridge Client Manager 7.0 in the list.
Databridge Client Manager 7.0 Properties dialog box opens.
-
(Optional) On the Recovery tab of the dialog box, specify that the service is restarted after the first or second failures and click Apply to save your settings.
Note
Do not set more than two failures; if the service fails more than that, a service failure is important to inform you of the problem.)
-
Click the Start button under "Service status".
-
Click OK to save and close the Properties dialog box.
Stop the service (Windows)
Use the following procedure to stop the service in Windows.
To stop the Client Manager
-
Return to the Services window. (See step 1 of Start the Service (Windows) above)
-
Click the square Stop button on the Services toolbar.
Start and stop the daemon (UNIX)
Log in using the user ID you specified for the daemon in step 9c of
Install Databridge Client on UNIX or as a user with root
privileges. If you start the daemon from the root (for example, by
typing su), the daemon automatically assumes the specified user ID.
Make sure that you specified the appropriate environment variables in
the dbdaemon script. If you use Oracle, add the Oracle bin directory
to the PATH. Failing to do this causes the bulk loader scripts to not
find the sqlldr program. Also, add the Oracle lib directory to the
LD_LIBRARY_PATH environment variable or the program
will be unable to find the shared libraries and will not start. For more
information, see Install Databridge Client on UNIX.
Start the daemon by doing one of the following:
-
On Linux and Solaris systems, type:
/etc/init.d/dbdaemon start -
On HP_UX systems, type:
/sbin/init.d
The daemon automatically creates the config and logs subdirectories
in the working directory, and then places a binary configuration file (dbcontrol.cfg) in the config subdirectory. This configuration file is updated each time you add a new data source in the Administrative Console.
If you're using the Administrative Console, see Setting up the Administrative Console).
To stop the daemon (UNIX)
You can start or stop the daemon anytime by manually running the dbdaemon script with the appropriate options (start or stop).
The Batch Console
The Batch Console automates routine Client tasks by allowing command files/shell scripts launched by the Client service to interact with the service. It interprets a source file that contains a set of statements written in a language similar to Visual Basic. These statements can initiate a connection, perform rudimentary tests, and issue console requests, to the service. For example, by using the Batch Console in an end-of-run script that runs daily reports, you can restart the Client after the reports are generated.
To use the Batch Console, you must first create a source file for the Batch Console and place it in the scripts directory of the service's working directory (also referred to as the Client's global working directory). We recommend that you use a file extension that allows you to easily identify this file as a Batch Console source file (for example, .bcs). You can debug this source file by running the Batch Console from the command line, using the source filename (including directory, such as scripts\source_filename) as the first argument of the Batch Console command.
The Batch Console always runs as a background run. Its activity is written to a log file in the current directory. The log filename uses the source filename with the extension .log added to it. For example, if your source filename is sourcefile.bcs, the log file is named sourcefile.bcs.log.
For more information, see Automating Client Operations with the Service in the Databridge Client Administrator's Guide.
Switch from User Scripts to the Client Configurator
If you currently customize your database via user scripts but wish to start using the Client Configurator, you must first run the dbscriptfixup program for each of your data sources. This program updates the client control tables so that you no longer need the user scripts. The dbscriptfixup program also creates a new set of user scripts that are compatible with the Client Configurator for backup purposes.
Note
This task is not time-sensitive and can be completed at any time after installation. We recommend that you get Databridge Client 7.0 running to your satisfaction before you perform this task.
To run dbscriptfixup
-
Create a backup copy of your user scripts.
-
Open a command prompt and change the directory to the working directory of a data source.
-
Run the dbscriptfixup
verifycommand (replacing \<data_source> with the actual name):dbscriptfixup verify <data_source>The dbscriptfixup program performs a read-only review of the user scripts and reports changes you must make to the scripts.
-
Make any changes if indicated by the dbscriptfixup program and then repeat step 2 until you get no errors. You may want to remove or rename problem user scripts and deal with them later.
-
Back up the control tables for the data source to an unload file by typing the following command:
dbutility unload <data_source> <data_source>_control_tables.sav -
Run the dbscriptfixup upgrade command:
dbscriptfixup upgrade <data_source> -
Depending on the results of step 6, do one of the following:
-
If the command succeeded (exit code=0), you can now use the Client Configurator. If you want to verify the process, see the following section.
-
If the command failed (exit code=1), reload your control tables by typing the following command and then replace any user scripts you changed in step 4 to restore the configuration to its previous state.
dbutility reload <data_source> <data_source>_control_tables.sav -
Verifying the results
You can verify that the dbscriptfixup program successfully updated your
control tables by executing a redefine command for the data source
with the –R option. If the command finds no changes in the table
layouts, you can safely use the Client Configurator, knowing that all of
the changes you made via user scripts are preserved.
Start Enterprise Server
You can start Databridge Enterprise Server using the shortcuts installed on the Windows Start menu or from a command prompt session. When you start Enterprise Server from the Start menu, Enterprise Server starts the application with Administrator privileges (required on Windows Vista and Windows 2008). DBDirector will also start Enterprise Server anytime DBDirector receives a connection request from a Databridge Client.
From the Enterprise Server Help menu, you can find instructions for importing sources (upgrades), creating sources, and configuring the program.
Start from the Start menu
-
From the Start menu, click All Programs > Micro Focus Databridge 7.0 > Databridge Enterprise > Configure Enterprise.
This runs Enterprise Server with elevated administrator privileges.
-
When Enterprise Server starts, the Databridge Enterprise window appears.
Start from a command session
Navigate to the directory where you installed Enterprise Server and type the following:
DBEnterprise.exe
For information about command-line options, see the Databridge Enterprise Server Help.