Installing Databridge on Windows
Use this procedure to install or upgrade the following Databridge products:
-
Databridge Client
-
Databridge Enterprise Server
-
Databridge Cluster Aware Service for Windows Clients
Before you install
The installer launches a post install performs additional configuration actions using a series of dialog boxes when you push the "Close" button after the installation completes successfully. One of these dialog boxes allows you to restrict access right to the files in the working directory. The Enable File Security checkbox, when enabled, allows you to specify which users can access the files in the working directory (step 5 of this procedure). File security for Databridge Enterprise Server is automatically enabled during installation. For more information, see Security Guidelines.
If the default location of the Enterprise Server configuration directory in this release is different from what you currently use, you can specify your current configuration directory during the upgrade process or import your configuration files after you upgrade (in Enterprise Server using the import button).
To install Databridge
Note
If you're installing on Windows Server 2012 R2 or newer in CORE mode, you must reboot with CORE mode disabled before installing Databridge.
-
Log on using a Windows account with administrator privileges.
-
To start the installer, do one of the following:
-
From the Windows subdirectory on the release medium choose the
setup.exefile. -
From the download site, click the Windows download link, select a location for the installer files, and then click Next.
-
-
In the Installer wizard, accept the license agreement and click Continue.
-
In the tabbed window, make your selections and then click Install Now:
Tab Description User Information Personalize your install if desired. File Location Specify a location for the Databridge program files (or accept the default). This path is saved as the INSTALLDIR string value for the Windows registry key. Feature Selection Click the Databridge component(s) you want to install and choose Feature will be installed on local hard drive from the popup menu. (Items with a red "x" won't be installed.)
Follow the same procedure if you choose the option to install Japanese Support and Localization.Advanced Specify the type of installation you want and your log file options.
Install to this PC: Installs the selected Databridge components to your computer.
Create an Administrative Install image on a server: An administrative installation does not actually install the product. Instead, it creates an installation image that you can use to deploy Databridge users.
When you create an administrative installation image, an image of Databridge is copied to a network location for later installation to multiple workstations. This network location can be used by deployment tools to access and create packages that are deployed to workstations. Also, end users can perform installations by running setup.exe from this location.
Log file settings: By default an installation log file is created, but this file is deleted if the installation succeeds. (This configuration avoids accumulation of large log files after successful installations.) To save a log file for all installations, including successful ones, click Create a log file for this installation, and uncheck Delete log file if install succeeds.
The installation log file, which provides details about the installation, is saved in the user's temp directory (%tmp%) with a generated name that begins with atm. To open this folder, click the Start menu, type Run in the Search field, click Run to open the Run command window, type %tmp%, and hit enter. -
Click the Install Now button to launch the installer.
When the installer finishes the message “Installation completed successfully” will appear in a dialog box that has a Close button. When you click Close the installer launches a program that performs additional configuration for the Client and Enterprise Server, when either the Databridge Client or Databridge Enterprise Server is selected in the Feature Selection tab of the installer. - Complete the various configuration tasks in these dialogs that are described in the next section.
- After installation is complete, see the Getting Started section of this guide.
Client Configuration Dialogs
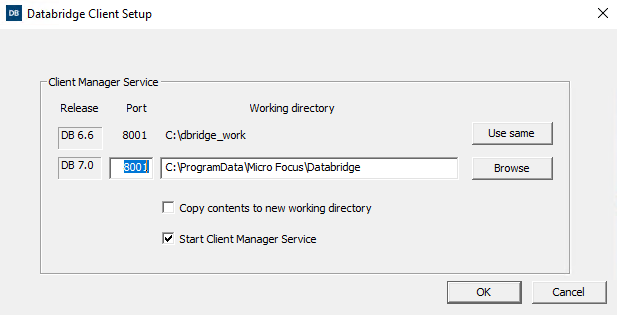
If you are installing Databridge Client software (SQL Server, Oracle, or Flat File) and click the Close button, the Databridge Client Setup dialog box opens. This dialog lists the version (as DB 7.n), the port number for the Client Manager Service and the working directory for older clients that are still installed on the machine. This is followed by a line containing the default port number and working directory (C:\ProgramData\Micro Focus\Databridge) for the 7.0 Client Manager Service.
| Dialog Item | Description |
|---|---|
| Use same | This button allows a user to select the working directory used by the older software, as the 7.0 working directory. This should only be done with previous versions 6.6, 6.5, 6.3 and 6.2 SP1, as the binary configuration files for the services in 6.2 and older versions are not compatible with version 7.0. When upgrading from older releases use the migrate utility to populate the new working directory. |
| Browse | This button allows a user to browse to a directory on the system instead of typing the path in the edit box. To change the drive letter use the edit box to the left of the Browse button. |
| Port | This edit box allows a user to change the Client Manager service’s port number |
| Copy contents to new working directory | This check box allows a user to copy pertinent files from the old working directory to the new one that is displayed in the edit box to the left of the Browse button. Log files, discard files and other files are omitted from the copy. This option makes it possible to keep the old working directory as a backup in case you decide to use older software. |
| Start Client Manager Service | This check box is checked by default to indicate that when the Client Configuration is completed the Client Manager Service will be started. When this happens you will get a confirmation message. |
| OK | Click this button when finished configuring the client to save your selection. The program will then display the next dialog. |
| Cancel | This button cancels the dialog, which will leave the Client partially installed. If Cancel is selected, double-click on updatepath.exe (found in the same directory as setup.exe) and redo the last part of the installation.Alternatively, you should uninstall Databridge and then run setup.exe again. |
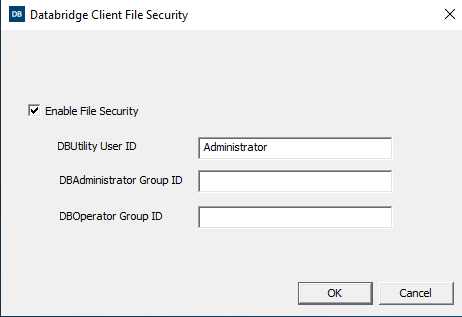
The next dialog is the Databridge Client File Security dialog.
| Dialog Item | Description |
|---|---|
| Enable File Security | Select this check box to set the security attributes for the Client working directory and its files and folders, according to the settings specified in this dialog box. |
| UserID and Optional Groups | When Enable File Security is selected, you can specify a user id or a group that has read-write privileges to all directories and files created by the Client programs (in addition to administrators and the built-in system account, which have these privileges by default). You can specify both individual users and groups if the user is not a member of the group. You can also specify a second group that has read-only privileges to these files. |
| UserID for dbutility | Specify the user ID that has full read-write control of the Databridge Client and its programs. All dbutility commands must be run under this user ID or by a member of the group specified in the DBAdministrator Group string in the Windows registry in the DBOperator Group ID edit box. NOTE: When you install Databridge, this value will be populated with the current ID, which can be changed if needed. |
| DBAdministrator Group | Specify a group name whose members can run the Databridge Client program and have read-write access to files in the Client Manager Services working directory. NOTE: Do not use the group Administators, as this is not an ordinary group. |
| DBOperator Group | (Optional) Specify a group name whose members can view the Databridge configuration and log files but cannot modify them. This selection is useful for groups who are not directly involved in running Databridge, but who need to monitor its operations. |
Click OK to save selections. This will move you to the final Client Setup dialog, which is shown below.
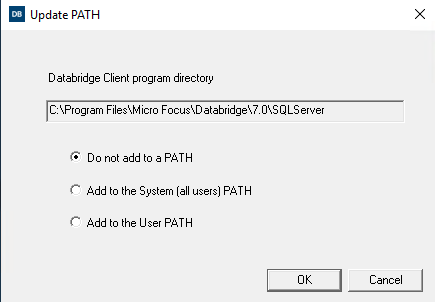
| Dialog Item | Description |
|---|---|
| Do not add to a PATH | By selecting this option users are required enter a fully qualified filename (including the Databridge install directory) each time a Databridge program is run from the command line. Make sure that you enclose the path in double quotation marks, as "Program Files" contains a space. Alternatively, set up command files to run the Client or use environment variables to make this task easier. Choose this setting if you use scripts that specify the full path for the client. |
| Add to the System (all users) PATH | Selecting this option allows anyone on the system to be run Databridge programs by just providing the program name without having to enter the full file specification by adding the Databridge program directories to the Windows Path environment variable. Do not select this option if system security is a concern. |
| Add to the User PATH | Selecting this option the user who installed Databridge to run Databridge programs by just providing the program name. |
Note
The Client Manager Service does not rely on the PATH being set up, it uses fully qualified file names when launching Client runs.
Click OK to save your selections. You will then get a confirmation message if updating the PATH has been selected. If you checked the Start Client Manager Service you will get an additional message informing you that the service was started using the specified port. If you are also installing Databridge Enterprise Server you will then get the Databridge Enterprise Setup dialog.
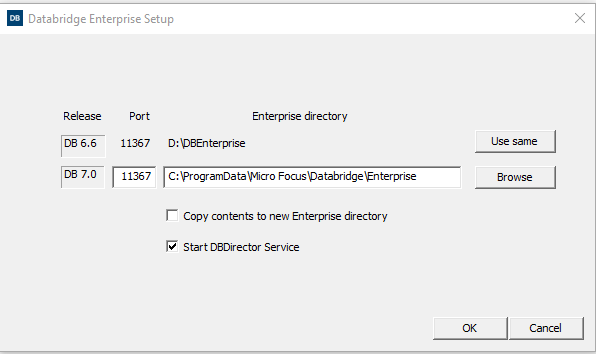
Enterprise Configuration Dialog
This dialog, which is almost identical to the Databridge Client Setup dialog, lists the version (as DB 6.n), the port number for the DBDirector Service, and the working directory for older versions of Enterprise Server that are still installed on the machine. This is followed by a line containing the default port number and working directory (C:\ProgramData\Micro Focus\Databridge\Enterprise) for the Databridge Enterprise Server.
| Dialog Item | Description |
|---|---|
| Use same | This button allows the user to select the working directory used by the older software, as the Enterprise working directory. |
| Browse | This button allows the user to browse to a directory on the system instead of typing the path in the edit box. Change the drive letter in the edit box to the left of the Browse button. |
| Port | This edit box allows a user to change the DBDirector service port number. |
| Copy contents to new Enterprise directory | This check box allows the user to copy pertinent files from the old working directory to the one that is displayed in the edit box to the left of the Browse button. Log files are omitted from the copy. This option makes it possible to keep the old working directory as a backup in case the old software is used. |
| Start DBDirector Service | This check box, which is checked by default, indicates that the service will be started when the Enterprise Server Configuration is completed. A confirmation message will appear when the service is started. |
| OK | Click this button when done configuring Enterprise Server to save your selection. |
| Cancel | This button cancels the dialog, which will leave Databridge Enterprise partially installed. If Cancel is selected, double-click on updatepath.exe (found in the same directory as setup.exe) and redo the last part of the installation. Alternatively, you should uninstall Databridge and then run setup.exe again. |
Note
The post install program that generates all the dialogs described above does not get launched when reinstalling or the repairing the installation. We strongly recommend that you uninstall the software and reinstall it to configure Databridge.
Installing Databridge Client and Enterprise Patches
Open the Windows folder of the Hot Fix, Update, or Service Pack and double-click the file databridge-7.0.bbbb-xxxx-W64.exe (where xxxx can be "hotfix", "update", or "service pack"). Depending on the software you installed, the Client and/or Enterprise Server will be updated.
Note
After the installation is complete, restart the Client Manager service/daemon manually. The service will not automatically start after a patch is applied.
Run the Migrate Program on Windows
If upgrading from any version of 6.6, 6.5, 6.3, 6.2, or 6.1 SP3, you do not need to run migrate or dbfixup when using the service. Use the existing working directory and configuration files and simply start the service.
If you're upgrading from 6.1 (or earlier) to 7.0, use this procedure after you install the Client. (See Installing Databridge on Windows.) The migrate program creates a new Client working directory and files.
To run the Migrate program
-
If you are upgrading from the DBLIB SQL Server client, make sure that you first create an ODBC data source in the Windows Control Panel. Make sure that you create a SYSTEM (not a USER) data source.
-
Open a command prompt and type
migrate. (If you didn't add the Databridge program directory to the system PATH during installation, type the full filename, including path, for migrate and enclose it inquotation marks.)The Migrate program creates a new global working directory for the Client and then a new working directory for each migrated data source. After updating the configuration file parameters and creating the service configuration file, the Migrate program moves user scripts and configuration files from the previous version to these directories. If you selected Enable File Security during installation, Databridge Client's global working directory and all files and folders will be re-created and secured.
-
Respond to the prompts:
-
If you answer
yesand provide the working directory, the Migrate program will find your data sources and migrate them. Skip the remaining steps. -
If you answer
noor do not provide the path to the working directory. Complete the remaining steps.
-
-
Enter the name of each data source and its working directory, using the path with drive letter or a directory and name relative to the current directory.
-
Repeat step 4 for each data source. When you're done, enter an empty line (that is,
<CR>).The Migrate program creates a working directory for each data source. It uses the existing configuration file to create a new binary configuration file in the config subdirectory. It removes deprecated parameters or replaces them with equivalent parameters. It moves user scripts to the scripts subdirectory. The Migrate program then starts the dbfixup program, which upgrades the client control tables and populates the dbscripts directory for each data source.
If the
read_null_recordsparameter is set to True, the Migrate program copies the Null Record files for the data sources to theconfigsubdirectories. It creates a new Client service configuration file (dbcontrol.cfg), which includes updated data sources and any existing scheduling parameters. The Migrate program runs a dbutilitygeneratecommand for each data sources to populate thedbscriptsdirectories.
Note
If you need to re-run the Migrate program for any reason, first delete the global working directory created by the Migrate program.
The Working Directory
Databridge Client's global working directory (also referred to as the service's working directory) is required for the Client to run. The working directory is different from the install directory, where the installer copies all of its files.
The first time you install Databridge Client on UNIX, you must create a working directory. In subsequent installations, you can reuse this directory. For instructions on creating this directory, see Install Databridge Client on UNIX.
The first time you install Databridge Client on Windows, the installer creates the working directory for you in the location you specify. This path is saved as the WORKINGDIR string value in the Windows registry key.
Contents of the Client Working Directory
The working directory contains four subdirectories: config, locks,
logs, and scripts.
| This subdirectory | Contains |
|---|---|
config |
The program-generated file (log.cfg) that keeps track of the current log file and the binary configuration file (dbcontrol.cfg), which the service updates when you make changes to settings in the Client Console. If you export the service configuration file, the exported copy (dbcontrol.ini) is created in this subdirectory. When you add a data source, a backup copy of the service configuration file dbcontrol.cfg is created (dbcontrol.bak). |
lock |
Lock files for each data source. A lock file is created the first time a client run starts. The file is re-opened on subsequent runs and kept open for the duration of the run to prevent additional runs using the same data source. The locks subdirectory is created the first time you start the service (new installations) or when you run the Migrate program (upgrades). |
logs |
Log files (.log) created by the service. A section in the configuration file named [Log_File] allows the user to set the criteria for switching log files. For more information, see Appendix C in the Databridge Client Administrator's Guide. |
scripts |
Command files launched by the service under circumstances such as, when a client run terminates or the BCNOTIFY program on the MCP sends the service a request to run a specific script file. This is a suitable location for saving Batch Console source files that contain the commands for the Batch Console. |
Each Data Source Has a Working Directory
Each data source requires its own separate working directory within the Client working directory. This directory is created automatically when you add a new data source in the Administrative Console or when you upgrade existing data sources using the Migrate program. If you use the command-line client (dbutility), you must create directories for your data sources. When dbutility executes a configure or a define command, it creates the subdirectories (if they don't exist) and a binary configuration file (dbridge.cfg) in the config subdirectory.
The data source working directory contains the following subdirectories:
| This subdirectory | Contains |
|---|---|
config |
The client configuration file (dbridge.cfg). For runs initiated by the Client service, this file must be binary. The command-line client can use a binary or a text file. For details, see Appendix C in the Databridge Client Administrator's Guide. Make sure that you delete any exported text configuration files (dbridge.ini) that are no longer used. These become obsolete when the configuration is updated from the Client Console.The Null record file for the data source and two program-generated files ( log.cfg and trace.cfg), which keep track of the current log and trace files.NOTE: You can make the Client add signon information to the configuration files it creates by running the configure or a define commands with switches to specify your signon parameters. For more information, see Signon Configuration. |
dbscripts |
Files created by the generate command, SQL scripts, bulk loader files (.ctl, .fmt), and command files to invoke the bulk loader. In Oracle, the control files also specify parameters for SQL*Loader. |
discards |
Files created by the client or the bulk loader when they encounter a data record that cannot be processed. If the Client determines that a DMSII record is bad before handing it to the bulk loader, it puts this record in the client discard file as if it was an insert operation. The data is encoded as an SQL stored procedure call using the appropriate stored procedure based on the type of update. Discard files can be executed using the database's query tool:
|
logs |
Client log files. The filename includes a user-configurable prefix followed by a date (yyyymmdd). If multiple log files exist for the same date, a time (_hhmmss) is appended to the end of the filename to make it unique. |
scripts |
User script files |
The data source working directory also contains temporary files. Many of these files aren't removed by the Client and should be deleted periodically. You can safely delete them any time the Client is not running (except during the interval between a redefine command and a reorg command). Temporary files include: trace files; bcp log files; unload files; scripts that are executed by the redefine command; and temporary files used by the Windows client during data extraction. You should use the logmaint utility to get rid of old log files. This utility lets you specify the number of log files you want to keep at a given time.
Installing and Configuring Databridge Cluster
The following procedure will enable an administrator to configure and run Databridge with the service on a clustered Windows Operating system. A cluster database provides scalability and data-sharing between multiple compute nodes. This sharing is designed to offer a fault tolerant database with high availability to minimize the effects of a single failure loss of service within your storage architecture.
If you are attempting to install the cluster feature after an unsuccessful install of Databridge version 7.0 please read Uninstalling the Cluster section prior to your installation.
Configuring the First Node
The First Node that you will be installing the client on should be your active node. If it is not the active node you will need to move the client to the active node.
-
From the Server Manager, expand the tree view features and expand Failover Cluster Manager to list the available clusters. Expanding the cluster to which Databridge will be added, right-click Services and applications in the tree view or select Configure a Service or Application on the right side taskbar to launch the High Availability Wizard.
-
Click Next on the Before You Begin prompt.
-
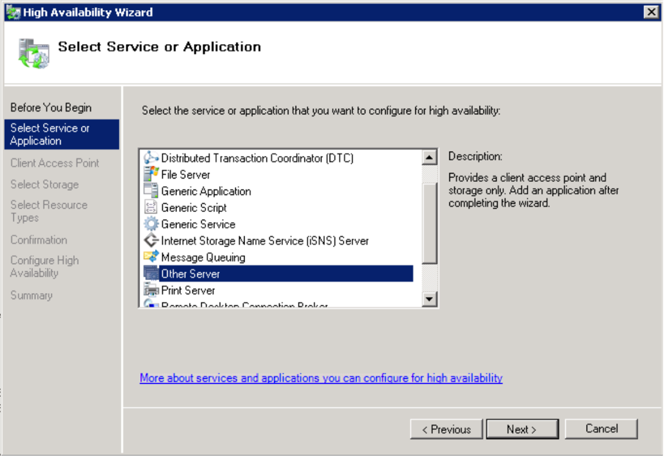
In the Select Service of Application prompt select Other Server from the list and click next as seen in Figure1-1.
-
In the Client Access Point prompt enter your desired name for the cluster and configure accordingly with your IPv4 address in the Address field and click next.
-
When prompted to Select Storage select from the available disks and click next. This disk will be shared by Databridge nodes for configuration and logging.
-
In the Select Resources Type prompt do not select an option and click next.
-
Continue through the Confirmation, Configure High Availability, and Summary prompts and select finish.
-
Install the Databridge Client version on the first node by following the steps in the Installing Databridge on Each Node section.
Installing Databridge on Each Node
Install the Databridge Client version 7.0 and follow the steps below. Ensure the Databridge installation is on the active node per the instructions.
-
Launch the Databridge setup.exe installer.
-
In the Feature Selection tab select the Databridge Enterprise Server (optional), SQL Server and Databridge Cluster to be included in the install.
-
We have selected ("\ProgramData\Micro Focus\Databridge 7.0\Client") for the Client Working Directory and ("\ProgramData\Micro Focus\Databridge 7.0\Enterprise") for the Databridge Enterprise Working Directory.
-
When configuring your Client Service Working Directory andDatabase Folder set the ports (assigned by a network administrator) and select Install Now.
Note
Do not start the service after this step.
Configuring and Installing the Second Node
-
In the second node, launch the Server Manager.
-
From the Server manager right-click the newly created application under the Service or applications tree view from Step 4 on your first node.
-
In the right click menu select Move this service or application to another node and select the second node.
-
Repeat the Installing Databridge on Each Node steps for the second node. Be sure to configure Databridge with the same Feature Selection and Options as done for your first Node.
-
After installing and configuring the client do not start the service. Launch Powershell as an administrator and type the following commands:
import-module failoverclustersadd-clusterresourcetype Databridge70 "c:\Program Files\Micro Focus\Databridge\7.0\clusterdll\dbcluster.dll""Databridge Cluster Resource Type" -
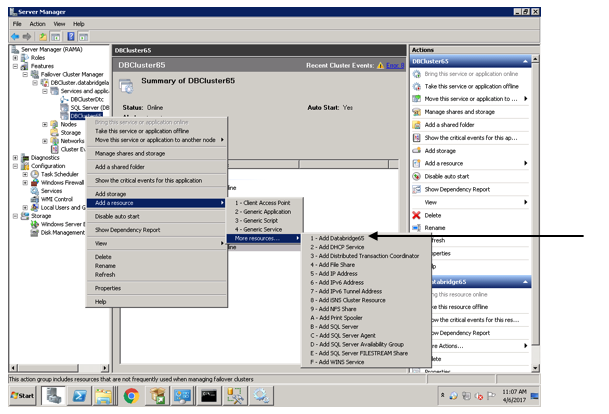
Return to the Server Manager and click on dbcluster70 located under Services and applications in the left hand tree view. Add dbcluster70 to Other Resources.
-
Right-click your created resource and select Properties.
-
Name the Resource added.
-
Navigate to theSet Dependencies tab and ensure the dependency is set on the server name and click insert.
-
Right click your created resource under Other Resources and select the Bring resource on-line option.
Uninstalling Databridge for Cluster Installation
To remove Databridge with the cluster feature, or, if your installation of Databridge with the cluster feature was unsuccessful follow the installation steps outlined to clean your workstation and re-install Databridge with the cluster feature.
-
Using Server Manager, take DBCluster offline.
-
Using Server Manager, delete DBCluster.
-
Using Powershell,
remove-clusterResourceType "Databridge70" -
On each node that is in DBCluster use Windows Explorer to navigate to Windows\cluster and delete
dbcluster.exe. -
From the Control Panel uninstall Databridge version 7.0.