File, Project and IDE Properties and Settings
There is a variety of options and settings that can be configured within Visual Studio. You are going to explore a few of them in this tutorial. Do not skip this section, as you are going to make at least one important configuration change in the project's properties.
Exploring the IDE settings
- In Visual Studio, click .
- Expand
Projects and Solutions and click
Locations.
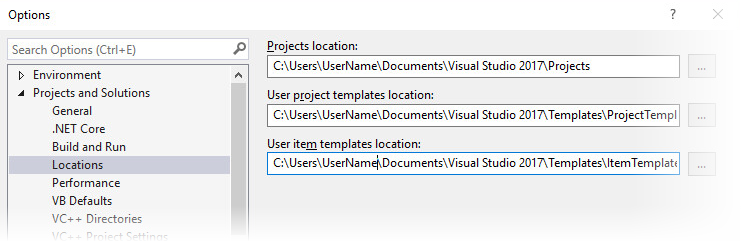
The Projects location field defines the default location for storing new projects. You can change this path if you are using a different working folder.
- In the Options dialog box, expand Environment and click Fonts and Colors.
- Ensure Show settings for is set to Text Editor.
- Look in the list in the Display Items pane and note the COBOL, BMS and JCL items whose font and color you can change.
- In the
Options dialog box, expand
Text Editor and then expand
Micro Focus COBOL.
You can use the settings in this section to configure features of the editor such as tab size, COBOL margins, some syntax checking rules, and others.
From the Quick Actions page for the editor properties, you can manage what quick actions will be enabled in the editor.
From the Advanced page you can fine tune the behavior of some features of the editor such as background syntax checking and outlining. You can also disable features that are not necessary which could be useful if you are working with a large code base.
Configuring the COBOL editor
You can configure how the editor wraps the code around the margins, or how it indents the code in the different COBOL areas, or how the Home and End keys move the cursor in the different areas. You can also choose the style of the ruler, and change the colors of the text and the margins. You can change the default editor settings and experiment with the new behavior by opening one of the COBOL programs in the editor.
You can now experiment by changing the following settings:
- Click
Tools > Options > Text Editor > Micro Focus COBOL > Margins - modify the settings for the
Smart edit mode which controls the word wrapping and the indentation in the different COBOL areas.
When there is a COBOL file opened in the editor, you can use
 ,
Toggle COBOL Smart Edit Mode, in the COBOL toolbar to turn on or off the smart editing mode. To open the COBOL toolbar, click
View > Toolbars > COBOL.
,
Toggle COBOL Smart Edit Mode, in the COBOL toolbar to turn on or off the smart editing mode. To open the COBOL toolbar, click
View > Toolbars > COBOL.
- On the same page in the IDE options, change the behavior of the Home and End keys.
- On the same page in the IDE options, check Show the ruler and check Mainframe style.
Project Properties
The properties you set at project level apply to all files in the project. Here's how to access them:
- Select the
BankDemo project in Solution Explorer and click
.
This opens the tabbed property pages for the project in the main Visual Studio window.
- Click the
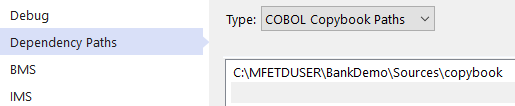
Dependency Paths tab.
Type should be set to COBOL Copybook Paths. Note that this has C:\MFETDUSER\Bankdemo\Sources\copybook set. This is the folder where the IDE is going to look for the copybook files required by this project.
- Click the BMS tab.
- Note the following paths in the
Output section:
- C:\MFETDUSER\Bankdemo\Sources\copybook in the Copybook Output Path field
- C:\MFETDUSER\BankDemo\System\loadlib in the Load Module Output Path field
These are the paths for the copybooks and load modules that will be produced from the BMS files during the build.
- Click the
COBOL tab.
- Note that the COBOL dialect is set to Enterprise COBOL for z/OS for the entire project.
-
Important: You need to set Character set to EBCDIC. You may need to scroll the COBOL property page to the right or expand the IDE to see the setting.
- Note that the Output path is set to C:\MFETDUSER\BankDemo\System\loadlib. This is where the build will produce the application executables.
- See what other directives have been set in the Additional Directives field.
- Build Settings is a read-only field that shows all directives that are set on the project.

- As you have made changes to the project properties, click in order to keep them.
File Properties
The individual source files can have their own local properties which override the project settings. To check a file's properties:
- In Solution Explorer, right-click
BBANK10P.cbl and click
Properties.
This opens the COBOL-specific file properties.
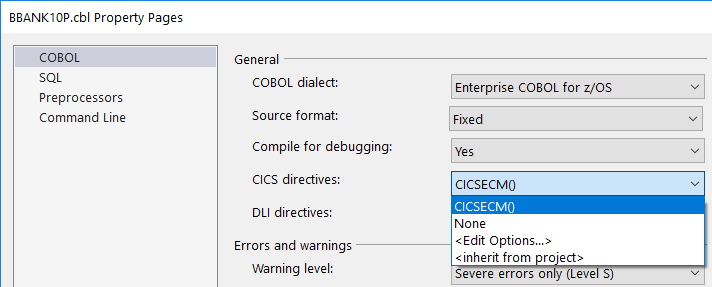
Notice that CICS Directives is set to CICSECM(). This has been set when you added the file to the project or performed a directives scan of the COBOL sources in your project.
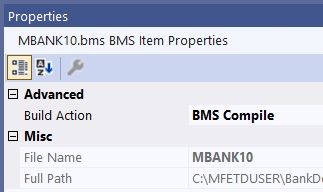
- In Solution Explorer, click the .bms file in your project.
- Click the
View main menu and then click
Properties Window.
This opens the Visual Studio properties window. Note that the Build Action is set to BMS Compile which means the build invokes the BMS Compiler.
- Similarly, check the properties for the .dat, the .jcl and the .cpy files and see the .dat file and the copybooks will not be compiled.