Making the Most Out of the PL/I Editor
The following features in the PL/I editor can help you be more efficient in writing PL/I:
Syntax error reporting
The code you type is parsed continuously to identify errors. The errors are underlined with red squiggly lines and any unknown objects are underlined with blue squiggly lines. To view more information about an error, you can hover over the error in the editor to see an error message tool-tip.
By default, the errors do not appear in the Error List window. To configure the window to show them, go to Tools > Options > Text Editor > PL/I and set Show background syntax check errors in the Error List to True.
Using IntelliSense suggestions
The Visual Studio IntelliSense feature provides basic support for writing PL/I code. You can use IntelliSense to complete words and to get parameter keywords.
To get suggestions that are in context with what you are typing in your code, press Ctrl + space. For example, if you are typing a PL/I statement and press Ctrl + space, the list of applicable items appears, with the best match for the statement you are typing highlighted in the IntelliSense pop-up. Any related keywords and templates using the highlighted statement also appear in the pop-up list. Pressing Ctrl + space inserts single matches in the code automatically.
IntelliSense only offers assistance for the variables and methods that are in scope based on the current cursor position. For variables and methods with ambiguous names, the string inserted is disambiguated.
Inserting comments
To automatically insert comments in your PL/I source, click on a line of code in the editor or make a selection such as within
the current line or across a few lines. Then click
Comment out the selected lines,
 , in the Text editor toolbar. This comments out the entire line or the selection, respectively.
To remove comments from a line of code or from a selection in the code, click
Uncomment the selected lines,
 .
.
Displaying the margins
The editor can automatically set margins based on the project type, such as PL/I mainframe subsystem projects that are configured to use -cics, -ims, or -mvs as the mainframe system with which the programs operate (see the System setting in the PL/I Compile Settings section of the PL/I tab in the project's properties). The margins should also be enabled from the IDE properties - click Tools > Options > Text Editor > PL/I > Margins.
You can configure the position of the margins on the
PL/I tab in the project's properties. Click
Show Advanced Directives,
 , to display the advanced options, and use the
Specify margins (-margins) field to configure the margins as required.
, to display the advanced options, and use the
Specify margins (-margins) field to configure the margins as required.
Opening include files
You can open include files directly from the editor - right-click the line of code that contains the %include statement and click Open File. This opens the include file in a separate tab in the editor.
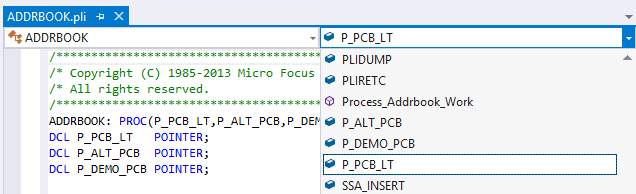
Types and Members drop-down
You can easily navigate the code using the types and members drop-down control as follows:
See the following sections for details on how to customize the editor.