Accessing External Applications
When you are working in AcuBench, it may be useful to have easy access to external applications, like Windows Explorer, or a calculator. The Tools tab of the Customize interface allows you to create a link to such external applications. Once the link has been made, you can launch the associated application from a menu within the workbench, or by adding a launch button to any toolbar.
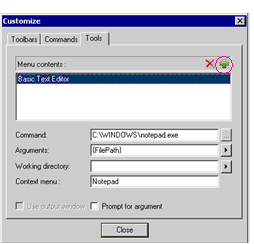
Add a link to an external application as described below:
- Click the New button in the upper right of the Menu contents list box.
- In the empty field created for the new list item, enter the name that you want to associate with the application. This is the name that is added to the Tools > Launch Tools menu and the text of the tool tip that is displayed when the mouse pointer is held over the command icon on the toolbar.
- Enter the full path of the external executable that you want to access from within AcuBench in the Commands field, or use the browse button to the right of the field to navigate to the executable.
- The Arguments field is used to specify switches or parameters to apply to the executable each time the application is started. You have
the choice to leave this blank or enter any options that you want to pass.
The arrow button to the right of the field expands to provide the following set of default arguments:
Argument Description File Path {FilePath} The full path name of the files that arecontained in the current project or folder. File Directory {FileDir} The directory for the files contained in the current project or folder. File Name {FileName} The name of the selected file or files. Current Directory {CurDir} The current directory containing the AcuBench application. Workspace Path {WkspPath} The full path name for the current workspace. Project Directory {ProjectDir} The directory containing the current project. Project Name {ProjectName} The name of the current project. The %directory_code% AcuBench macros can also be used in this interface.
- If applicable, enter the full path to the directory that the applicationwill use as its working directory in the Working Directory field.
By default, the working directory is the same as the location of the application. Three of the tokens used in the Arguments field can also appear in the working directory field. These are {FileDir}, {CurDir}, and {ProjectDir}.
- Click Close to save your changes and exit the Customize interface.
Note that text in the Context menu field is not used at this time.