Creating a Project
When you create a project, AcuBench creates the infrastructure for the project, including a set of folders (working directories). Optionally, you can create a project that includes a templated source file, a templated screen, and a program structure file (.psf). You can also create a project with object files directed to a remote server. For more information about projects, see Projects.
Once a project is created, you can change the name of the project, but you cannot change the name of the project's working directory or the names of any of the sub-directories.
Before you create a project, you need to decide whether to add the new project to the current workspace (if a workspace is open) or to create it in a new workspace. If you want to work on the new project concurrently with another project, open the workspace that contains that project before creating the new project.
Create a new project using the following procedures:
- Click New from the File menu, and then click the Project tab.
This opens the New dialog window with the Project tab selected.
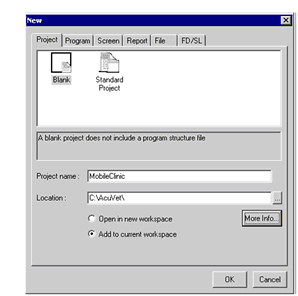
- Click a project template.
The Standard Project template creates a project and a program. The program, in addition to the program structure file, gets a standard graphical screen.
The Blank template creates only an empty project structure, to which you can add programs and files.
- Enter the name of the project in the Project name field. By default, the project directory is given the same name as the project, as shown in the Location field.
Note that you can change the default path, and that multiple projects can reside in the same directory. Also note that the only files that must reside in this project directory are the workspace project file (.pjt) and the workspace information file (.wif).
- Select one of the two radio buttons near the bottom of the Project tab to either include the project in the current workspace (this option is disabled if no workspace is open), or to create the project in a new workspace.
- If you want to change the name of any of the standard project directories, click the More Info button and make the desired changes in the Project Information dialog box.
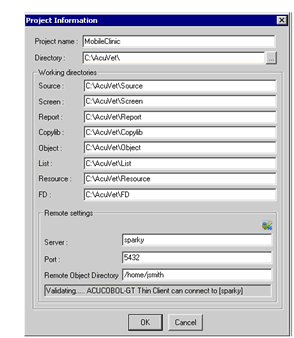
This dialog box is populated with information based on the project name that you have entered and the default project directory structure defined in the Tools > Options > Environment > Prefix interface. Information that you change in the Project Information dialog box applies only to the individual project. To make changes to the default directory structure established for any new project that you create, use the Tools > Options interface, as described in Prefix Options.
In the top portion of the Project Information dialog box, you can change the name of the project and the project directory. In the middle portion of the dialog box, you can change the default location for each of the file types (source, screen, report, and so on) associated with an AcuBench project.
- If you want your project's object files to reside on a remote server, use the remote settings area of the Project Information dialog box to enter the server name, port number, and remote object directory for your project.
You can use the Validate button (located at the upper right corner of the remote settings area) to determine whether AcuBench can make the remote connection. If the remote server is up and AcuConnect is running, the validation should succeed. If it does not succeed, you will receive one of the following error messages:
- ACUCOBOL-GT cannot connect to servername. This may indicate, among other things, that the server name that you entered is invalid, that you do not have a network connection, or that the server is not listening on the specified port.
- remotedirectoryname is invalid, or does not exist. This may indicate that the specified directory does not exist, that you are using incorrect directory syntax, or that you do not have permissions to access the directory.
- Click OK to create the project.
To add files and resources to your project, click the Add/Remove Files button on the Project toolbar. See Adding Files to a Project.
It is possible, however, to save information about a single project in a project file (.pjf). Just right-click the project icon and select Save Project - projectname. You can then move or copy the project to a new workspace using the File > Open Project command).