10.2 Upgrading a Large Filr Deployment

Before upgrading a Filr deployment, you must ensure certain requirements are met. See Before You Upgrade! and then complete the instructions in the following sections in order:

Before You Upgrade!

Failure to comply with the following critical points could result in a non-functional Filr system.

Critical Point

Details

  • Review the Release Notes and Limitations

  • Check the Release Notes for any upgrade issues and Upgrade before you start the upgrade process.

  • Plan the upgrade order and follow it.

  • You must upgrade the appliances in order of dependency upon each other.

    1. Shut Down Order: Prepare a list of your appliances that defines the correct shut down order:

      • Filr: All Filr appliances must be shut down first.

      • Filrsearch: Next, you shut down the Filrsearch appliances.

    2. PostgreSQL: If you are using PostgreSQL appliance (shipped with Filr), then ensure it is running.

    3. Deployment Order: Prepare a second list of that defines the correct upgrade and deployment order:

      • Filrsearch: You must upgrade and deploy the Filrsearch appliances before the Filr appliances.

      • Filr: When the upgraded Filrsearch appliances are up and running, upgrade and deploy the first Filr appliance. Then upgrade and deploy the additional Filr appliances.

    4. If there are things you need to remember about individual appliances, include those reminders in the appropriate list.

    5. Use the shut down list as you complete the steps in Upgrading the VMs.

    6. Use the upgrade list as you complete the steps in Deploying the Upgraded (Replacement) VMs.

  • Ensure that the VM host has enough unformatted disk space.

  • The VM host server must have enough unallocated disk space to contain the following disks for each appliance. This is only temporary because after the upgrade completes, old appliances can be deleted and their disk space reclaimed.

    • System Disk (/): This is created automatically as you deploy the downloaded software.

      Size is 50 GB per appliance.

    • Disk 2 (/vastorage): You make a copy of each old appliance’s Disk.

      Size needed equals the total size of all disks to be copied.

    • Each Disk 3 (/var): You create this disk for each appliance in conjunction with the upgrade process.

      Size recommendation for Filr is 4 GB plus 3 times the RAM allocation for each appliance being upgraded.

    NOTE:The existing /vashare mount point is used by the upgraded Filr appliances. No new disk space is required for upgrading.

  • Make sure that existing appliances are running version 4.3.1.2 with the latest patches.

  • Make sure that all appliances are running version 4.3.1.2 with the latest patches applied.

    See Managing Field Test Patches in the Filr 5.0 Administrative UI Reference.

  • The earlier version of Filr must be upgraded to Filr 4.3.1.2 for upgrading to Filr 5.0.

  • If the existing appliances are running version is 4.3.1.1, then before upgrade, you will be prompted to enter the CIFS vashare details.

  • Remove all VMware Snapshots

  • Before copying Disk 2, make sure to remove all VMware snapshots so that the /vastorage disk has the correct disk file and latest configuration settings.

  • Make sure that upgraded appliances meet the system requirements.

  • Do not attempt unsupported path migrations.

  • No Cross-platform: You cannot upgrade from one virtualization platform to another. You can only upgrade VMware to VMware, and so forth.

  • No Mixed Versions: All of the Filr and Filrsearch appliances in an expandable deployment must be upgraded to the same version.

  • No Cross-Deployment-Types: You can only upgrade small to small, non-expandable to non-expandable, or expandable to expandable.

    If you have a small or non-expandable deployment, and you need an expandable deployment, you must either install a new system or contact Micro Focus Consulting to assist you with the migration.

  • Appliances with two network adapters.

  • You should manually add the additional network card on successfully upgrading the appliance.

  • Plan when to upgrade.

  • Filr services must be offline during the upgrade.

    1. Schedule the upgrade for a block of time that is least disruptive from a production standpoint.

    2. Notify Filr users about the upgrade.

After ensuring that you have met the prerequisites and cautions above, complete the instructions in the following sections in order.

10.2.1 Understanding the Appliance Upgrade Process

The process of upgrading Micro Focus appliances is illustrated in Figure 10-1.

Figure 10-1 Overview of the Appliance Upgrade Process
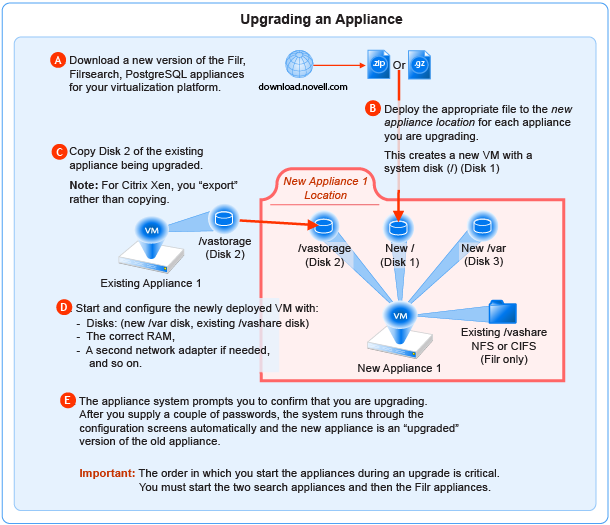
NOTE:

  • If you are using PostgreSQL DB shipped with Filr, then the order in which you start the appliances during an upgrade has to be

    1. PostgreSQL

    2. Lucene (Search Appliances)

    3. Filr Appliances

  • If you are using an external database, the order in which you start the appliances during an upgrade is critical. You must start the two search appliances and then the Filr appliances.

10.2.2 Downloading and Preparing Software for the Upgrades

Download and prepare the software for your virtualization platform as described in the following sections:

VMWare

  1. Download the Filr software shown below to your management workstation.

    IMPORTANT:Registration with Micro Focus is required to receive an email with a software-download link.

    Appliance Type

    Filename

    Filr

    Filr.x86_64-version.ova.zip

    Search

    Filrsearch.x86_64-version.ova.zip

    PostgreSQL

    PostgreSQL-version.ova.zip

  2. Extract each .ova.zip file on your management workstation until an ApplianceType-version folder appears.

  3. Launch the vSphere Client and navigate to the datastore where you plan to host the upgraded VMs.

  4. Create a folder for each appliance that you plan to upgrade.

    Name each folder with a name that is easily associated with (but not the same as) the VM name of the associated appliance being upgraded.

  5. Continue with Copying Each Appliance’s /vastorage Disk (Disk 2).

Hyper-V

  1. Log in to the Hyper-V host server either locally or from a remote workstation using Remote Desktop.

  2. Download the Filr software shown below to the location where you plan to host your upgraded VMs.

    IMPORTANT:Registration with Micro Focus is required to receive an email with a software-download link.

    Appliance Type

    Filename

    Filr

    Filr.x86_64-version.vhdx.zip

    Search

    Filrsearch.x86_64-version.vhdx.zip

    PostgreSQL

    PostgreSQL-version.vhdx.zip

  3. Extract each .vhdx.zip file in the directory where you downloaded it until an ApplianceType-version.vhdx archive file appears.

  4. Create a new directory for each virtual machine you are upgrading.

    As a best practice, name these directories with names that are easily associated with, but not the same as the VM name of each appliance being upgraded.

  5. Move the filr-version.vhdx archive file to the first Filr appliance-type folder and then copy the file to the remaining Filr appliance type folders.

  6. Move the filrsearch-version.vhdx archive file to the first Filrsearch appliance-type folder and then copy the file to the second Filrsearch folder.

  7. Continue with Copying Each Appliance’s /vastorage Disk (Disk 2).

Xen

  1. Log in to the Xen VM host server either locally or from a remote workstation.

    If you are connecting from a remote Linux workstation, use the following command:

    ssh -X root@host_ip_address

    The -X in the command in required for the GUI installation program upon which the steps in this section are based.

  2. Download the Filr software shown below to the Xen VM host server in the location where you plan to host your upgraded VMs.

    IMPORTANT:Registration with Micro Focus is required to receive an email with a download link.

    NOTE:Begining with Filr 5.0, any .tar.gz files will not be shipped. Instead, the images will be provided.

    Appliance Type

    Filename

    Filr

    Filr.x86_64-version.xen.qcow2

    Search

    Filrsearch.x86_64-version.xen.qcow2

    PostgreSQL

    PostgreSQL-version.xen.qcow2

  3. Copy and rename the ApplianceType-version directories until you have one directory for each appliance that you are upgrading.

    IMPORTANT:Only change the directory names.

    Do not change the names of the .qcow2 or .xenconfig files within the directories that you have copied and renamed.

    For example:

    1. Rename the Filr-version directory to filr-1-30-192.168.1.61.

    2. Copy the filr-1-30-192.168.1.61 directory and rename it to filr-1-30-192.168.1.62, and so on until you have a directory for each appliance you are upgrading.

    3. In a similar manner, copy and rename the Filrsearch-version directory until you have two Filrsearch appliances.

  4. Continue with Copying Each Appliance’s /vastorage Disk (Disk 2).

Citrix Xen

  1. On a workstation with Citrix XenCenter installed, download the Filr software shown below.

    IMPORTANT:Registration with Micro Focus is required to receive an email with a download link.

    Appliance Type

    Filename

    Filr

    Filr.x86_64-version.xva.xva

    Search

    Filrsearch.x86_64-version.xva.xva

    PostgreSQL

    PostgreSQL-version.xva.xva

  2. Extract each .xva file on your management workstation until an ApplianceType-version folder appears.

  3. Continue with Copying Each Appliance’s /vastorage Disk (Disk 2).

10.2.3 Copying Each Appliance’s /vastorage Disk (Disk 2)

IMPORTANT:

  • VMware requires shutting down an appliance before copying a disk.

    This doesn’t mean that the entire service must be down while disk copying takes place.

    If you have a Filr-clustered deployment, you can minimize service interruption by shutting down one Filr or Filrsearch appliance, copying the disk, restarting the appliance and continuing with the next appliance.

  • On Citrix Xen you export rather than copying Disk 2.

Copying each appliance’s disk is at the heart of the upgrade process because it uses the corresponding old appliance’s configuration settings on Disk 2 to create an upgraded version of the appliance with minimal input on your part.

Disk copying can take a while, depending on disk size and the VM host environment.

Therefore, we recommend keeping service downtime to a minimum by making the copies while the Filr system is still running.

  1. Using the tools provided by your hypervisor, copy the /vastorage (second disk) to its associated folder or directory that you created for your upgraded appliances in Downloading and Preparing Software for the Upgrades.

10.2.4 Upgrading the VMs

Shutting Down the Appliances

  1. Shut down all of your existing appliances in the shut down order that you identified earlier:

  2. Continue with the instructions for your VM platform:

Upgrading VMware VMs

Complete the steps in Table 10-1 for each appliance that you are upgrading

Table 10-1 Upgrading a VMware VM

Page, Dialog, or Option

Do This


1 - Launching the vSphere Client.

  1. On your management workstation, start the vSphere Client.

vSphere Client

2 - Deploying the OVA Template and naming the VM.

  1. Click File > Deploy OVA Template.

Deploy OVA Template

  1. Click Browse.

Open

  1. For the appliance type you are deploying, navigate to the contents of the folder that you downloaded and extracted in Downloading and Preparing Software for the Upgrades.

  2. Select and open the.ova file.

Deploy OVA Template

  1. Name the appliance with the same name of the folder that you created for this upgraded appliance in Step 4.

  2. Click Next.

  3. Choose the datastore and folder were you copied the appliance’s Disk 2.

  4. Click Next to accept the default for the disk format.

  5. Do not select Power on after deployment.

  6. Click Finish.

    The boot disk is created and the appliance is deployed as specified to this point.

3 - Editing the VM settings.

vSphere Client

  1. In the vSphere Client, right-click the VM you just deployed and select Edit Settings.

    The Virtual Machine Properties dialog displays.

Virtual Machine Properties

  1. Set the Memory and CPU settings to match the appliance you are replacing, or increase them as planned.


4 - Configuring Disk 2 (/vastorage)

Virtual Machine Properties

  1. Click Add.

Add Hardware

  1. Select Hard Disk, click Next and select Use an existing Virtual disk.

  2. Click Next > Browse, then navigate to and select the copy of Disk 2 that you made for this appliance.

  3. Click Next > Next > Finish.


5 - Adding and Configuring Disk 3 (/var)

Virtual Machine Properties

  1. Click Add.

Add Hardware

  1. Select Hard Disk.

  2. Click Next > Next.

  3. Adjust the Disk Size to the same size as disk 3 (/var) on the appliance you are replacing.

  4. Under Disk Provisioning, select either:

    • Thick Provision Eager Zeroed

      or

    • Support clustering features such as Fault Tolerance

    Depending on the VMware version that you are running.

  5. Under Location, select Specify a datastore or Datastore cluster

  6. Click Browse.

  7. Select the datastore and folder for this appliance.

  8. Click OK.

  9. Click Next.

  10. Under the Virtual Device Node section, select SCSI.

  11. Click Next.

  12. Click Finish.

  13. If you need to add network adapters, continue with 6 - (Optional) Adding a Network Adapter.

    Otherwise, click OK, return to 2 - Deploying the OVA Template and naming the VM., and deploy the next appliance that you have planned for

    When all of your planned appliances have been deployed, continue with Deploying the Upgraded (Replacement) VMs.


6 - (Optional) Adding a Network Adapter

You can add a network adapter if your Filr deployment accesses a separate network for one or more of the following reasons:

  • Appliance administration.

  • NFS mount or CIFS access to the /vashare mount point.

  • Security of Memcached.

    IMPORTANT:Bonding or teaming NICs is not supported with Filr.

Virtual Machine Properties

  1. Click Add.

Add Hardware

  1. Select Ethernet Adapter.

  2. Click Next.

  3. Under Network Connection, select the secondary network associated with the Filr installation.

  4. Click Next > Finish > OK.

vSphere Client

  1. Repeat the steps in this table from 2 - Deploying OVA Template until all of your planned appliances have been deployed, then continue with Deploying the Upgraded (Replacement) VMs.

Upgrading Hyper-V VMs

Complete the steps in Table 10-2 for each appliance that you are upgrading.

Table 10-2 Upgrading a Hyper-V VM

Page, Dialog, or Option

Do This

1 - Open Hyper-V Manager.

Hyper-V Host Server

  1. Open the Hyper-V Manager.


2 - Create a new VM.

Hyper-V Manager

  1. In the left pane, right-click the server where you have planned to create the new virtual machine, then click New > Virtual Machine.

    The New Virtual Machine Wizard displays.

  2. Click Next.

Specify Name and Location

  1. Name the appliance with the name of the directory that you created for it in Step 4.

  2. Click Next.

Specify Generation

  1. Make sure that Generation 1 is selected.

  2. Click Next.


3 - Specify memory

Assign Memory

  1. In the Startup RAM field, specify the same amount of memory (in MB) of the appliance that you are replacing, or increase the memory as planned.

  2. Click Next.

4 - Assign network adapter

Configure Networking

  1. On the Configure Networking page, select the networking card for this VM.

  2. Click Next.


6 - Identify the system disk

Connect Virtual Hard Disk

  1. Select Use an existing virtual hard disk.

  2. Browse to and select the .vhd that you created for this appliance.

  3. Click Open.

  4. Click Next.

Summary

  1. Click Finish.

    The VM is created and appears in the list of Virtual Machines.


7 - Specify processors

Hyper-V Manager

  1. In Hyper-V Manager, right-click the VM that you just created.

  2. Click Settings.

Processor

  1. Click Processor.

  2. In the Number of virtual processors field, specify the number of processors for this VM.

  3. Click Next.


8 - Use existing copy of hard Disk 2 (/vastorage).

Settings for VM on Host Server

  1. Add the copy you made of Disk 2 to this VM.

  2. When you have added the disk, review the VM summary information and click Finish.


9 - Add hard Disk 3 (/var).

Hyper-V Manager

  1. In Hyper-V Manager, right-click the VM that you just created.

  2. Click Settings.

  3. Create a new blank virtual disk the same size as disk 3 on the appliance you are upgrading.

Summary

  1. Review the summary information.

  2. Click Finish > OK

10 - (Optional) Add a Network Adapter

  1. If the appliance you are upgrading has a secondary network adapter, add that now.

Hyper-V Manager

11 - Repeat until all VMs have upgraded copies

  1. Repeat the steps in this table until all of your planned appliances have been deployed, then continue with Deploying the Upgraded (Replacement) VMs.

Upgrading and Deploying Xen VMs

IMPORTANT:Unlike the other virtualization platforms, which you power on and deploy separately from the upgrade process, upgraded Xen VMs power on automatically when the upgrade process completes. You must then deploy the appliance before continuing with the next one.

Therefore, it is critical that you make sure to follow the deployment order that you identified earlier.

Complete the steps in Table 10-3 for each appliance that you are upgrading and deploying.

Table 10-3 Upgrading and Deploying a Xen VM

Page, Dialog, or Option

Do This

1 - Launch the installer.

Terminal prompt on Xen VM Host Server

  1. Run the following command to launch the GUI configuration menu:

    virt-manager

    NOTE:The vm-install command is deprecated from SLES 12 releases.

Create a new virtual machine

  1. Click File > New Virtual Machine.

    The Create a new virtual machine wizard is displayed.

  2. Select Import existing disk image.

  3. Click Forward.

Storage path and Operating System

  1. Browse and select the existing disk image.

  2. Select SUSE Linux Enterprise Server 12 SP4.

  3. Click Forward.

Choose Memory and CPU settings

  1. Set the amount of memory (in MB) to match that of the VM you are upgrading.

  2. Specify the CPUs to match the number of the VM you are upgrading.

  3. Click Forward.


2 - Name the VM.

Name of Virtual Machine

  1. Specify the name of the appliance.

  2. Select Customize configuration before install.

  3. Click Finish.


3 - Configure Disk 2 (/vastorage)

Hardware

  1. Click Add Hardware at the bottom left of the screen.

  2. Select the option Select or create custom storage.

  3. Add the copy you made of Disk 2 to this VM. Select the .qcow2 file.

  4. Click Open > Finish.


4 - Add and Configure a new Disk 3 (/var)


  1. Click Add Hardware at the bottom left of the screen.

  2. Select the option Select or create custom storage.

  3. Navigate to the contents of the folder for the appliance you are creating.

  4. Select the .qcow2 file.

  5. Click Open > Finish.


5 - (Optional) Add a Network Adapter

You can add a network adapter if your Filr deployment accesses a separate network for one or more of the following reasons:

  • Appliance administration.

  • NFS mount or CIFS access to the /vashare mount point.

  • Security of Memcached.

    IMPORTANT:Bonding or teaming NICs is not supported with Filr.

Summary

  1. Click Network Adapters.

Network Adapters

  1. Click New.

Virtual Network Adapter

  1. Specify the settings for the adapter.

  2. Click Apply.

Network Adapters

  1. Click Apply.

Summary

  1. Click OK.

    The virtual machine is created, the appliance starts, and the configuration process begins.

Console

6 - Deploy the Appliance

  1. Access the appliance’s console.

  2. When prompted, enter the root and vaadmin passwords for the appliance being replaced.

    The upgrade process proceeds automatically.

  3. When the appliance displays the final screen in the console window, open your management browser and log in to the appliance on port 9443 as the vaadmin user.

Port 9443 Admin Console

  1. Depending on the appliance type you are upgrading, check the following:

    • Filrsearch:

      1. Click the Filrsearch configuration icon.

      2. Ensure that all of the settings are in place as expected.

      3. If the configuration wizard displays, there was a problem with the configuration.

      4. Resolve the configuration issues, then click Finish to reconfigure the system.

    • Filr:

      1. Click the Filr configuration icon.

      2. Ensure that all of the settings are in place as expected.

      3. If the configuration wizard displays, there was a problem with the configuration.

      4. Resolve the configuration issues, then click Finish to reconfigure the system.

        Common configuration issues include:

        • If your system is not using DNS, the most likely problem is unresolvable DNS names and missing /etc/hosts entries.

        • If the appliance doesn’t have access to the database, ensure that all of the settings are as expected.


7 - Upgrade the Next Appliance

  1. Return to the top of the table and repeat the process for the next appliance in your list.

    When all of your appliances are running, continue with Performing Post-Upgrade Tasks.

Upgrading Citrix Xen VMs

Table 10-4 Upgrading a Citrix Xen VM

Page, Dialog, or Option

Do This


1 - Launch XenCenter.

Management Workstation

  1. Start XenCenter.

XenCenter

  1. Connect to the Citrix XenServer where you are deploy the upgraded appliances.

  2. Right-click the server and select Import.


2 - Import the system disk

Locate the File you want to import

  1. Browse to and select the .xva file on your management workstation for the appliance that you are upgrading.

  2. Click Open.

  3. Click Next.

Select the location where the imported VM will be placed

  1. Select the XenServer.

  2. Click Next.

Select target storage

  1. Select the storage repository for the VM.

  2. Click Import.


3 - Select the network adapter

Select network to connect VM

  1. Select the virtual network adapter.

  2. Click Next.

Review the import settings

  1. Deselect Start VM(s) after import.

  2. Click Finish.

    IMPORTANT:Depending on network latency and other factors, it can take a while to import the system disk.


4 - Specify Memory

  1. If you need to adjust the memory to the amount of memory, select the newly created VM in the left pane.

  2. Click the Memory tab.

  3. Click Edit, change the setting, and click OK.


5 - Specify Processors

  1. If you need to adjust the CPUs, right-click the newly created VM in the left pane.

  2. Select Properties.

  3. Click CPU, change the setting, and click OK.


6 - Link to Disk 2 (/vastorage)

  1. With the newly created VM selected in the left pane, add the copy of Disk 2 for this appliance.


8 - Add Disk 3 (/var)

Virtual Disks

  1. Click Add....

Add Virtual Disk

  1. Type a disk name that reflects the appliance name and that this is disk 3. For example, Filr-1-disk-3.

  2. Change the Size field value to match that of the appliance you are replacing.

  3. Click Add.

9 - (Optional) Add a Network Adapter

You can add a network adapter if your Filr deployment accesses a separate network for one or more of the following reasons:

  • Appliance administration.

  • NFS mount or CIFS access to the /vashare mount point.

  • Security of Memcached.

    IMPORTANT:Bonding or teaming NICs is not supported with Filr.

  1. With the newly created VM selected in the left pane, click the Networking tab.

  2. Select the secondary network associated with the Filr installation..

XenCenter

  1. Repeat the steps in this table until all of your planned appliances have been upgraded, then continue with Deploying the Upgraded (Replacement) VMs.

10.2.5 Deploying the Upgraded (Replacement) VMs

IMPORTANT:

  • Make sure that you deploy (Start and configure) your appliances one at a time.

    Attempting to start and configure multiple upgraded appliances at the same time causes timing, synchronization, and other problems.

  • Also make sure that you deploy the appliances in the deployment order that you identified earlier:

    1. Filrsearch

    2. Filr

  1. Power on the first (or next) appliance in your deployment order list.

  2. Access the appliance’s console.

  3. When prompted, enter the root and vaadmin passwords for the appliance being replaced.

    The upgrade process proceeds automatically.

  4. When the appliance displays the final screen in the console window, open your management browser and log in to the appliance on port 9443 as the vaadmin user.

  5. Depending on the appliance type you are upgrading, check the following:

    Filrsearch

    Filr

    1. Click the Filrsearch configuration icon.

    2. Ensure that all of the settings are in place as expected.

    3. If the configuration wizard displays, there was a problem with the configuration.

      Resolve the configuration issues, then click Finish to reconfigure the system.

    1. Click the Filr configuration icon.

    2. Ensure that all of the settings are in place as expected.

    3. If the configuration wizard displays, there was a problem with the configuration.

      Resolve the configuration issues, then click Finish to reconfigure the system.

    Common configuration issues include:

    • If your system is not using DNS, the most likely problem is unresolvable DNS names and missing /etc/hosts entries.

    • If the appliance doesn’t have access to the database, ensure that all of the settings are as expected.

  6. When the appliance is running, deploy the next appliance.

  7. When all of your appliances are running, continue with Performing Post-Upgrade Tasks.

10.2.6 Performing Post-Upgrade Tasks

After upgrading to a new version of Filr, you should perform the following tasks to ensure a fully functional Filr system:

Install Your New Filr License

The newly upgraded Filr appliances have a 60-day evaluation license installed. The evaluation license is expired in most cases since it considers the day of deployment as the day when it was installed with the earlier version.

To prevent a service interruption, you must install your new license by following the instructions in Installing/Updating the Filr License in the Filr 5.0: Administrative UI Reference.

Java Heap

For optimal performance of Filr appliance, the minimum Java heap space should be 12 GB. After upgrading the appliance, the Java heap space is overwritten with the value that was set for the earlier Filr appliance. If new value is less, then ensure to update it to 12 GB or greater.