About the Initialization Wizard
After the Setup Wizard completes, the Welcome window of the Micro Focus Fortify WebInspect Enterprise Initialization Wizard appears.

The Initialization Wizard initializes the software as described in this section. Its functions include:
-
Activating the Fortify WebInspect Enterprise license
-
Creating a new Fortify WebInspect Enterprise database or updating an existing one as needed
-
Creating the Fortify WebInspect Enterprise website and web service
-
Connecting Fortify WebInspect Enterprise and Micro Focus Fortify Software Security Center (Optional)
-
Establishing the initial Fortify WebInspect Enterprise system administrator
Note: After you complete these installation procedures, you will always be able to restart the Initialization Wizard if necessary, by clicking Start > All Programs > Fortify > Fortify WebInspect Enterprise 21.1.0 > WebInspect Enterprise Initialize.
Activating the License
To activate the Fortify WebInspect Enterprise license:
-
Click Next.
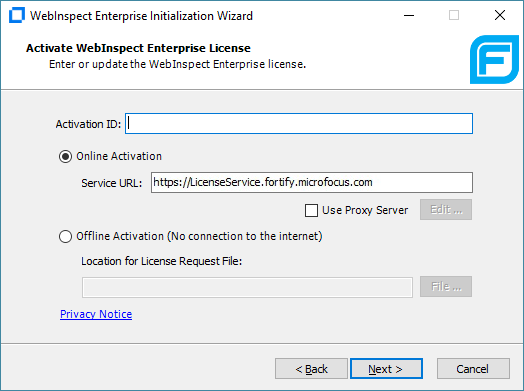
The Activate WebInspect Enterprise License dialog box appears.
-
Enter the Activation ID that Micro Focus sent to you.
-
-
If the computer is connected to the Internet, select Online Activation.
If you are using a proxy server, select Use Proxy Server, click Edit, and provide the requested information.
-
If the computer is not connected to the Internet, select Offline Activation and then click File to select the location on this computer where you want the installation software to create a license request file named LicenseRequest.xml. This file will contain information about the computer that is required to obtain a license.
-
-
Click Next.
The WebInspect Enterprise License user information dialog box displays user information as submitted to Micro Focus.

-
Correct the information as needed and click Next.
-
If you selected Offline Activation in Step 3, the Complete Offline License Activation dialog box appears. It indicates that the license request file was generated successfully. Perform the procedure in this step to download from Micro Focus a license response file named LicenseResp.xml that you can copy to the computer, not connected to the Internet, on which you are installing Fortify WebInspect Enterprise.

-
Copy the
LicenseRequest.xmlfile you created in Step 3 to a portable device such as a flash drive. -
Copy the
LicenseRequest.xmlfile from the portable device to a computer that is connected to the Internet. -
Open a browser and navigate to
https://licenseservice.fortify.microfocus.com/OfflineLicensing.aspx.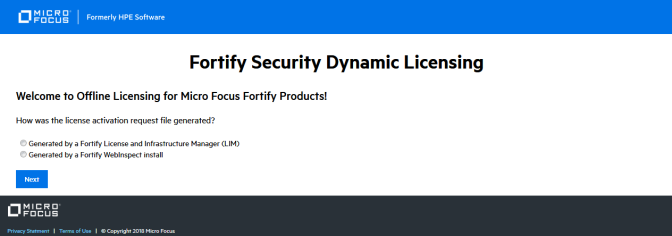
-
Select the option that describes how the license request file was generated and click Next.
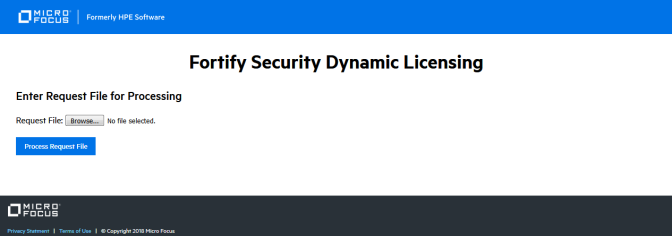
The Enter Request File for Processing window appears.
-
Click Browse as needed, select the
LicenseRequest.xmlfile that you copied to this computer, and then click Process Request File.If the request is processed successfully, the Successfully processed Request for Micro Focus Licensing window appears.

-
Click Retrieve Response File.
-
On the File Download dialog box, click Save and specify the location on the portable device where you want to download the response file
LicenseResp.xml. -
Return to the computer on which you are installing Fortify WebInspect Enterprise. Copy the
LicenseResp.xmlfile from the portable device to a location on this computer. -
In the Fortify WebInspect Enterprise Initialization Wizard, specify the License Response File field by clicking File and navigating to the location of the
LicenseResp.xmlfile you just copied from the portable device.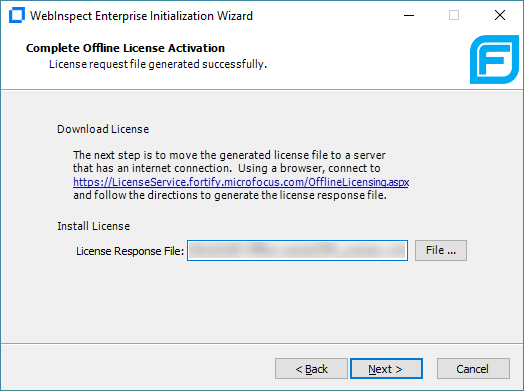
-
Click Next.
-
-
The WebInspect Enterprise License Information dialog box displays information about the license. Review the information.
Configuring the Database
To provide the SQL Server information and select the database:
-
Click Next.
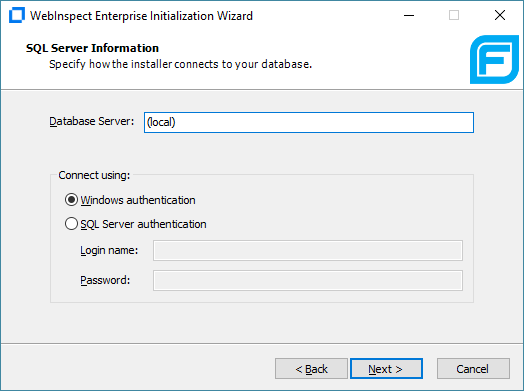
The SQL Server Information window appears.
-
Enter the name of the SQL Server instance in the Database Server field and select the authentication that will be used. If you are installing Fortify WebInspect Enterprise for the first time, you must have privileges to create a database (or your database administrator must create a blank database and assign ownership to you).
-
Click Next.
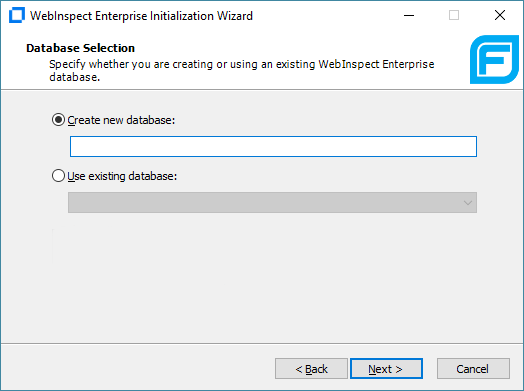
The Database Selection window appears.
-
Do one of the following:
-
To use a new database, select Create new database and enter a database name. You must have privileges to create this database.
-
To use an existing Fortify WebInspect Enterprise 20.2.0 database for an upgrade, select Use existing database and select a database from the drop‑down list. You must have owner privileges for that database.
-
Click Next.
-
Do one of the following:
-
If you created a new database, skip to Configuring the Web Service.
-
If you are using an existing database for an upgrade from Fortify WebInspect Enterprise 20.2.0, the database must be upgraded, and the Fortify WebInspect Enterprise Database Upgrade window appears, instructing you to back up that database before upgrading it. After you have backed up the database, select the Database is backed up check box and click Next.
-
Configuring the Web Service
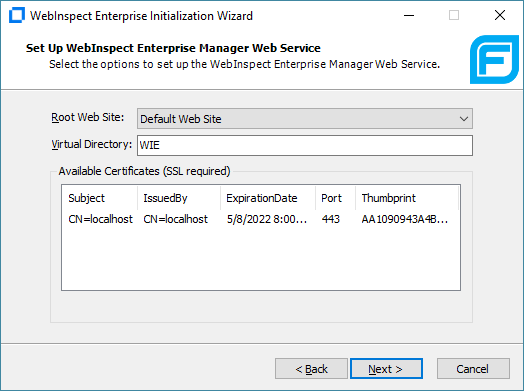
After configuring the database, the Set Up WebInspect Enterprise Manager Web Service window appears.
If you have configured HTTPS bindings for the root web site in IIS, only those bindings will be listed in the Available Certificates. You will not be able to create a new binding for a web site in the Fortify WebInspect Enterprise Initialization Wizard. You can create a new binding only in IIS. The following table describes your options, based on your IIS settings.
| If... | Then... |
|---|---|
| HTTPS is setup on the default web site for port 443 in IIS | Only that binding is available to select. You cannot create a new binding in the initialization wizard. |
| Multiple HTTPS bindings are configured in IIS | You may select the binding you want Fortify WebInspect Enterprise to use. Your selection determines the host name that is used in the URL and the port that is used. This allows Fortify WebInspect Enterprise to run on a non-standard port. |
| No HTTPS bindings have been created for port 443 | You may select the certificate you want to use or create a new certificate. |
To configure the web service:
-
Specify the root Web site and the IIS virtual directory name (
WIEin the previous example), and select (or add and select) a certificate.These entries create the URLs for the following components:
-
Fortify WebInspect Enterprise URL for login to the Administrative Console:
http(s)://<computer name>/<Virtual Directory name> -
Web Console URL:
http(s)://<computer name>/<Virtual Directory name>/WebConsole
-
-
Click Next.
Note: If an HTTPS binding has been created for site A and you select site B, which does not have any HTTPS bindings configured, then a warning message appears. You must set up an HTTPS binding manually for site B or select another site.
Setting Up Fortify WebInspect Enterprise Database Users
At this point, the Initialization Wizard performs a file check to ensure that the user has read access to the machine keys directory where the Data Protection Application Programming Interface (DPAPI) keys used for decrypting the connection string are stored. If you receive an error message, ensure that the Administrator has read access to the machine keys directory.
The Set Up WebInspect Enterprise Database User window appears.

-
Enter the User Name and Password used for SQL server authentication.
-
Click Next.
What's Next?
Continue as follows:
-
To install or upgrade a Fortify WebInspect Enterprise that is integrated with Fortify Software Security Center, go to Setting Up a Fortify Software Security Center (SSC) Connection.
-
To install or upgrade a standalone Fortify WebInspect Enterprise, go to Installing or Upgrading a Standalone Fortify WebInspect Enterprise.
-
To upgrade and decouple Fortify WebInspect Enterprise that is integrated with Fortify Software Security Center, go to Upgrading and Decoupling Fortify WebInspect Enterprise from Fortify Software Security Center.