Configuring Kerberos
Kerberos requires configuration in Windows (KDC and Active Directory), the MSS Administrative Console, and your browser.
Note
If using a load balancer, use its information for the Cluster DNS value and Service Account.
Configure KDC and Active Directory
To configure Windows Authentication - Kerberos authentication, these steps must first be done on the KDC:
Create a Service Account for your MSS deployment
-
Open Active Directory Users and Computers (Start | Administrative Tools | Active Directory Users and Computers).
-
Select the Active Directory domain in the menu on the left.
-
Select the New User action to display the New User wizard.
-
In the Full name field, type the name of your MSS deployment service account (such as
my-mss-deployment). -
In the User logon name field, type the name of your MSS deployment used in step 4.
-
Click Next.
-
Assign a password to this service account. Be sure to take note of this password because it will be needed later.
-
Uncheck User must change password at next logon.
-
Check Password never expires.
-
Click Next.
-
Click Finish.
Assign an SPN for the Cluster DNS to the Service Account
-
Open a command prompt with Administrator rights.
-
To verify no duplicate SPN entries exist, type the command
setspn -X. -
Type the command
setspn -A HTTP/<fully-qualified-cluster-DNS> <service-account-name>Example:
setspn -A HTTP/my-cluster-DNS.my-company.com my-mss-deployment -
To verify the SPN was successfully added, type the command
setspn -L <service-account-name>
For further help on the spn command, use the setspn /help command.
Create a Keytab for the Service Account to be used by MSS
-
Open a command prompt with Administrator rights.
-
Type the command
ktpass -princ HTTP/<fully-qualified-cluster-DNS>@<active-directory-domain> -mapuser <service-account-name> -pass <service-account-password> -ptype KRB5_NT_PRINCIPAL -crypto ALL -out <service-account-name>.keytabExample:
ktpass -princ HTTP/my-cluster-DNS.my-company.com@MYDOMAIN.COM -mapuser my-mss-deployment@MYDOMAIN.COM -pass password -ptype KRB5_NT_PRINCIPAL -crypto ALL -out my-mss-deployment.keytab -
Make sure the keytab file that is created is available when configuring Windows Authentication - Kerberos in the MSS Administrative Console.
Notes
- The keytab file contains sensitive data, so be sure to protect it accordingly.
- You can use any name for the keytab file.
- When setting up a cluster of MSS servers, this keytab file with a single SPN is all that is needed.
Update supported encryption types and delegation rights in the SPN
-
Open Active Directory Users and Computers (Start | Administrative Tools | Active Directory Users and Computers).
-
In the left menu, click the Active Directory domain to expand the tree.
-
In the list of containers, click Users.
-
Find the user that was created in step 5 of the Configure KDC and Active Directory section.
-
Right-click that user and click Properties.
-
Open the Account tab.
-
In the Account options dialog, scroll to the bottom of the options list.
Locate and CHECK these two items:
- This account supports Kerberos AES 128 bit encryption
- This account supports Kerberos AES 256 bit encryption
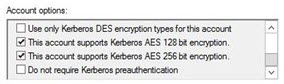
Note
In the event a Kerberos Unsupported etype error is received, check "Do not require Kerberos preauthentication".
For more information, see this Microsoft article. -
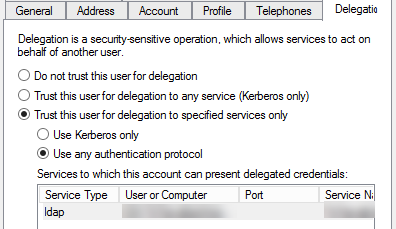
Open the Delegation tab.
Notice the default setting: Do not trust this user for delegation.
-
Click these two items:
- Trust this user for delegation to specified services only
- Use any authentication protocol
-
Add the service
ldapfor the LDAP server that will be used to assign users. -
Click Apply and OK.
Settings in the MSS Administrative Console
After enabling Kerberos and configuring the KDC and Active Directory to generate the keytab file, you must configure Kerberos in the MSS Administrative Console. Follow these steps:
-
Be sure to enable OAuth to enable the Kerberos settings.
-
Navigate to Configure Settings - Authentication & Authorization and click Windows Authentication - Kerberos.
-
Select the desired Authorization method.
-
In the Kerberos Configuration section, enter the following:
a. Realm - The name of your realm or domain name. For example,
MYCOMPANY.COM.b. Service Principal Name (SPN) - The SPN created for your MSS instance. Enter the SPN using the indicated format:
HTTP/<fully-qualified-cluster-DNS>@<REALM-NAME>.c. Key Distribution Center (KDC) - Specify the KDC or domain controller host name.
d. Port - Enter the KDC port if different from the default of 88.
e. Click IMPORT to upload the keytab file generated on the KDC. This file must be available on the system used to access the MSS Administrative Console.
f. Click TEST CONNECTION to test that the KDC can be accessed.
-
In the LDAP Servers section, click ADD to configure the Active Directory used by the KDC.
(See LDAP Configuration for further details).
-
Click Apply.
Notes
- The SPN must be the SPN used when configuring the KDC.
- The SPN must be in the keytab file that is uploaded.
- You must configure an LDAP server with Windows Active Directory as the Server type because Active Directory is the only supported LDAP Server type for Windows Authentication - Kerberos.
Configure your browser for Kerberos
To sign in using Kerberos, your browser must be configured correctly for Windows Authentication via Kerberos and your machine must be a member of the proper domain (Kerberos realm).
Consult your browser's Help for instructions on how to enable Kerberos.
Verify your Kerberos configuration
Now that your single MSS server is configured for Windows Authentication - Kerberos, it is a good idea to verify that the configuration is working correctly.
Steps to verify:
-
Use a client system that is a member of the Active Directory domain.
-
Log on to the client system using the credentials of a user that is a member of the Active Directory.
-
Be sure to Configure your browser for Kerberos.
-
Once configured for Kerberos, use that browser to access the url:
https://<fully-qualified-cluster-dns>/osp/a/hc/auth/app -
To verify your Kerberos configuration:
When configured correctly, you should see that the user logged in to the client machine is logged in to the web application without being prompted for any credentials.
When NOT configured correctly, you may see a prompt for credentials indicating that LDAP fallback has occurred, or you may encounter an error message. If this happens, see Troubleshooting Kerberos Configuration for assistance.
Note
When using Kerberos authentication for Reflection Desktop clients, the browser on the client system must also be configured. See Configure your browser for Kerberos.