10.0 Configuring Your Own ZENworks Management Zone
Before you begin to build your ZENworks Management Zone make sure to store the credentials for your ZCM users in the home directory of the logged-in user on a ZCM Primary server using the zman asc command (see zman).
If you did install your own ZCM zone you most likely will log in to your ZCM Primary server as root (if you are using an appliance make sure to enable SSH access) and will use Administrator to login to the ZCC.
Next copy the archive ZCM-cif_yyyymmdd.tgz (see CIF download site) to any directory on the same ZCM Primary server and extract it. Inspect the file zman_params.cfg and carefully read the description of each variable. If you do not want to use the names for folders, groups, and registration keys used throughout this document please modify zman_params.cfg to meet your requirements.
Change into the directory zman_structure_create. If you have made changes to zman_params. cfg execute zman_structure_create.sh. This will create the file zman_structure_create. in that you can process using zman bex <input file> to create the required structures in your ZCM zone.
If you did not make any changes to zman_params.cfg simply use zman bex zman_structure_ create.in.cif to create a default structure in your ZCM zone.
zman will create all required folders, groups and registration keys for infrastructure servers and the environments DEV, PRD, and TST. The bundle groups will be assigned to server groups as required.
The next step is to create and execute your subscriptions. Login to the ZCC, select and scroll down to . Setup one credential for each customer center you will be working with as explained Figure 8-12.
Change to , create your subscriptions and place them in the folders that have been created in the preceding step as explained in Creating Subscriptions starting with the subscriptions for the update channels. Remember that subscriptions for pool channels are optional while the subscriptions for update channels are mandatory:
When a subscription is complete execute it. By default you can only have two subscriptions active in parallel. This can be increased to a maximum of 5 under .
Occasionally, it can happen that a subscription will abort with an error message about a checksum mismatch. If this happens just start the replication again. Depending on your WAN connectivity you may even have to start the subscriptions repeatedly until they are complete.
Once a subscription for an update channel is complete create a Frozen Patch Level for it as explained in Managing Pool Bundles, Update Bundles and Update Bundle Groups. Add the FPL to the bundle groups you want to use and create the YUM service for the bundles group.
When all required update bundles have been replicated and frozen it is time to take care of the configuration bundles. Copy the Folder ZCM_Bundles that has been created when extracting the archive to the workstation from where you are managing your ZCM zone.
In the ZCC go to and select . This will require the ZCC helper to be installed on your workstation. The ZCC will discover if this should not be the case. Follow the on screen instructions to install the helper.
Figure 10-1 Importing A Bundle into the ZCM zone
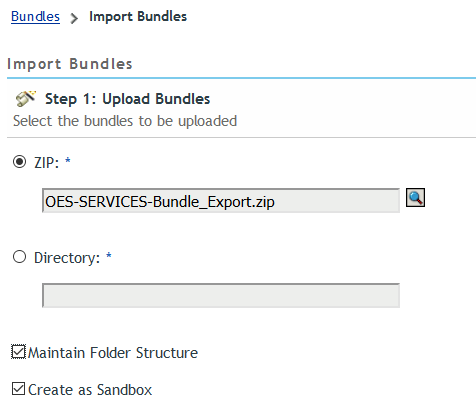
Check before you browse for any of the zip files in the copied folder. For example, to import all configuration bundles for OES services select OES-SERVICES_Bundle_ Export.zip, select and once the upload is completed verify that is checked before you select .
When the bundles contained in the archive are listed select again and when the import summary is displayed select .
If you have more bundles to import select and repeat this process until all zip files have been imported into your ZCM zone. Again, make sure to check before you select . Once all the bundles have been imported select .
The bundles contained in the zip file should have been imported into your ZCM zone. In the above example you will find them in the folder /Bundles/Linux/CUSTOM/OES-SERVICES.
The final step is to assign the bundles you just imported to the appropriate bundle groups. Go back to your ZCM primary server and change into the directory zman_bundle_assign.
If you have not made any changes to zman_params.cfg you can simply execute the command zman bex zman_bundle_assign.in.cif. This will make all the required membership assignments for the imported configuration bundles.
In case of any changes to the parameter file you first need to execute zman_bundle_assign.sh and process the resulting file zman_bundle_assign.in with zman bex.
Finally you need to publish every bundle that you want to become effective on your managed Linux systems.