8.5 Linux Bundles and Bundle Groups

In this section we describe how we recommend to manage bundles and bundle groups to assign configuration bundles and update bundles to devices.

This includes folder structures to store the bundles and bundle groups as well as a standard for the names for these two object types. We will also explain the principles that have been used when developing configuration bundles.

For a complete description of the Linux package management in ZCM please refer to the ZENworks Linux Package Management Reference.

8.5.1 Folder Structure for Bundles and Bundle Groups

At the first level of the folder structure configuration bundles and Configuration Bundle Groups are placed in the folder CUSTOM.

Figure 8-9 Folder Structure for Bundles and Bundle Groups

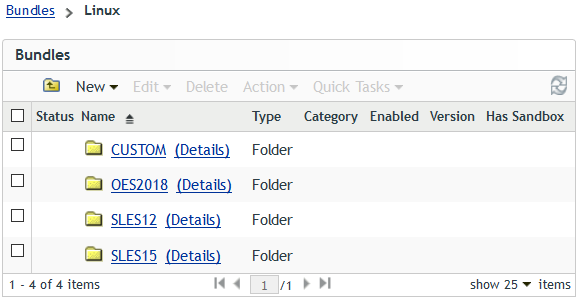
For update bundles and update bundle groups we recommend to use one folder for each software product and version for example OES2018, SLES12, or SLES15.

Folder Structure for Configuration Bundles and Configuration Bundle Groups

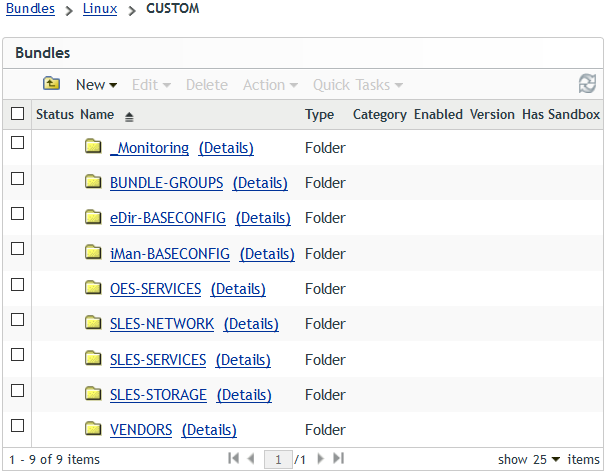
The folder CUSTOM holds all configuration bundles and the bundle groups used to assign them to devices. As the number of bundles and bundle groups can become quite substantial additional folders are used to group these objects.

Figure 8-10 The Folder CUSTOM

  • _Monitoring: Any configuration bundle that is used to configure how your OES servers and your SLES servers interact with your monitoring solution should be placed into this folder. This includes bundles to configure Ganglia that is installed on every OES server by default.

  • BUNDLE-GROUPS: Any bundle group used to assign configuration bundles to devices should be placed in this folder.

  • eDir-BASECONFIG: This folder is intended to store bundles that configure eDirectory on OES or SLES.

  • iMan-BASECONFIG: This folder is intended to store bundles that configure iManager on OES or SLES.

  • OES-SERVICES: This folder accommodates bundles that apply configuration settings to OES servers such as a bundle to configure aliases for OES specific commands or bundles that configure a specific OES service like CIFS or FTP.

  • SLES-NETWORK: Any bundle that configures any aspect of the network connectivity such as the configuration of a bond device or increasing the MTU for an iSCSI interface is stored in this folder.

  • SLES-SERVICES: This folder accommodates bundles that apply general configuration settings on SLES servers or bundles that configure a specific SLES service such as SLP or SSH.

  • SLES STORAGE: Any bundle that configures an aspect of the storage connectivity such as multipath.conf or the bindings files used to assign user friendly names to the shared device used by the nodes of a cluster come to mind..

  • VENDORS: Bundles to distribute or configure third party solutions such as anti-virus software or backup software are typically placed in this folder.

Folder Structure for Update Bundles and Update Bundle Groups

The folders that accommodate update bundles and update bundle groups for a software product are split into separate folders for the initial release (FCS | GA | SP0) of the product and for each of its support packs.

Figure 8-11 Folder Structure for OES2018 Updates

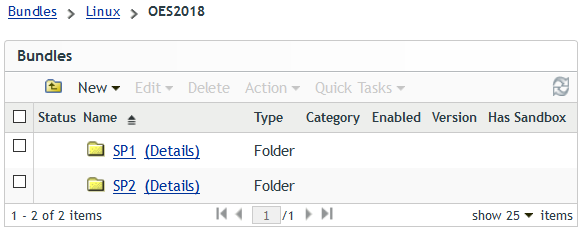
These are the folders that are selected when defining the subscriptions for update channels or for pool channels (Figure 8-5). All the other folders that are needed to manage update bundles, pool bundles and Update Bundle Groups are automatically created when you execute the subscriptions.

8.5.2 Bundle Groups

Bundle groups are used to assign multiple bundles with a single operation. If a number of bundles has to be deployed to devices it is more efficient to make these bundles member of a bundle group and assign the bundle group instead of assigning each bundle individually.

We distinguish between the following two types of bundle groups:

  • Configuration Bundle Group: These bundle groups combine bundles that manage configuration settings or add additional software such as anti-virus software or backup software to the devices.

  • Update Bundle Group: These bundle groups are used to assign updates to all devices that are on the same product, version and support pack, such as all OES2018 SP2 servers.

Configuration Bundle Groups use the same naming standard as Configuration Server Groups.

Table 8-6 Configuration Bundle Groups Naming scheme: %ENVIRONMENT%_%CONFIG_GROUP%

Element

Description

ENVIRONMENT

DEV | TST | PRD

This part of a group name identifies to which environment the members of this group belong.

CONFIG_GROUP

Branch | Cluster1 | eDir | eDir-iMan | eDir-iMan-DA |...

This part of the group name identifies the function of the members of the Configuration Server Group:

Branch: Branch Office Servers (typically providing all services)

Cluster1: Nodes of NCS cluster Cluster1

eDir: dedicated eDirectory/LDAP servers

eDir-iMan: dedicated eDirectory/LDAP servers with iManager

eDir-iMan-DA: dedicated eDirectory/LDAP servers with iManager and configured as SLP Directory Agent

The name of the Update Bundle groups is derived from the updates they assign to the devices of a particular environment. This is discussed in detail in Assigning a Frozen Patch Level.

8.5.3 Subscriptions

Subscriptions in ZENworks Configuration Management define how content is replicated from external repositories to create update bundles in the ZCM zone. From the many types of subscriptions available in ZCM only Novell Subscriptions and SUSE Subscriptions are discussed here.

Subscription are characterized by the following properties:

  • The descriptive name of the subscription

  • The folder where to place the subscription

  • The folder where to place the replicated content

  • An optional description

  • The credentials to access the external repositories

  • The catalog and targets to replicate

  • The replication schedule

  • The ZCM servers that executes the subscription

Once a subscriptions has been created some additional properties can be configured

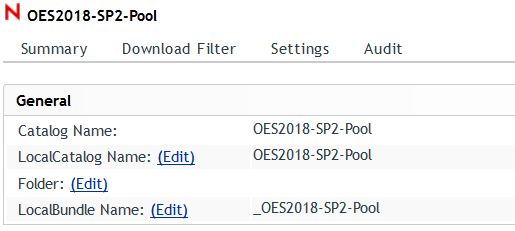
  • The local catalog name (not used by Micro Focus Consulting)

  • The local name of the resulting bundles (only used for Pool bundles)

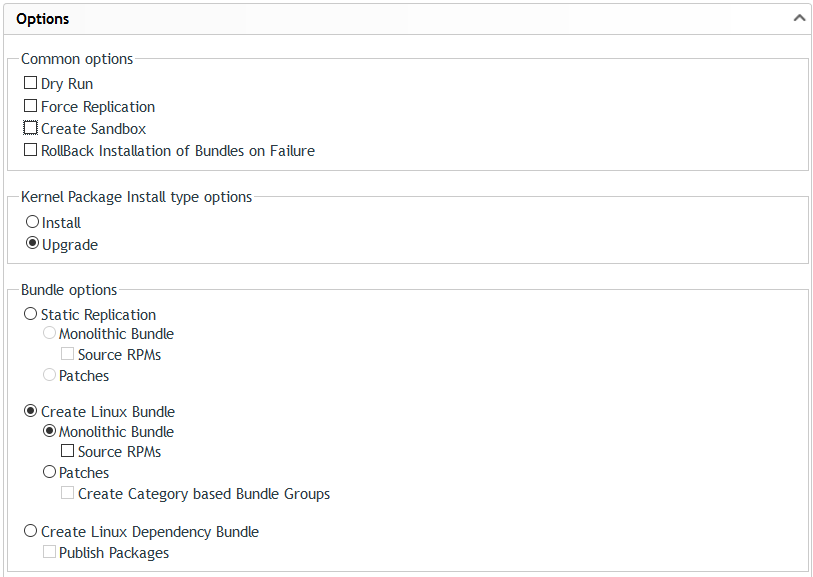
  • Common options (Dry Run / Force Replication / Create Sandbox / Rollback on Failure)

  • Kernel package install type options (Install / Upgrade)

  • The bundle type (Static Replication / Linux Bundle / Linux Dependency Bundle)

The following sections describe the steps to create subscriptions in more detail.

Proxy Settings for Subscriptions

If you need to use a proxy server to access the external repositories, this cannot be configured in the ZCC. Instead the relevant information needs to be provided in the file /etc/opt/novell/zenworks/lpm-server.properties.

#########################
## LPM Server Settings
#########################
#
# Debug logging for Subscription Replication Module
Debug=false
# Time to Live(days) for Subscription WebCache metadata
TTL=24
#
#Subscription Proxy Settings
subscription-proxyaddress=<IP|DNS of proxy server>
subscription-proxyport=<port of proxy server>
subscription-proxyuser=
# Obfuscated password. Do not specify the raw password here directly.
# In stead use "zman srpp" command to specify the password in obfuscated format
subscription-proxypassword=
subscription-useNTLM=false

Be aware that in a ZCM zone with multiple ZCM Primary servers this file needs to be configured on each server with internet access.

If you have very strict security requirements you may even be required to configured this file to use different proxies depending on which sites a particular ZCM Primary server is allowed to access.

Credential Vault

Novell update repositories or repositories from other vendors like SUSE or Red Hat are not freely accessible. A credential tight to some sort of maintenance contract is typically needed to gain access to such repositories. In the Micro Focus Customer Center you can find your mirror credentials under “Software”, the SUSE Customer Center lists them under “Proxies”.

Instead of entering the credentials every time a subscriptions is executed they can be stored in the ZCM zone as objects in the credential vault that then can be consumed by the subscriptions. We recommend to create a separate credential for each external repository source. The credential vault can be accessed in the ZCC by selecting > Configuration and then scrolling to the bottom of the page.

Figure 8-12 Credential Setup

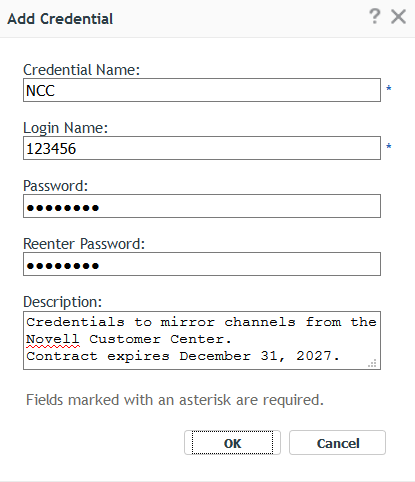
A credential has the following properties:

Credential Name:

A descriptive name

Login Name:

The credential login name

Password:

The credential password

Description:

A meaningful description to tell others what this credential is for. Should the credential have an expiration date it might be helpful to add this information to the description.

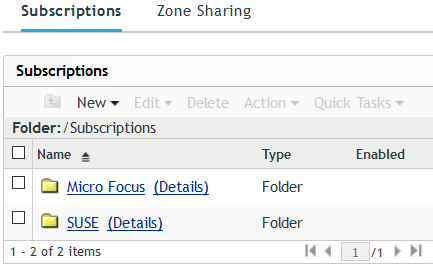
Folder Structure for Subscriptions

As you will integrate more and more operating system releases and their support packs into your build environment you will find that the number of subscriptions will increase just as quickly.

To make it more easy to keep an overview of your subscriptions we recommend that you create a separate folder for each repository provider.

Figure 8-13 Subscription Folders

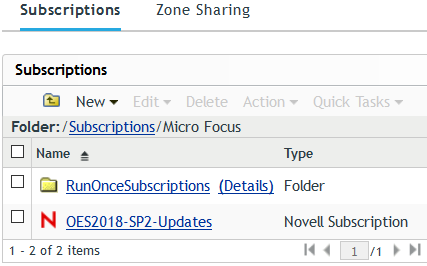
Another aspect of the design is the fact that subscriptions for pool channels are typically only executed once while subscriptions for update channels will be executed regularly. Therefore we recommend that you create a sub-folder to accommodate subscriptions for pool channels for each repository provider.

This is illustrated for Micro Focus subscriptions in the following figure where the subscriptions for pool channels have been placed in the folder RunOnceSubscriptions.

Figure 8-14 Micro Focus Subscription

Creating Subscriptions

Maintaining a software product typically will require you to replicate multiple channels from the software repository of the manufacturer to your ZCM zone. At the very minimum you will have to sync the update channel for your product and support pack level.

If you cannot or do not want to have the original installation sources permanently attached to the installed systems you may also need to replicate the corresponding pool channel.

However, if you have installed additional components there might be other channels that you need to include into your subscriptions. For instance, if you should be using any of the modules that are available with SLES12 and later, for instance the Scripting Module or the Containers Module you also need to include their catalogs into your subscription.

SUSE has introduced a separate Installer Updates channel with SLES12 SP3. If you want to use these updates with pure SLES systems they need to be part of the corresponding SLES updates subscriptions. Note that there is no pool channel for these Installer Updates and that you may not use this channel with OES2018!!

With SLE15 SUSE has introduced the Unified Installer concept. This is why your SLE15 subscriptions need to include the Product Update channel in addition to the Module Updates channels and the Installer Updates channel.

Earlier OES versions have been Add-On products and the updates for the underlying SLES operation system have been replicated from the SCC while the OES specific updates were retrieved from the NCC.

OES2018 is a product in its own right and all its approved channels are provided by the NCC. In addition to the OES2018 updates you also need to include the NCC channel with the updates for the SLES 12 operating system on which OES2018 is based. You must not apply any packages from the SCC to any OES2018 system!

There are also update channels for the various SLES 12 Modules that are available for OES2018 system. For instance, if you plan to use any docker based services such as the Cloud Integrated Storage (CIS) you will need to install and maintain the Containers module. Depending on the services you plan to use you may need to include additional modules. Note that not all modules that are available for SLES 12 are also available for OES2018.

In any case you create one subscription for all the pool channels and another subscription for all the update channels for each product and support pack level that you use in your environment.

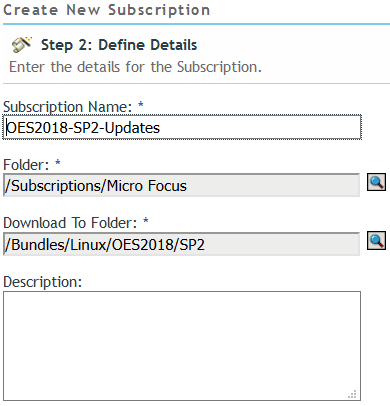
When you create a new subscription you first have to select what type of subscriptions (Novell / SUSE) you want to create. In the next step you give the subscription a descriptive name and select the folder in which the bundles replicated by the subscription will be placed (see Folder Structure for Update Bundles and Update Bundle Groups).

Figure 8-15 Subscription for OES2018 SP2 Updates (1)

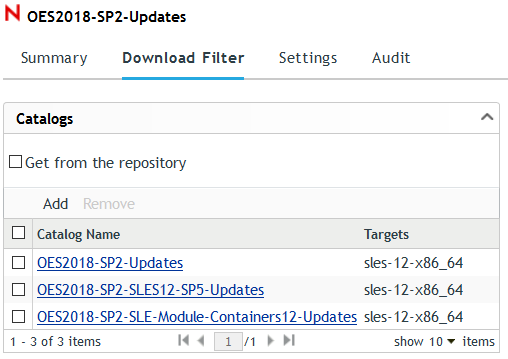
In the following example the download filter for the sles-12-x86_64 target includes the updates for OES2018 SP2, the underlying SLES12 SP5 operating system and the corresponding Container Module required for dockerized containers.

Figure 8-16 Subscriptions for OES2018 SP2 Updates (2)

Finally the subscription is configured to create a Monolithic Bundle containing all packages and the Create Sandbox flag is removed.

Figure 8-17 Subscription for OES2018 SP2 Updates (3)

We strongly recommend that you keep a 1:1 relationship between the subscription for the update channels and the corresponding subscription for the pool channels. Subscriptions to replicate the pool channels are created similar to the subscription for the update channels with three differences:

  • The subscription will replicate the catalogs for the pool channels.

  • The subscription will create a Linux Dependency Bundle instead of a Linux Bundle.

  • The local name of each bundle will be set to _%PRODUCT%%VERSION%-SP%SUPPORTPACK%-Pool, in other words the bundle name is prefixed with “_” and “ _bundle” is removed from the original bundle name, i. e. _OES2018-SP2-Pool.

Figure 8-18 Modified Local Bundle Name

While a pool subscription typically only is executed once, subscriptions for update channels need to be repeated regularly.

As OES updates typically are only released once every three month it is sufficient to execute these subscriptions monthly to catch any interim patches.

For SUSE updates it may make sense to execute the subscriptions in shorter intervals as SUSE releases these updates more frequently.

When subscriptions are executed for the first time a folder is automatically created for each catalog being replicated.

Figure 8-19 Catalog Folders for OES2018 SP2

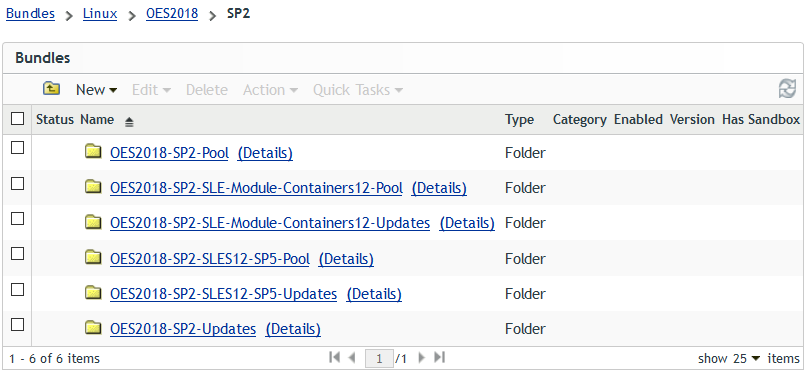
The above example depicts the folders that are created by the two subscriptions for the update channels and the pool channels for OES2018 SP2 defined in the preceding steps.

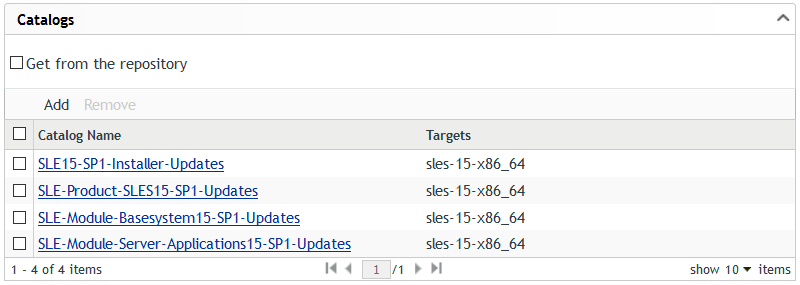
Setting up subscriptions for SLES15 is a little bit more involved as the subscriptions will need to include the pools and updates for the product as well as pools and the updates for all modules that you are using on your SLES15 SP1 servers.

In this example the subscription only contains the modules Basesystem and Server-Applications that are both selected for installation by default. Depending on the modules that you are using you may need to add more update catalogs to your subscription.

Figure 8-20 Subscription for SLES15 SP1 Updates - Catalogs

Initially only the subscription server will receive the content from the external provider. If your ZCM zone should have multiple ZCM Primary Servers the other servers will only receive the new content when the next Primary Server recurring content replication cycle is executed.

For more details on subscriptions please refer to Subscriptions in the “ZENworks Linux Package Management Reference”.

8.5.4 Managing Pool Bundles, Update Bundles and Update Bundle Groups

When subscriptions are executed they populate the bundle folder structure. This section describes how to use the bundles created by subscriptions.

Pool Bundles

When installing a package on a Linux device there is always the possibility that the package you try to install is dependent on other packages that also need to be installed. This process is known as dependency resolution.

To resolve a dependency the Linux device needs access to the packages it needs to install to resolve this dependency. If your systems have been installed from physical media or from an ISO image this source might no longer be available when you later attempt to install additional packages.

One way to avoid this problem is to assign the pool bundles for your software to the devices.

Creating a Frozen Patch Level

A subscription ensures that local repositories and remote repositories are kept in sync. Every time a subscription is executed it updates the local bundle with any changes it finds on the remote repository.

When you have to re-install a system, for whatever reason you typically will want the system to be in the exact same state it was in when it was lost. This includes its configuration as well as the updates. To be able to meet this requirement patch levels must be provided unchanged over long periods of time.

Furthermore applications that depend on specific kernel versions and kernel modules may require a patch level which differs from patch levels needed by systems providing other applications. We term bundles that contain all the updates that have been available in the source repository at a given date Frozen Patch Level (FPL).

In ZCM the way to “freeze” a patch level is to simply copy the bundle created by the subscription. The name of the copied bundle is derived by replacing “bundle” in the name of the bundle maintained by the subscription with the date the copy is created as yyyymmdd, where yyyy denotes the year, mm indicates the month and dd is the day.

Figure 8-21 Frozen Patch level for OES2018 SP2 SLES12 SP5 Updates

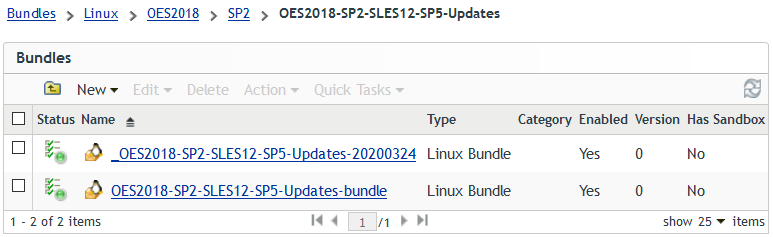
Finally, the name of the bundle with the FPL is prefixed with “_”. This is done to get the update bundles sorted to the bottom of the list of all bundles that are assigned to a device.

Copying a bundle will not consume any additional disk space as it only adds additional pointers in the ZCM database.

Assigning a Frozen Patch Level

The first step in assigning a Frozen Patch Level bundle to a device is to make it a member of an Update Bundle Group. The name of this bundle group is obtained by adding the identifier of the environment to which the target devices belong to the name of the bundle belonging to the subscription.

Figure 8-22 Assignment of a Frozen Patch Level to an Upgrade Bundle Group

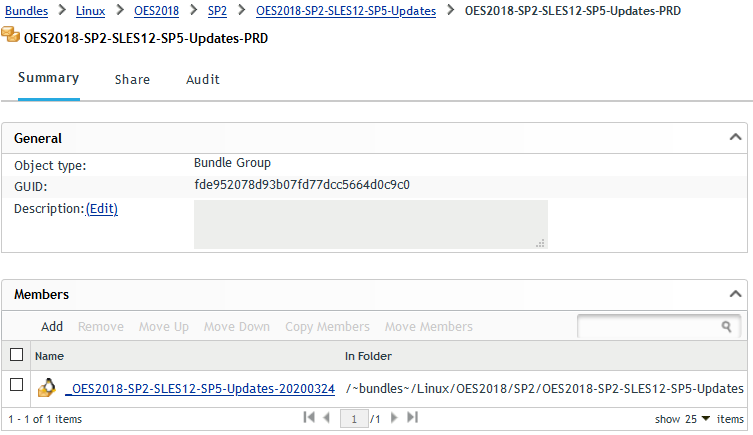
In the above example the SLES12 SP5 updates for OES2018 SP2 have been frozen in the bundle _OES2018-SP2-SLES12-SP5-Updates-20200324 and have been added to the Update Bundle Group OES2018-SP2-SLES12-SP5-Updates-PRD.

Assigning Pool Bundles and Update Bundle Groups

As the second step the Update Bundle groups need to be assigned to the target devices. We recommend that you make all bundle assignments for Linux devices to server groups instead of individual server objects or to folders holding server objects. This will greatly simplify bundle assignments.

Figure 8-23 Assignment of Pool Bundles and Update Bundle Groups

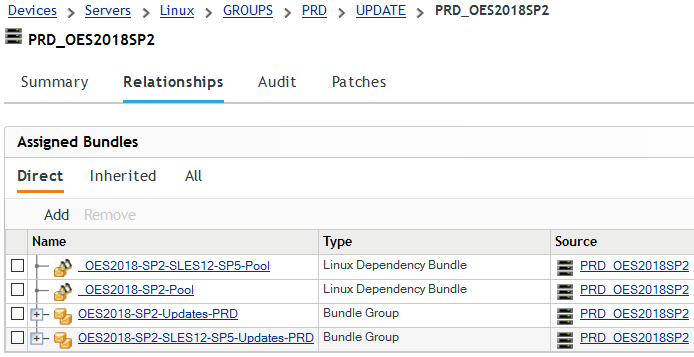
This example illustrates the assignment of Pool Bundles and Update Bundle groups to the server group for OES2018 SP2 devices in production.

As Pool bundles required for dependency resolution are expected to not change they are directly assigned to the server group PRD_OES2018SP2. Update bundles on the other hand will change regularly and are therefore assigned through bundle groups to the same server group.

There are various options how you can configure when the contents of the bundles is distributed to the managed devices. The distribution schedule can be set for specific times or it can be set to occur with the next device refresh. The setting Install Immediately after Distribution determines automatic installation of the bundle content. If you enable this option keep in mind that many updates require a reboot to become effective.

These assignments are made when you introduce a new product or a new support pack for a product to your ZCM zone. Once the assignment is made it will not be changed as long as that product or support pack is serviced by ZCM.

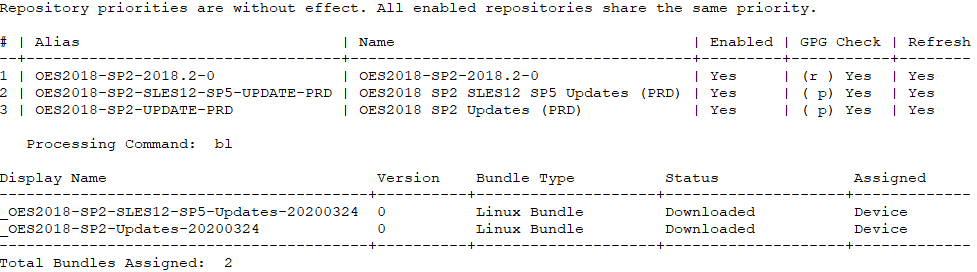
After a device refresh executing the command zac bl will list the bundles assigned to the device.

Figure 8-24 Bundles Assigned to a Managed Device

Note that the two pool bundles are shown with a status of Available. This is expected, because Linux Dependencies Bundles are never installed, they are only used to resolve dependencies.

The two update bundles on the other hand are shown as Downloaded. This indicates that the content of the assigned bundles has been downloaded to the ZENworks cache but has not yet been installed. This is the expected behavior if the option Install Immediately after Distribution has not been enabled.

To install update bundles use the zac bin command:

Figure 8-25 Installation of Update Bundles with zac bin

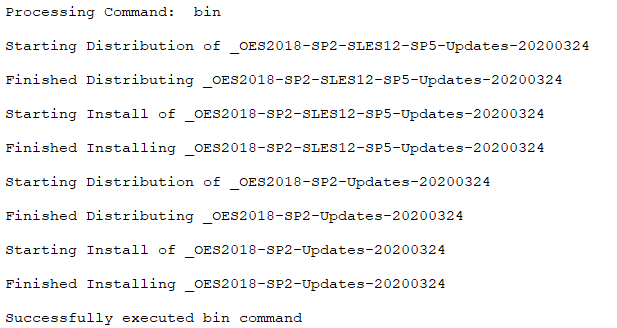
If you do this on a device that has been installed with the same Update Bundles configured as Add-On repositories executing zac bin will just update the status of the ZENworks Update Bundles to Available. No packages will be installed because they have already been installed during the installation of the system.

If the update bundles contain newer packages than what is already installed on the manged device, i. e. if you are deploying a new Frozen Patch Level, executing zac bin will updated all packages installed on the managed device to the latest available version.

Figure 8-26 Bundles Installed on a Managed Device

When the ZAA has verified that all available and required packages have been installed the status of the update bundles will change to Available.

YUM Repositories Derived From Frozen Patch Level Bundles and Pool Bundles

Frozen Patch Levels and Pool bundles created as described above need the ZCM Adaptive Agent on the managed device. If the ZAA cannot be installed or if the FPL is to be used as Add-On repository in the initial installation ZCM bundles are not suitable due to the format of the ZCM bundles.

However, ZENworks Configuration Management has the ability to create a YUM (Yellowdog Updater Modified) repository from ZENworks Linux bundles and ZENworks Linux Dependency bundles. These repositories can be consumed by zypper, the main package management tool of SLES. This allows you to update devices that do not have the ZAA installed.

In addition, YUM repositories can be consumed during installations to integrate the updates from the FPL. This reduces administrative overhead as devices installed in this way do not need to be updated until the next patching cycle.

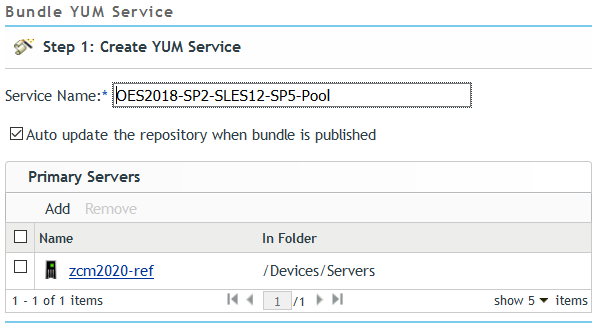
As a Pool bundle hardly ever changes there is no need to freeze it and the YUM service for it can be created on the bundle itself. We recommend that you edit the YUM Service Name and remove the leading “_”.

Figure 8-27 YUM Repository for the OES2018 SP2 SLES12 SP5 Pool

The YUM service for update bundles is created on the bundle group, not on the bundle itself.

Figure 8-28 YUM Repository for OES2018 SP2 SLES12 SP5 Updates

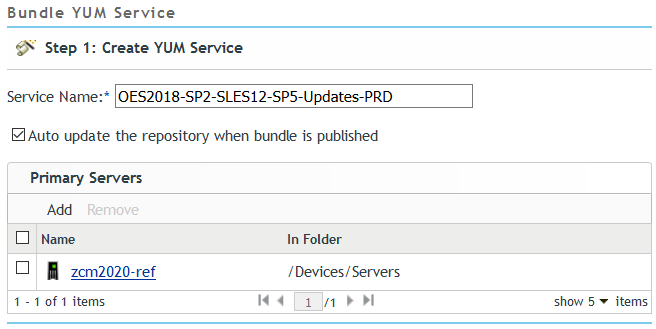
This is done to preserve the URL of the YUM service used by the managed devices. When a new FPL becomes available it is simply added to the Update Bundle Group. The bundle for the old FPL needs to be removed from the bundle group and the YUM service must be refreshed to make the new updates available to the devices where they can be installed using zac bin or zypper up -t patch.

If your ZCM zone should have multiple ZCM Primary Server each of them can be configured as YUM repository server. You can configure multiple YUM servers for fault tolerance and load sharing. However, a YUM repository can only be created or updated on a ZCM Primary Server after it has received the corresponding content from the subscription server.

These repositories can be consumed by package management tools such as rpm or zypper. While the ZAA always displays the name of the individual bundles (see Figure 8-26) zypper shows the YUM service names and aliases.

Figure 8-29 YUM Repositories for OES2018 SP2 Pools and Updates

As the YUM service names for update bundles are based on bundle groups it is not possible to see from the repository listing when the last FPL has been created.

Field Test Files

Field Test Files (FTFs), also known as Patch Test Files (PTFs) are RPMs provided by engineering as fix for a reported issue.

They can be deployed using ZCM much the same way as ordinary updates. The major difference is that there is no repository from which FTFs can be replicated, so we need to build this source repository ourselves using a RPM Application bundle.

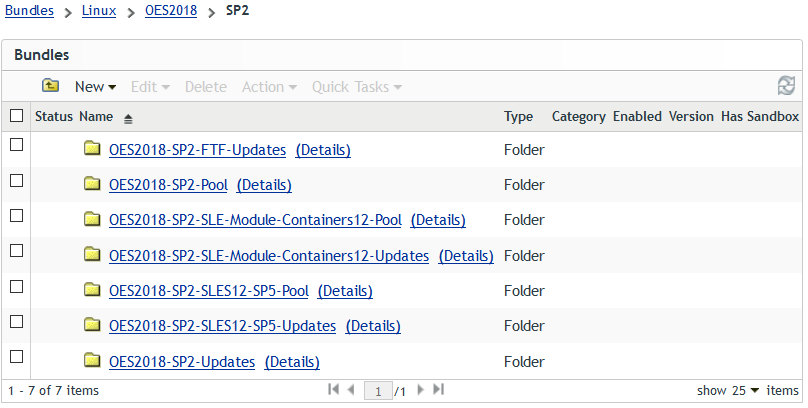
The first step is to create a folder for the FTFs parallel to the folders for Pool Bundles and Update Bundles.

Figure 8-30 Folder for OES2018 SP2 FTF Updates

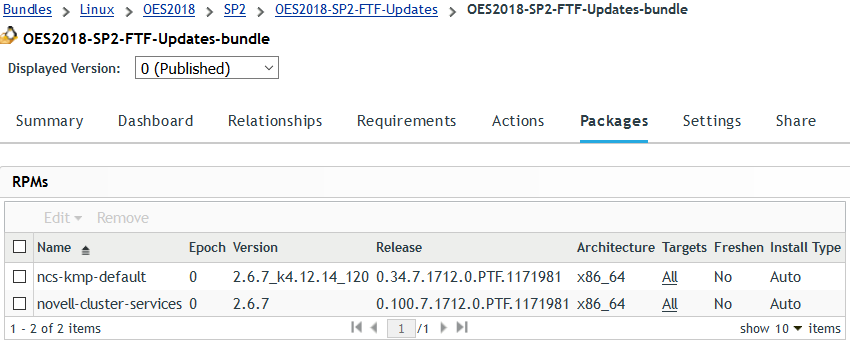
Inside this folder we create the RPM Application Bundle and upload the RPM files for the FTFs into it.

Figure 8-31 Packages in an OES2018 SP2 FTF Updates bundle

From here onwards the process to deploy the FTFs is the same as creating and deploying a FPL for an Update Bundle obtained through a subscription (Creating a Frozen Patch Level).

The bundle is copied and added to a bundle group that in turn is assigned to the Upgrade Server Group that has the target devices as members.

Figure 8-32 OES2018 SP2 FTF Updates Bundle and FTF Updates Bundle Group

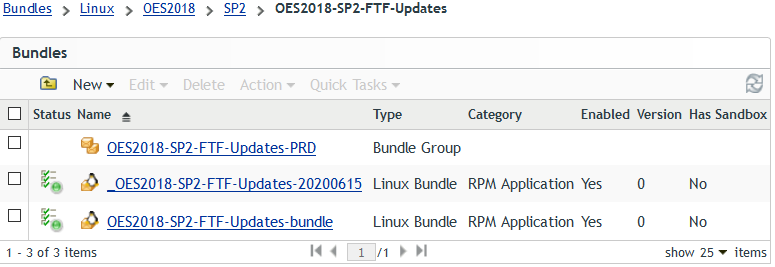
Finally the YUM service for this FTF Updates Bundle Group is configured.

Every time a FTF s added or removed from this bundle a new FPL needs to be created for it.

Assigning Update Bundles After a Server Upgrade

After a server has been upgraded to the next support pack using AutoYaST package management tools such as zypper automatically have access to the Add-On repository for the new support pack (seeFigure 5-2 Zypper and ZCM Repositories After Upgrade to OES2018 SP2).

To supply the ZENworks Adaptive Agent with the same updates the server must be removed from the server group representing systems with the old support pack and must be made a member of the server group representing the systems that already have been upgraded to the new support pack. For example, if you have upgraded a server from OES2018 SP1 to OES2018 SP2 in your production environment you need to move its server object from the server group PRD_OES2018SP1 to the server group PRD_OES2018SP2.

After a zac ref bypasscache the ZAA will be using the same updates as zypper. The zac bin command needs to be executed to update the bundle status from Downloaded to Available (Figure 8-25, Installation of Update Bundles with zac bin).

Figure 8-33 Zypper and ZCM Repositories on OES2018 SP2

Use the commands zypper lr and zac bl to verify that zypper and the ZAA on the system are using the desired repositories.

8.5.5 Managing Configuration Bundles and Configuration Bundle Groups

The creation of a configuration bundle is always an administrative task. As a general rule all our configuration bundles have been created as empty Linux bundle but you can use any category of Linux bundle available in ZCM to create a configuration bundle.

Bundle Design Guidelines

In theory configuration bundles are only assigned to devices where these bundles make sense. However, there is always a chance of error and therefore, with the exception of bundles that apply to all devices we use requirements to ensure that a bundle will only become effective on the intended target devices.

Requirements are available on the bundle level as well as on the individual action. For ease of administration requirements on the bundle are preferred. For instance, if you want to create a bundle to configure some NSS setting (bundle OESALL_NOV-NSSSTART-CFG) this bundle should have a requirement to only apply to devices where the file /etc/opt/novell/nss/nssstart.cfg does exist.

Action requirements are used as an exception. For instance there are differences in the default NTP configuration on SLES11 and SLES12. Therefore modifications to /etc/sysconfig/ntp (bundle SLESALL_NOV-NTP-SYSCONFIG) depend on the SLES release and actions that only apply to a specific release must be defined with a requirement for that particular release.

Finally all Linux bundles must execute their actions as root otherwise they will fail to execute.

We propose that for configuration bundles you use the following naming scheme.

Table 8-7 Configuration Bundle Naming Scheme: %PRODUCT%[%VERSION%[SP%SP-LEVEL%]]_%INITIATOR%-%PURPOSE%[-%TARGET%]

Name

Description

PRODUCT

EDIR | IMAN | SLES | OES

This part of the bundle name identifies the component or product to which a bundle applies. Bundles for SLES also apply to OES systems. Bundles for eDirectory or iManager apply to both, SLES systems and OES systems.

VERSION

[ 11 | 12 | 15 | 2015 | 2018 | .. | ALL]

This part of the bundle name indicates the minimum version of a product to which a bundle applies. If a bundle does not have a version limitation, ALL is used instead. This part is not used for eDirectory or iManager specific bundles.

For instance, as NLVM was only introduced in OES11 the name of any NLVM specific bundle needs to begin with OES11… to indicated that this bundle must only be assigned to devices running OES11 and later versions.

SP-LEVEL

[[ 1 | 2 | 3 | ..] [only]] | ALL

This part of the bundle name indicates the minimum support pack level of a product to which a bundle applies. If a bundle does not have a support pack level limitation, ALL is used instead. If a bundle should only apply to a specific support pack only will be added. This part is not used for eDirectory or iManager specific bundles.

For instance, as Ganglia was only introduced in OES11 SP2 the name of any Ganglia related bundle needs to being with OES11SP2… to indicate that this bundle must only be assigned to devices running OES11 SP2 or later.

INITIATOR

MFC | NOV | <CUST>

This part of the bundle name identifies who created the initial version of a bundle. Bundles that are not specific for a customer and have been created by Micro Focus Consulting use MFC. Bundles that have been created before the merger between Novell and Micro Focus still use NOV.

Customer specific as well as customer created bundles use a customer specific identifier <CUST> instead (max. 4 characters).

PURPOSE

This part of the bundle name is fairly flexible and is intended to give a hint on which part of a system is affected by the bundle.

This can be the name of a configuration file that is modified by the bundle such as NTP-CONF (note that we use “-” instead of “.”).

Where a bundle modifies multiple configuration files or modifies different files in different releases it may be appropriate to indicate the function of the system that is being configured, i. e. BOOTSPLASH-CONFIG.

TARGET

<Cluster1> | PRV | …

This is an optional part of the naming standard that only will be used if a bundle is specific for certain systems such as bundle distributing the cluster specific bindings files to the nodes of a given NCS cluster.

Another use case would be a bundle that only applies to systems in a specific location.

The suggested names for configuration bundles are case-sensitive and the separators “_” and “-” are a relevant part of their name.

Assigning Configuration Bundles

Just like update bundles are made a member of Update Bundle Groups, configuration bundles are made a member of Configuration Bundle Groups. The naming scheme for these bundle groups has already been defined in Table 8-6 Configuration Bundle Groups Naming Scheme.

These Configuration Bundle Groups are assigned to the various Server Groups with a distribution schedule of On Device Refresh and immediate installation after distribution.

Selected Configuration Bundles

Over the years many configuration bundles have been developed for different customers and projects. This section describes a set of ZCM bundles used in literally every consulting project.

We describe how these bundles are build and designed and we also give some more background on the use case applicable to these bundles.

Archives with these bundles can be downloaded from the CIF download site and can be directly imported into your ZCM zone.

Please be aware that these bundles are only intended as examples. You should carefully inspect each bundle and verify that it meets your specific needs before you apply it to your environment.

Process the file zman_bundle_assign.in.cif through the zman bex command to make the imported bundles a member of your Configuration Bundle Groups (see Configuring Your Own ZENworks Management Zone).

Bundles in the Folder EDIR-BASECONFIG

Bundles in this folder are used to modify the configuration of eDirectory or its services.

EDIR_MFC-disable-FIPS

All eDirectory 9.0 servers run in FIPS mode for OpenSSL by default however, FIPS is not supported with OES (eDirectory Features Not Supported in OES 2018 SP2).

Operating OES servers with FIPS enabled can have detrimental side effects. Therefore FIPS mode needs to be disabled after OES2018 has been installed or a server has been upgraded to OES2018. If you should have non-OES eDirectory servers in the same tree as your OES servers it is recommended to apply this bundle to these servers as well.

The bundle uses an Edit Text File action that searches a line beginning with “n4u.server.fips_tls=1" in /etc/opt/novell/eDirectory/conf/nds.conf. If such a line is found, the whole line is replaced with "n4u.server.fips_tls=0".

The unavoidable backup files that are created in the process are removed through a File Removal action.

Summary

EDIR_NOV-NMAS-CONF

By default NMAS refreshes its login policies with every login attempt. In particular on servers that do not hold a replica of the Security container this is not desirable. In addition the NMAS login policies are not likely to change frequently so it is sufficient to refresh them at scheduled intervals.

The bundle uses an Edit Text File action to create the NMAS configuration file with a contents of “nmas RefreshRate 30”.

Summary

Bundles in the Folder IMAN-BASECONFIG

The bundles in this folder modify the configuration of iManager and manage which users are allowed to make configuration changes.

IMAN_NOV-change-config-xml

In the real world some default settings of iManager such as the timeout of 30 minutes are not very practicable. This bundle is used to modify some of these settings. It first deploys the python script change_config_xml.py to /usr/local/zac. Subsequent actions execute the python script to set the following parameters:

  • Enable “Remember login credentials”

  • Disable “Hide specific reason for login failure”

  • Timeout 180 minutes

Finally an embedded bash script is used to set the tree name and to add the server name to the login dialog.

The bundle can easily be extended with additional actions to set other settings to meet your needs.

Summary

  • Environments: all iManager servers

  • Configuration File: /var/opt/novell/iManager/nps/WEB-INF/config.xml

IMAN_NOV-users

By default only the user that installs a server has the rights to manage iManager on this server. In many environments it is desirable to have multiple users or groups configured in this role.

An embedded bash script is used to set the users in the iManager configuration file. You must modify this script and add the users and/or groups that you want to grant iManager manager capabilities.

Summary

  • Environments: all iManager Servers

  • Configuration File:

    /var/opt/novell/iManager/nps/WEB-INF/configiman.properties

Bundles in the Folder OES-SERVICES

Bundles in this folder configure various aspects of different OES services.

OES11ALL_NOV-CHECK-MOVE

By default OES does not provide a means to easily monitor the progress of a pool move. This bundle deploys the script check_move.sh to /usr/local/ncif. When this script is executed with a pool name as the only parameter it documents the status of the corresponding pool move in the file /usr/local/ncif/move_<PoolName>. Executing this script in regular intervals through cron will document the progress of a pool move.

Summary

  • Environments: all OES servers with NSS

  • Components: NSS

  • Tools: NLVM

OES11ALL_NOV-NLVM-CMD-COMPLETIONS

This bundle implements command completion for nlvm commands by deploying the completion file nlvm_completion.sh to the /etc/profile.d directory. With this file in place possible completions for a nlvm command are displayed when hitting the <TAB> key.

Summary

  • Environments: all OES servers with NSS

  • Components: NLVM

  • Configuration Files: /etc/profile.d/nlvm_completion.sh

OES11ALL_NOV-NLVM-CONF

As a general rule it is not advisable that nlvm has access to the system device(s). This bundle only applies to systems installed through the Consulting Installation Framework. An embedded bash script determines devices from /root/install/variables and excludes the first system device from nlvm.conf. If the second device should be used by a LVM VG named ZCM it will also be excluded.

Summary

  • Environments: all OES servers with NSS

  • Configuration File: /etc/opt/novell/nss/nlvm.conf

OES2018_MFC-DISABLE-CIS-AGENTS

Cloud Integration Services (CIS) agents are active on every OES2018 servers that has NSS installed by default. If CIS is not implemented in an environment this is not advisable. The bundle uses an embedded bash script to stop and disable the following three agents:

  • oes-cis-agent

  • oes-cis-recall-agent

  • oes-cis-scanner

Summary

  • Environments: all OES2018 servers with NSS not using CIS

OESALL_NOV-BASHRC

This bundle deploys bash.bashrc.local to /etc. This file primarily contains aliases for cluster commands that are executed via sudo. For instance the command cluster status can be executed using its alias cs.

Summary

OESALL_NOV-CIFS-CONFIG

The bundle uses an embedded bash script to set the following CIFS parameters:

  • block invalid users for 5 minutes

  • disable offline caching

  • enable DFS support for CIFS

  • enable sub-tree search for CIFS

A second embedded bash script is used to remove the server context from and to add the organization as additional context to the CIFS context file.

Summary

  • Environments: all OES servers with CIFS

  • Components: n/a

  • Tools: n/a

  • Configuration File:

    /etc/opt/novell/cifs/cifs.conf

    /etc/opt/novell/cifs/cifsctxs.conf

OESALL_NOV-NAM-CONF

This bundle uses an embedded bash script to set the following LUM configuration options:

  • cache-only=yes

  • persistent-search=no

  • case-sensitive=no

  • convert-lowercase=yes

  • dont-deny-pamservice=yes

Summary

  • Environments: all OES servers

  • Configuration File: /etc/nam.conf

OESALL_NOV-NCPSERV-CONF

This bundle uses an embedded bash script to disable NCP broadcasts and to configure the handling of duplicate shadow files in DST. Its sets the following NCP server options:

  • DISABLE_BROADCAST = 1

  • DUPLICATE_SHADOW_FILE_ACTION = 4

  • DUPLICATE_SHADOW_FILE_BROADCAST = 0

Summary

OESALL_NOV-NSSSTART-CFG

This bundle uses an embedded shell script to set the following NSS parameters:

  • /ListXattrNWmedata

  • /CtimeIsMetadataModTime

  • /FastWriteOfMessyBeasts

Summary

  • Environments: all OES servers with NSS

  • Configuration File: /etc/opt/novell/nss/nssstart.cfg

OESALL_NOV-PureFTP-local-bind

The FTP server by default listens on all interfaces of a server. When you want to implement FTP for a cluster resource it is important to reconfigure the FTP server to only listen to the IP address of the cluster node. This is achieved with an embedded bash script that determines the primary IP address of the host and sets it as the only IP address for FTP. The FTP service is restarted.

Summary

  • Environments: all OES cluster nodes with FTP enabled cluster resources

  • Configuration File: /etc/pure-ftpd/pure-ftpd.conf

OESALL_NOV-PureFTP-SYSLOG-ClusterName

Pure FTP by default uses the syslog facility ftp and logs to /var/log/messages. This can be pretty confusing when using FTP to access cluster resources and most customers prefer if the logging goes to the corresponding cluster resource in such cases.

This bundle uses Edit Text File actions to illustrate how to reconfigured the syslog facility local1 to point to /media/nss/FTP/var/log/pure-ftpd-FTP.log. local1 must be set as SyslogFacility in the Pure-FTP configuration file on the cluster resource.

This is obviously only an example assuming that the FTP cluster resource will use an NSS volume named FTP. Also ClusterName in the name of the bundle needs to be replaced with the name of the cluster hosting the FTP service.

The syslog service is reloaded to activate the configuration change.

Summary

8.5.6 Bundles in the Folder SLES-SERVICES

SLES12ALL_MFC-LFTP-CONFIG

lftp is the default FTP client in SLES12 and beyond. This bundle uses an embedded bash script to enable SSL support for FTP and to set the path where the CA certificates need to be stored to /etc/ssl/certs/.

Summary

  • Environments: all OES2018 servers that need a SFTP client

  • Configuration File: /etc/lftp.conf

SLESALL_Customer-SSH-Keys

This bundle implements a centralized management for SSH public keys for root access. It uses an Edit Text File action to create/replace the authorized_keys file in /root/.ssh.

The file can be used to deploy the public SSH key for users that need to access the target system as root. It also can be used to deploy public SSH keys for other servers that shall be able to execute ssh commands on the target system.

Summary

  • Environments: all OES servers

  • Components: SSH

  • Configuration File: /root/.ssh/authorized_keys

8.5.7 SLESALL_NOV-BOOTSPLASH-CONFIG

SLES servers by default display a splash screen during boot. This bundle disables this splash screen so that the messages during boot can be viewed on the screen without the need to first have to hit the ESC key.

For SLES11 this is implemented through an embedded bash script that modifies the configuration for the grub boot loader and the sysconfig settings that are used when re-creating the initrd.

For SLES12 and beyond an Edit Text File action is used to modify the default settings for the grub2 boot loader and the initrd is recreated.

Requirements ensure that these actions are only executed on servers with matching SLES release.

Summary

  • Environments: all SLES servers

  • Components: grub / grub2

  • Tools: SLES12: /usr/sbin/grub2-mkconfig

  • Configuration File: SLES11: /boot/grub/menu.lst

    SLES11: /etc/sysconfig/bootloader

    SLES12: /etc/default/grub

    SLES12: /boot/grub2/grub.cfg

SLESALL_NOV-no-SuSE-Register

By default cron_suse_register is executed at 19:41 of the 5th of every month to (re-)register a system with the customer center. In many environments the servers do not have access to the internet and therefor this registration will always fail.

This bundle uses an embedded bash script to delete the corresponding crontab file.

Summary

  • Environments: all SLES servers without internet access

  • Configuration File: /etc/cron.d/novell.com-suse_register

SLESALL_NOV-NTP-SYSCONFIG

The NTP daemon terminates silently if the time it receives deviates from the local time by more than 15 minutes. This can easily happen whenever the system time is changed because daylight saving time begins or ends, the hardware clock does not get updated accordingly and the system is restarted.

In an eDirectory environments this is not desirable. Therefor this bundle uses an embedded bash script to set NTPD_FORCE_SYNC_ON_STARTUP to yes. A second embedded bash script does also set NTPD_FORCE_SYNC_HWCLOCK_ON_STARTUP to yes on SLES11 servers. As this setting is default on SLES12 a restriction is used to ensure that this action is only executed on SLES11. A third action restarts the NTP daemon.

A bundle requirement for the existence of the configuration file ensures that this bundle does not get executed on SLES15 servers that are using chrony instead of ntp.

Summary

  • Environments: all SLES11 and SLES12 servers

  • Configuration File: /etc/sysconfig/ntp

SLESALL_NOV-SLPDA-CONFIG

This bundle uses an embedded bash script to configure the SLP daemon to act as Directory Agent. It also enables the synchronization of SLP service registrations between different DAs and enables the backup of local and remote service registrations every 15 minutes.

Local IP addresses are removed from the list of DAs. Finally slpd is stopped and started again after a delay of 5 seconds.

Summary

  • Environments: ONLY servers that need to be configured as SLP Directory Agent

  • Configuration File: /etc/slp.conf

SLESALL_NOV-ZYPP-CONFIG

This bundle uses an embedded bash script to configure zypper to download all packages before it starts to install them. This is of particular importance if zypper is used to retrieve and install a series of packages over a WAN link that might be come unavailable during the process.

The bundle also disables the use of delta rpms because this typically results in a high load on the system being updated.

Summary

  • Environments: all SLES servers

  • Configuration File: /etc/zypp/zypp.conf

Bundles in the Folder SLES-STORAGE

The bundles in this folder are used to manage the multipath configuration typically required when servers access storage systems over a Storage Area Network (SAN).

DM-MPIO uses two configuration files. The behavior of the daemon is configured in multipath.conf. To avoid any inconsistency the goal is that exactly one configuration file shall be used for all systems in a customer environment. This file may contain settings for multiple storage systems. The daemon will only use those settings that are relevant for the storage systems a particular server is connected to.

By default the disk devices provided by a storage system are uniquely identified by 32-byte World Wide Identifier, the WWID. If a server is attached to many storage devices it can become difficult to distinguish these devices based on their WWIDs. DM-MPIO allows to use a bindings file to translate WWIDs into user friendly names. The bindings file should be specific for a server, or a group of servers in case of a cluster.

SLESALL_NOV-BINDINGS-ClusterName

This bundle just copies the file bindings to /etc/multipath with mode 600 into the directory /etc/multipath and reconfigures the multipath daemon with this new file using an embedded bash script.

The bindings file in this bundle is only a template. Whenever multipath discovers new devices it will add the corresponding entries to the end of the file using the default multipath device names. To assign a user friendly name to a device you simply replace the default multipath device name with the name of your choice. If the device is used by NSS the device name you choose must not match the name of the NSS pool or the NSS volume. To avoid this problem the device names in the sample file have been appended with “-1”.

For better readability it is recommended to separate the two columns with tabs rather than just spaces.

Finally, if you are working in a cluster and compare the bindings file of different cluster nodes you might find that the device that has the name mpatha assigned on the first node is using a different name on another node. As this can become pretty confusing in a cluster using many devices it is mandatory to ensure that all nodes of a give cluster are using the same bindings file.

Therefor, whenever there are any changes to the devices assigned to a cluster you only make the change in the bindings file of one cluster node, upload it to your ZCM zone and let ZENworks distribute it to all cluster nodes.

Summary

SLESALL_NOV-MULTIPATH-CONF

This bundle deploys the multipath.conf file to /etc and reconfigures the multipath daemon using an embedded bash script.

The configuration file in this bundle sets a number of defaults that apply to all storage systems. Device specific settings for a number of commonly used storage systems are contained in the devices section.

The blacklist section demonstrates various ways to prevent the multipath daemon to manage local devices independent of their WWID. This is very important to avoid systems with btrfs and multipath to exit to emergency mode.

Summary

Bundles in the Folder SLES-NETWORK

The bundles in this folder are used to manage various aspects of network connectivity.

SLES11ALL_MFC-BONDING

Manually setting up a bonded network interface requires many steps that are automated by this bundle.

As a precaution this bundle is only installed if no bond device does exist on the target system. If this is the case it deploys the bash script config_bond.sh to /usr/local/zac. A second action will create an active-passive bond device with slaves eth0 and eth1 (up to four slaves are possible) using one ARP ping per second to the default gateway to monitor the link status. As this process will restart the network this bundle should not be executed on an active cluster node.

The script can also be used to create a bond that cannot reach the default gateway. In this case the IP address of the ARP ping target must be specified using the --target command line parameter.

Summary

  • Environments: all servers that require bonded network interfaces.

  • Tools: /usr/local/zac/config_bond.sh

  • Configuration File: /etc/sysconfig/network/ifcfg-bond0

SLESALL_MFC-MTU-9000-eth2-eth3

When using iSCSI it is very important to increase the maximum packet size to improve throughput.

This bundle deploys the bash script set_mtu.sh to /usr/local/zac. A second action executes the script and sets the MTU for all interfaces specified as command line parameter to 9000.

Summary

  • Environments: all servers with iSCSI connections

  • Configuration File: /etc/sysconfig/network/ifcfg-eth*