5.2 Implementation

This section first gives a brief overview of how the Consulting Installation Framework is used to implement the AutoYaST workflow depicted in Figure 2-1, AutoYaST Process Overview before it provides a detailed description of each element.

5.2.1 Overview

By default the autoyast= parameter at the boot prompt of the system being installed points to the URL http://<AutoYaST-Server>/xml/default.

This control file is retrieved and processed. Contrary to what one might expect the control file for our solution does not contain a class section. Instead it contains a scripts section to define the pre-script pre-fetch.sh and a software section that is only required for the installation of SLES15.

After processing the control file AutoYaST enters the pre-script stage and retrieves the pre-fetch.sh script via HTTP. pre-fetch.sh is the command center of the solution that manages all aspects of building the customized control file for the server to be installed.

The script first retrieves and sources the system configuration file AY_MAIN.txt and the main library ay_lib.sh to define the environment for the CIF. From this point forward, pre-fetch.sh exclusively uses functions from the main library unless additional functions are defined in the custom library that is retrieved and sourced next to further modify the CIF environment, if required.

CUSTOMER.txt is the first configuration text file that is retrieved and sourced resulting in a first set of values that are assigned to the variables that describe the system that will be installed.

In the next step the server configuration file server.txt is searched for the IP address that must be provided at the beginning of the installation. This address is used to identify the entry that provides the server type, the intended partitioning, the software to be installed and some other information.

If the entry for the new server in server.txt should specify an eDirectory tree name and/or a server location, the corresponding configuration text files are retrieved and sourced as well. This will overwrite any values that have been assigned to variables from CUSTOMER.txt earlier. server.txt is processed a second time to preserve more specific values from the server configuration file over values from the configuration text files. This will assign the final value to every variable.

The variables along with their value are compiled in the file variables.txt that will be stored in the /root/install directory of the installed system. This file is used to make the variable definitions available to other scripts.

In the next step, the original control file, /tmp/profile/autoinst.xml, is copied to /tmp/profile/modified.xml and all subsequent control file modifications happen on this copy.

Based on the specifications obtained from the configuration text files additional template files are retrieved and are merged into the control file. Among other things, these files determine the disk partitioning of the new server and which patterns and packages will be installed.

Finally, the service type specified in Field 14 of each line in the server configuration file server.txt is evaluated and the template files required to build the specified service type are retrieved and merged into the control file.

These XML snippets contain some SLES configuration information, such as the boot loader configuration, the memory reservation for the kdump kernel, or the scripts to be executed in the post-scripts and init-scripts phase of the installation.

For OES servers additional files contain information about the configuration of the various services such as eDirectory, NSS, and CIFS that are also merged into the control file.

As the last execution step, pre-fetch.sh replaces all placeholder variables that originated from the different template files and XML snippets that are now part of the /tmp/profile/modified.xml control file with the values that have been derived from the various configuration text files and the server configuration file. This is the same configuration information that you would enter into YaST during a manual installation of SLES or OES.

If any error should occur during this process, pre-fetch.sh outputs an error message on the screen of the system being installed indicating where the error has occurred. The administrator can inspect the error message and decide whether to abort or to continue the installation. For the great majority of errors that can occur the safe option is to abort the installation!

When pre-fetch.sh terminates without error, AutoYaST picks up the /tmp/profile/modified.xml control file and processes it as explained in Design.

The remainder of this section explains this process in more detail.

5.2.2 Directory Structure of the Consulting Installation Framework

Figure 5-1 illustrates the directory structure for the Consulting Installation Framework underneath the top level directory /data/autoyast.

Figure 5-1 Directory Structure

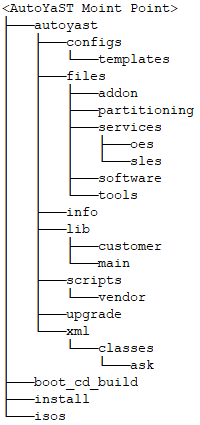
/data/autoyast/xml is the driver file repository directory introduced and explained in section Control File and Class File Repository.

The directory /data/boot_cd_build is used to build the Installation Boot Medium as explained in Installation Boot Medium.

The /data/isos sub-directories is used to store the installation sources and the Installation Boot Medium. /data/install is used to mount the installation sources as discussed in Installation Repositories.

The purpose of the directories underneath /data/autoyast is explained in the following table.

Table 5-1 Directory Layout for the Consulting Installation Framework

Directory

Description

.../configs

All configuration files are stored in this directory:

  • The system configuration file AY_MAIN.txt.

  • The customer configuration file CUSTOMER.txt.

  • Your tree name configuration files <TreeName>.txt.

  • Your location configuration files.

  • The server configuration file server.txt.

.../configs/templates

Holds template files to create your customer configuration file, your tree name configuration files, and your location configuration files.

.../files/addon

Holds the XML class files defining the Add-On products for the various Server Types used in Field 04 of server.txt.

.../files/partitioning

Holds the XML class files for the partitioning of the various disk types used in Field 07 of server.txt.

.../files/services/oes

Holds the XML class files configuring the OES services that are part of the service types defined in CUSTOMER.txt.

.../files/services/sles

Holds the XML class files configuring the SLES services that are part of the service types defined in CUSTOMER.txt.

.../files/software

Holds the XML class files for the different software selections used in Field 08 of server.txt.

.../files/tools

Stores the check_errors.xml ask file required for the error handling.

.../info

Holds files providing additional boot options.

.../lib/customer

Stores the custom library customer_lib.sh that can be used to implement customer-specific functions to further customize the installation process.

.../lib/main

Stores the main library ay_lib.sh provided by Micro Focus Consulting and SUSE Consulting. Most of the functionality of the Consulting Installation Framework is implemented in this library. It must not be changed or modified in any way. Use the customer library instead.

.../scripts

Every script that is executed in the pre-, post- or init-phase of the installation process is stored in this directory.

.../scripts/vendor

Stores scripts to perform additional configuration tasks. Any script in this directory named *.sh will be executed by the script post-inst.sh.

.../upgrade

The control file and any other files that need to be retrieved to perform an upgrade via AutoYaST need to be stored in this directory.

5.2.3 Configuration Files

The definition of the environment in which the Consulting Installation Framework (CIF) operates and the configuration information for the servers being installed using the CIF is defined in a set of configuration files that by default are stored in /data/autoyast/configs.

Configuration file entries consist of three pieces of information:

  • The type of the variable.

    This can be a string, an IP address or DNS name, an URL, a file or directory name, a list of values, or any custom definition.

  • A short description of the information stored in the variable,

  • The actual definition in the format VARIABLE="value".

IMPORTANT:The variables are only documented in the files. If you want to learn more about the meaning of a certain variable or the syntax to use with a variable please refer to the comments in the configuration files.

The following example defines the name of the OES Installation user that is used to authenticate against the eDirectory tree when installing a new server into an eDirectory tree:

## Type String
## Description: fully distinguished name of the OES Installation user in LDAP syntax 
OES_INSTALL_USER="cn=Admin,o=MF"

Although strictly technical it is not always required, we strongly recommend that you enclose all values in double quotes.

There is one notable exception: because the encrypted password for the root user typically contains “$”, it must be enclosed in single quotes instead of double quotes. As a best practice, any setting that is not used in a particular configuration file should be commented.

System Configuration File AY_MAIN.txt

This configuration file defines the directory structure to store the various components of the CIF, the name of the files used by the CIF, and the URLs to retrieve this information.

IMPORTANT:As explained in The Script pre-fetch.sh, the name and path of this file must be hard-coded in pre-fetch.sh and any other shell script used by the CIF that needs access to the configuration files.

These scripts use the variable PREFIX, to identify the CIF base directory (default: autoyast). The variable AY_CONFIG_DIR contains the path to the configuration files relative to the CIF base directory (default: configs).

The framework has been tested only with the default names used in this document and defined in our version of the system configuration file. If you should want to use different names, you can do so at your own risk, making the appropriate changes in AY_MAIN.txt and the scripts. However, we strongly recommend that you use the default name wherever possible.

Environment Configuration Files

The purpose of the environment configuration files is to separate information that applies to multiple servers from server-specific information provided by the server configuration file (default: server.txt). DNS name servers, time servers, the distinguished name of the UNIX configuration object, or the list of LDAP servers are examples for the type of information that is provided by these files.

To allow for sufficient flexibility to accommodate a wide variety of environments, the framework supports up to three configuration files defining the same set of variables. The variables are organized in the sections infrastructure, OES with the sub sections DHCP, DNS, DSfW, LDAP, NSS, and NSS-AD, and SLP and SLES. The files are discussed below in a global-to-local order.

Customer Configuration File CUSTOMER.txt

This file is the most global configuration file. It is mandatory for every systems that is installed using the CIF. Information that applies to all servers in all environments should be defined in this file.

There are three sections that by default are only found in this configuration file:

  • Customer name (informational only).

  • Definition of the service types.

    These definitions combine all the XML class files that are required to configure all services that have been installed. The service type for an OES system always needs to include the service type for the corresponding SLES base.

  • Information about the systems used for software updates.

Typically this information applies to all servers and environments. However, if required any of these three sections can be copied to any of the other environment configuration files. For instance if you plan to use a different system to provide updates to servers in a specific environment just copy the last section of CUSTOMER.txt to the configuration file for this environment and specify the appropriate values for the copied variables.

Tree Name Configuration File <TREE_NAME>.txt

Most customers have more than one eDirectory tree in their environment. Each of these eDirectory trees requires its own configuration file and only values that apply to all servers of a tree should be specified in these files.

Even so the CUSTOMER.txt configuration file may appear to be sufficient to provide all required settings in small environments with a single tree and only a few servers, the tree name configuration file must always exist to install OES servers (even if not a single values should be set in the file) as it determines in which eDirectory tree the server will be installed.

The name of this file consists of the eDirectory tree name specified in Field 10 of the server.txt server configuration file and the suffix ".txt". For example, if an eDirectory tree is named MYCOMPANY-TREE, then pre-fetch.sh searches for a file .../autoyast/configs/MYCOMPANY-TREE.txt (case-sensitive).

Location Configuration File

Configuration information defined in the customer configuration file or in the tree name configuration file can be overwritten with information from an optional location configuration file. You can choose any file name for this type of configuration file. If it is used, it must be specified in Field 13 of the server configuration file. Each server can only use a single location configuration file.

“Location” can represent a lot of things. It could provide configuration information specific for a country, a city, a site, a building, a data center or a server room, or even just a LAN segment -basically anything that defines a group of servers that need different configuration information.

You also can use this configuration file to apply specific settings to a logical group of servers. For instance if you would want to set a particular root password on a group of servers this could be achieved by using a location configuration file that only defines that password.

If the only configuration information that is specific for groups of servers is their default gateway it is not required to create a location configuration file for every group. Instead, the default gateway of each server can be provided in Field 3 of the server configuration file from where it is retrieved when this file is processed the second time.

Configuration File Templates

Templates for the three environment configuration files are available in /data/autoyast/configs/templates. When you build your CIF environment you need to copy these template files to /data/autoyast/configs and supply the values for the different variables. Tree name configuration file(s) and location configuration file(s) need to be named to match your environment.

Server Configuration File server.txt

The server configuration file defines the server-specific information for the Consulting Installation Framework.

Each server configuration is represented by a single line, with its fields separated by semicolons. The current server configuration file contains 14 fields explained in the following table:

Table 5-2 Field Descriptions for the server.txt Server Configuration File

No.

Field Name

Meaning

Example

Multivalue Required

1

HOST_NAME

Short name of the server being installed

machine01

No Mandatory

2

IP_ADDRESS/CIDR

IP address and net mask of the server being installed; used as system identifier.

Net mask in CIDR notation. For example, 255.255.240.0 = 20

10.10.10.10/24

No Mandatory

3

GATEWAY

IP address of the default gateway

10.10.10.1

No Optional

4

SERVER_TYPE

Pure SLES or OES systems, including version and support pack level.

ovl at the end of the identifier denotes that the system will be installed from the combined SLES/OES installation medium.

Server types for different environments can be created by appending identifiers such as -DEV or -TST.

sles12sp5-DEV

sles15sp1-TST

oes2018sp2-PRD

oes2015sp1-ovl-DEV

No Mandatory


IMPORTANT: There must always be a corresponding addon_ products-$SERVER_TYPE. xml file in the .../files/addon directory.


5

DEVICE_NAME0

Name of the first system disk device.

/dev/sda, /dev/xhda

No Mandatory

6

DEVICE_NAME1

Name of the second system disk device.

/dev/sda, /dev/xhda

No Optional

7

PART_FILE

Partitioning class file. Must be located in .../files/ partitioning.

The file name should identify type and size of the device(s) for which the partitioning has been defined (Partitioning).

No Mandatory

8

SOFT_FILE

Software class file. Must be located in .../files/software.

The file name must identify the SERVER_TYPE and the purpose of the server for which the software selection is valid.

For example: soft-oes2018_eDir.xml soft-sles15_ZCM.xml

No Mandatory

9

ZCM_KEY_LIST

Keys for the registration of the new device with the ZENworks Management Zone Multiple keys, separated by ':' are possible.

The first key is used for the registration with the ZCM zone. All other keys are used for subscribing to server groups for managing configuration and software updates.

Examples for valid ZCM keys for a production Environment are:

Location: PRD_eDir Configuration: PRD_eDir_GRP Update: PRD_OES2018SP2

Yes Optional

10

TREE_NAME

eDirectory tree name.

There must be a configuration file <TREE_NAME>.txt in .../configs.

The file name is case-sensitive.

My_Tree

No Mandatory for servers with eDir.

11

TREE_TYPE

Determines whether a new tree will be created or the server will join an existing tree.

existing|new

No Mandatory for servers with eDir.

12

SERVER_CONTEXT

Server context in LDAP syntax.

ou=servers, ou=services, o=MF

No Mandatory for servers with eDir.

13

SERVER_LOCATION

Configuration file determining all aspects of the physical server location such as the following:

  • Default gateway

  • LDAP server list

  • NTP server list

There must be a configuration file <SERVER_LOCATION> in ../configs.

The file name is case-sensitive.In smaller environments, all of this information can be provided in the tree name configuration file or in the customer configuration file.

Utah.txt

Provo.loc

DC1.info

No Optional

14

SERVICE_TYPE

XML profile as defined in the customer configuration file.

The file names are case-sensitive. The XML files referenced by the profile must exist in .../files/services/oes and .../files/services/sles.

SLES15_BASE, OES2018_EDIR_IMAN

No Mandatory

5.2.4 XML Snippets

The files stored in the directory structure underneath .../files have been created by retrieving the relevant section from an autoinst.xml file saved after a manual installation of an OES or SLES system with all patterns and by replacing dynamic information with placeholders.

In the following example the DNS information has been replaced with place holders enclosed in %%.

<dns>
  <dhcp_hostname config:type="boolean">false</dhcp_hostname>
  <dhcp_resolv config:type="boolean">true</dhcp_resolv>
  <hostname>%%HOST_NAME%%</hostname>
  <domain>%%DOMAIN%%</domain>
  <searchlist config:type="list">
    <search>%%SEARCH_LIST%%</search>
  </searchlist><nameservers config:type="list">
  <nameservers config:type="list">
    <nameserver>%%NAMESERVER%%</nameserver>
  </nameservers>
</dns>

If you build your own AutoYaST server you should carefully inspect each of these files to ensure that the files provided by our solution meet your specific requirements.

Add-On Products

Each server installed using the Consulting Installation Framework requires one add-on XML file. This file must be named addon_products-$SERVER_TYPE.xml, where $SERVER_ TYPE is the value of Field 04 in the server configuration file server.txt.

For current OES and SLES systems, these files determine which updates for OES and SLES (YUM repositories) are deployed as part of the installation process including updates for SLES Modules if they should be installed.

Typically the YUM repositories for the various updates will be provided by a ZCM Primary server configured as described in YUM Repositories Derived From Frozen Patch Level Bundles and Pool Bundles.

In the case of OES2018 SP2 each of the two update repositories needs to be specified as a separate list entry in the add-on XML file:

 <listentry>
      <!-- SLES12 SP5 for OES2018 SP2 Updates -->
      <media_url>%%YUM_SERVER%%/zenworks-yumrepo/OES2018-SP2-SLES12-SP5-Updates-PRD</media_url>
      <product>OES2018-SP2-SLES12-SP5-UPDATES</product>
      <product_dir>/</product_dir>
      <name>OES2018 SP2 SLES12 SP5 Updates (PRD)</name>
      <alias>OES2018-SP2-SLES12-SP5-UPDATE-PRD</alias>
</listentry>
<listentry>
      <!-- OES2018 SP2 Updates -->
      <media_url>%%YUM_SERVER%%/zenworks-yumrepo/OES2018-SP2-Updates-PRD</media_url>
      <product>OES2018-SP2-UPDATES</product>
      <product_dir>/</product_dir>
      <name>OES2018 SP2 Updates (PRD)</name>
      <alias>OES2018-SP2-UPDATE-PRD</alias>
</listentry>

SMT creates YUM repositories when it synchronizes updates from the customer centers. The list entries for the OES2028 SP2 updates provided by an SMT server only differ in the media URL:

<listentry>
     <!-- SLES12 SP5 for OES2018 SP2 Updates -->
     <media_url>%%YUM_SERVER%%/repo/$RCE/OES2018-SP2-SLES12-SP5-Updates-/sle-12-x86_64</media_url>
     <product>OES2018-SP2-SLES12-SP5-UPDATES</product>
     <product_dir>/</product_dir>
     <name>OES2018 SP2 SLES12 SP5 Updates (PRD)</name>
     <alias>OES2018-SP2-SLES12-SP5-UPDATE-PRD</alias>
</listentry>
<listentry>
     <!-- OES2018 SP2 Updates -->
     <media_url>%%YUM_SERVER%%/repo/$RCE/OES2018-SP2-Updates/sle-12-x86_64</media_url>
     <product>OES2018-SP2-UPDATES</product>
     <product_dir>/</product_dir>
     <name>OES2018 SP2 Updates (PRD)</name>
     <alias>OES2018-SP2-UPDATE-PRD</alias>
</listentry>

If an URL should be misspelled or a repo is not reachable AutoYast will report “Failed to add add-on product” early in the installation process.

For OES systems, up to and including OES2015 these files can also define the installation source for OES if the combined OES Install Media should not be used. In this case the URL for the OES add-on product uses the aliases defined in the inst_server.conf apache configuration file described in Apache Web Server Configuration.

Partitioning

Files in this sub-directory contain partitioning information for up to two disk devices. As a general rule, from SLES12 onwards we strongly recommend that you boot from GPT partitioned devices. Class files for this kind of partitioning are identified by GPT in the file name.

We also recommend that you use btrfs as the file system for the system disk of any system based on SLES12 or later. Due to the snapshots created and maintained by btrfs these disks need to be larger then the system disks you have been using with earlier releases of SLES. We consider a capacity of 20 GB and a 2 GB swap partition sufficient for test and development systems. Production systems should use a minimum disk capacity of 50 GB and a swap partition of 4GB.

However, eDirectory does not support and cannot be installed on btrfs. Therefore we create an additional primary partition formatted with xfs and mounted at /var/opt/novell/eDirectory. The size of this partition obviously depends on the size of your eDirectory tree. As a guideline determine the disk space used by eDirectory on a server that holds your complete eDirectory tree and use three times this space as the absolute minimum for the xfs partition.

Most customers prefer to put this xfs partition into LVM for easier expansion. For this purpose we name the LVM Volume Group and the LVM Logical Volume eDir. Class files that implement this kind of partitioning are identified by btrfs-lvm in the file name.

WARNING:These partitioning files use the device names specified in Field 05 and Filed 06 of server.txt, typically /dev/sda and optionally /dev/sdb.

When you (re-)install a system with access to shared devices these kernel device names could be assigned to a path to a shared device. This would result in data loss because the installation would partition and format the shared device!

Therefore, when you (re-)install such a system, make sure that access to shared devices has been temporarily disabled by either removing host access on the storage system, by revoking access to the SAN through a zoning change or by simply disabling ALL host bus adapters for shared devices!

Only re-enable access to shared devices once the installation and configuration has been completed successfully.

For ZENworks Configuration Management servers we recommend to also use LVM and to place the ZCM data on a separate disk mounted at /var/opt/novell/zenworks. The size of this disk obviously depends on the content that will be replicated to the Satellite server.

Following the above recommendation OES servers that also are a ZCM Satellite Server use two LVM VGs and LVs named eDir and ZCM respectively (part-vmware-GPT-btrfs-lvm-50G_2nd-HDD_ZCMSat.xml).

For a ZCM Primary Server a system disk of 50 GB is not sufficient and we recommend a minimum of 100 GB. part-vmware-GPT-btrfs-lvm_2nd-HDD_ZCM.xml creates the BIOS Boot partition and a 4 GB swap partition on the first disk and assigns the remaining capacity to the btrfs partition mounted at /. The second disk is used for the xfs formatted LVM volume ZCM.

These are only a few examples to illustrate how XML class files can be used to define the desired disk partitioning.

Software

The files in this sub-directory are referenced in Field 08 of server.txt and determine which patterns and packages will be installed on the target system.

The guideline for software selection should always be to only install what is required. For instance, you might want to define one software selection for dedicated eDirectory/Login/iManager servers and another one for cluster nodes providing print and file services accessed through AFP, CIFS, or NCP. Branch office servers providing additional services such as DHCP and DNS might require yet another software selection.

A SLES system accommodating a ZCM Primary Server might require other packages than a SLES system hosting some monitoring system or GroupWise.

Services

This area is divided into two directories where the class files defining the configuration of the SLES and OES components that have been installed are stored.

In general these files apply to all versions of SLES or OES supported by the framework. File names including a version number such as ca_mgm_sles12.xml apply to versions up to and including the version specified as part of the file name.

Services – OES

Files in this sub-directory apply to OES systems only. The oes_base.xml file contains all of the configuration settings that are required by every OES server independent of specific patterns, such as the LDAP servers for OES, the eDirectory, SLP, and NTP configuration information, or the configuration of LUM or the NCP Server.

Note that Domain Services for Windows (DSfW) domain controllers for the Forrest Root Domain need to use their own version of this file (DSfW child domains are not supported by CIF). One of these files needs to be part of every service type for OES systems defined in CUSTOMER.txt.

The other files in this directory configure individual OES services such as AFP, NSS, or iPrint, to only name a few. You cannot configure Novell Cluster Services as part of the initial installation, because NCS in most cases needs access to shared storage which can only be configured once the initial installation is complete. Therefor the configuration of NCS must always be done manually after you have completed your storage configuration and verified proper storage access. Also consider the warning on shared devices on the previous page.

Services – SLES

Files in this sub-directory such as bootloader.xml, general.xml, or net.xml apply to SLES systems as well as to OES systems. net-forward.xml configures the network in the same way as net.xml but additionally enables IP forwarding. This is required when using containers.

There is a different version of the class file system*.xml configuring the system services for every SLES release. The file to configure the SLES certificate authority does not apply to SLES15.

scripts-zcm.xml defines the scripts that are executed in the post-phase of the installation. This class file will execute the script zcm-install.sh and if a ZCM key is defined for the system being installed the ZENworks Adaptive Agent will be installed and the system will be registered with the ZCM zone.

Tools

This directory currently only holds the check_errors.xml ask file that is part of the error checking mechanism of the pre-fetch.sh pre-script.

5.2.5 Info Files

These files provide an overflow mechanism to accommodate boot options that do not fit on the limited kernel command line of linuxrc. We provide templates for SLES15 SP1 to either initiate an automated installation, a manual installation or to boot into the rescue system.

The following example shows an info file with all non-network related boot options to perform an AutoYaST installation of SLES15 SP1 using the installer updates that are provided by a YUM repository on a ZENworks Configuration Management Primary Server.

autoyast=http://<IP address of your AutoYaST server>/xml/default-<IP address of your AutoYaST server>
install=http://<IP address of your ISO server>/sles15sp1/
## Installer self-updates - only enable ONE option!!!
## from SMT
#  self_update=http://<IP address of your YUM server>/repo/SUSE/Updates/SLE-INSTALLER/15-SP1/x86_64/update/
## from YUM
self_update=http://<IP address of your YUM server>/zenworks-yumrepo/SLE15-SP1-Installer-Updates

IMPORTANT:To use these files you need to copy them and to manually replace <IP address of your...> with the IP address or your AutoYaST, ISO and YUM server respectively.

As these files are evaluated very early in the installation process AutoYaST cannot do this replacement for you.

This info file is integrated into the menu entry of a grub or grub2 configuration file by means of the info= boot option.

### sles15sp1
title SLES15 SP1
        kernel /kernel/sles15sp1/linux info=http://10.10.10.101/info/info-sles15sp1-ay.txt netsetup=hostip,gateway netmask=255.255.255.0 gateway=10. netwait=10
        initrd=/kernel/sles15sp1/initrd

5.2.6 Libraries

The framework uses two libraries. The main library ay_lib.sh (a set of shell functions that can be reused to reduce code fragments) developed and maintained by Micro Focus Consulting Germany in collaboration with SUSE Consulting Germany contains nearly all code used by pre-fetch.sh and other scripts of the framework.

This library must not be changed or modified in any way as any potential update to the Consulting Installation Framework almost certainly will include a newer version of this library that will replace the current version removing any customer modification.

To accommodate customer-specific functionality, the empty /data/autoyast/lib/customer/customer_lib.sh library file is available. This file can either accommodate completely new functions or it can amend functions from the main library. It can use any function that is already implemented in the main library.

New functions intended to be used in the pre-script phase most likely will also require modifications of pre-fetch.sh (that may or may not get lost with a potential update to the framework). To extend a function from the main library the function needs to copied to the customer library and modified there. The modifications may only add functionality but not modify or remove existing functionality as the function in the customer library will replace the function with the same name from the main library.

For example, you could copy the function do_replace() to the customer library and enhance it to replace additional placeholders defined by you, but you must not alter the existing replacements in any way. However, if your customer library should replace functions from the main library you need to be prepared to adjust your functions with any modification that might be contained in the main library of a potential newer version of the framework.

customer_lib.sh is sourced and executed by pre-fetch.sh before the configuration files are retrieved and processed. No update to the framework will ever touch this particular library.

5.2.7 The Default File Again

The full default file used by the Consulting Installation Framework is displayed below:

<?xml version="1.0"?>
<!DOCTYPE profile>
<profile xmlns="http://www.suse.com/1.0/yast2ns" xmlns:config="http://www.suse.com/1.0/configns">
  <scripts>
  <!--
    This section is mandatory and must not be removed.
    Amongst other things it is used to determine the
    IP address of the AutoYaST server in the post-inst
    phase
  -->
    <pre-scripts config:type="list">
        <script>
        <interpreter>shell</interpreter>
        <filename>pre-fetch.sh</filename>
        <location>http://<IP address of your AutoYaST server>/autoyast/scripts/pre-fetch.sh</location>
        <notification>Please wait while pre-fetch.sh is running...</notification>
        <feedback config:type="boolean">false</feedback>
        <debug config:type="boolean">false</debug>
        </script>
    </pre-scripts>
  </scripts>
  <software>
  <!--  Required for SLES 15  -->
    <products config:type="list">
      <product>SLES</product>
    </products>
  </software>
</profile>

The scripts section of this file defines the pre-fetch.sh pre-script file located in the scripts directory on the AutoYaST server. This information causes the AutoYaST engine to retrieve and execute this script.

This section is one of the few places where customer-specific values must be hard-coded. The IP address of the AutoYaST server is unique to every customer environment and cannot be derived from environment parameters. Therefore it must be explicitly specified in the URL to the pre-fetch.sh script in the location directive of the pre-script definition in the default file, making this file customer specific.

The software section is only required for the installation of SLES15 servers. Earlier SLES versions and OES ignore this section.

5.2.8 The Script pre-fetch.sh

The first action of this script is to retrieve the system configuration file AY_MAIN.txt. This is implemented in the function get_main_config_files() that first derives the IP address of the AutoYaST server being used from the command line.

The script needs three other pieces of information to be able to retrieve the required files from the AutoYaST server:

  • The name of the top-level directory of the Consulting Installation Framework directory structure (PREFIX="autoyast")

  • The name of the directory where the configuration files are stored relative to the top-level directory (AY_CONFIG_DIR="configs")

  • The name of the system configuration file (MAIN_CONFIG_FILE="AY_MAIN.txt")

None of this information can be retrieved from the system environment and therefor is hard-coded in the function get_main_config_files(). If you want to use a different name for the system configuration file or for any of the directories making up the path to it, ensure that you set the correct values here.

All other file names, directory names, and URLs required to retrieve files from the AutoYaST server are read from the system configuration file.

The same function also retrieves and sources the main library ay_lib.sh and the customer configuration file CUSTOMER.txt (or whatever name is defined for this file in the system configuration file).

In some cases, a customer might have requirements that cannot be accomplished by the code of the main library. For these cases, the customer_lib.sh file is provided. Code contained in this file is evaluated after code from the main library but before the replacement of the template variables takes place.

Configuration information such as the default gateway, a list of DNS name servers, or the DNS suffix search list, and also OES specific information such as the name of the installation user or the IP address of an existing replica server can be specified in three different files:

  • The customer configuration file (default name CUSTOMER.txt; mandatory)

  • The eDirectory tree configuration file (must be named <TreeName>.txt; mandatory for OES servers)

  • A location configuration file (can use any name; optional)

After processing the customer configuration file, the script parses each line of the server configuration file server.txt and compares the IP address that has been entered at the beginning of the installation to the IP address part of Field 02 using the library function parse_line. The first match completes the parse operation and the resulting line is used to configure the server.

The tree name configuration file and the optional location configuration file for a particular server are defined in Field 10 and Field 13 of the server configuration file server.txt.

Overall pre-fetch.sh sources the three possible configuration files in the following order:

customer configuration file > eDirectory tree configuration file > location configuration file

This process overwrites the value assigned to a variable from a global configuration file with information from more specific configuration files. For example, a list of NTP time servers specified in the customer configuration file as a company-wide default can be overwritten by specifying a different set of NTP servers in a configuration file representing a particular eDirectory tree. This NTP server list can be further modified by specifying yet another list of NTP servers in a location configuration file representing a particular site.

One of the central functions performed by pre-fetch.sh is to merge XML snippets into the final control file. In particular, the partitioning, software, and services XML files are merged completely into /tmp/profile/modified.xml. This functionality is based on XSLT techniques utilizing /usr/share/autoinstall/xslt/merge.xslt, which is part of any installation RAM disk provided by SUSE.

Another important function of the pre-script is the replacement of the placeholders with their real values. After parsing the server-specific line in server.txt and processing the specified configuration files, every variable will have its final value assigned. The replacement process now searches for every placeholder (enclosed in %%) within /tmp/profile/modified.xml and replaces the whole string with the value of the corresponding variable. For example, any occurrence of %%HOST_NAME%% anywhere in the control file is replaced with the value held by the variable HOST_NAME.

The last action performed by pre-fetch.sh is a basic error check. First, it checks to see if the control file /tmp/profile/modified.xml still contains %%-signs (which implies that “%%” must exclusively be used to identify placeholders. Any other usage, even in comments, will result in an error during this check).

Then it looks for the file /tmp/profile/errors.txt. Various functions from the main library will create this file when an error condition is encountered, for instance, if the IP address that has been entered could not be located in the server configuration file, or in case the retrieval of a file fails. If this file exists, a pop-up is generated that displays the contents of the file along with the list of variables and there assigned values. The administrator can then decide to abort the installation process or to continue it.

5.2.9 Post Installation Scripts

Post-installation scripts perform actions that require an installed system. They must be specified within the <scripts> section of the AutoYaST control file.

The Consulting Installation Framework uses a separate class file (/data/autoyast/files/services/sles/scripts-zcm.xml) that specifies which scripts are to be executed at the end of the installation:

  <?xml version="1.0"?>
  <!DOCTYPE profile>
  <profile xmlns="http://www.suse.com/1.0/yast2ns" 
  xmlns:config="http://www.suse.com/1.0/configns">
    <scripts>
    
      <!-- chroot-scripts (after the package installation, before the first boot) -->
      <chroot-scripts config:type="list">
        <listentry>
        <filename>create-variables.sh</filename>
          <interpreter>shell</interpreter>
          <source>
  <![CDATA[

  # save variables in /root/install/variables.txt
  if [ -f /tmp/profile/variables.txt ]; then
     mkdir -p /mnt/root/install
     cat /tmp/profile/variables.txt  >>/mnt/root/install/variables.txt
  fi
  ]]>
          </source>                                                                                                                              
                      <notification>Please wait while variables list is stored in /root/install/variables.txt . . .</notification>
        </listentry>
      </chroot-scripts>

      <!-- init-scripts (during the first boot of the installed system, all services up and running) -->
      <init-scripts config:type="list">
        <listentry>
         <!-- Miscellaneous changes -->
         <filename>post-inst.sh</filename>
         <interpreter>shell</interpreter>
         <location>%%AY_SERVER%%/%%PREFIX%%/scripts/post-inst.sh</location>
        </listentry>
        <listentry>
          <!-- Install ZCM agent -->
          <filename>zcm-install.sh</filename>
          <interpreter>shell</interpreter>
          <location>%%AY_SERVER%%/%%PREFIX%%/scripts/zcm-install.sh</location>
        </listentry>
      </init-scripts>
    </scripts>
  </profile>

In the chroot phase of the installation, just before the first boot the script create-variables.sh, defined inside the class file is executed and stores the file variables.txt that holds the list of variables and their assigned values into the /root/install directory.

When the system has performed its first boot and all services are running the installation reaches the init stage and executes the scripts specified inside the <init-scripts> tag. The Consulting Installation Framework uses two such scripts.

The Post-Installation Script post-inst.sh

This script sources /root/install/variables.txt created during the first stage of the unattended installation giving it access to the whole set of variables and their assigned values that have been used during that installation stage.

It is used to make configuration adjustments that are not possible in AutoYaST. Currently, it performs the following operations:

  • Add comments to /etc/ntp in SLES12 and earlier.

    If NTP is configured through AutoYaST /etc/ntp.conf only contains a few directives to configure the daemon. However, many customers would like to have a complete ntp.conf including the comments with explanations. This is not possible with AutoYaST and therefore the function complete_ntp() has been introduced.

  • Disable IPv6.

  • Remove “localhost” from the IPv6 loopback entry in /etc/hosts.

  • Enable X forwarding for SSH connections over IPv4.

The script also executes any scripts named *.sh from /data/autoyast/scripts/vendor. This is intended as a simple way to add any customization you may need to the build environment.

The Post-Installation Script zcm-install.sh

If the service type of the system being installed defined in Field 09 in server.txt does not contain “ZCM” and at least one ZCM registration key is specified in Field 09 in server.txt this script will retrieve the ZENworks Adaptive Agent from the source specified by the variable ZCM_AGENT_URL.

The agent is installed and the system is registered with the ZENworks Management Zone (ZCM zone) using the first registration key. Additional ZCM registration keys specified in Field 09 are processed executing the zac add-reg-key command for each of them.

This process ensures the creation of the server object in the ZCM zone in the desired folder (using the first registration key specified). The server is then made a member of device groups (as defined by the additional registration keys) that are assigned to bundle groups holding configuration bundles and update bundles.

As a result configuration bundles are deployed and immediately installed on the new server. Updates have already been installed as part of the installation process however, their status in ZCM needs to be updated (see Assigning Pool Bundles and Update Bundle Groups).

After a reboot the new server is ready for production.

5.2.10 Server Upgrade Using AutoYaST

AutoYaST can not only be used to install new servers it can also be used to upgrade existing servers to the next support pack.

For OES2018 SP2 this is described in Using AutoYaST for an OES 2018 SP2 Upgrade in the OES 2018 SP2 Installation Guide. The AutoYaST control file required to perform an upgrade is the file autoupgrade.xml provided in the root directory of the installation medium for the new support pack.

However, this control file can only be used directly for servers installed in English using an US English keyboard. If your servers should use a different keyboard or are installed in a different language or with support for multiple languages you will need to adjust the corresponding sections of the control file.

   :
  <keyboard>
    <keymap>Your_Keyboard</keymap>
  </keyboard>
  <language>
    <language>Your_Language</language>
    <languages>Your_LanguageList</languages>
  </language>
   :

If you are upgrading to the next support pack after updates have been released for it you can integrate these updates into the upgrade by adding the appropriate add-on section to your control file.

To do so you can simply copy the section from the Add-On XML snippet that you would use to install a server with the new support pack (see Add-On Products). However, as the upgrade does not use the process that replaces placeholders with actual values you need to modify the media URLs and need to replace %%YUM_SERVER%% with the access protocol and the IP address or DNS name used to access your YUM repository server.

For example, if you want to include updates for OES2018 SP2 provided by a ZCM Primary Server for servers in your production environment this section would look as follows:

   :
  <add-on>
    <add_on_products config:type="list">
      <listentry>
        <!-- SLES12 SP5 for OES2018 SP2 Updates -->
        <media_url>http://<IP|DNS of your YUM server>/zenworks-yumrepo/OES2018-SP2-SLES12-SP5-Updates-PRD</media_url>
        <product>OES2018-SP2-SLES12-SP5-UPDATES</product>
        <product_dir>/</product_dir>
        <name>OES2018 SP2 SLES12 SP5 Updates (PRD)</name>
        <alias>OES2018-SP2-SLES12-SP5-UPDATES-PRD</alias>
      </listentry>
      <listentry>
        <!-- OES2018 SP2 Updates -->
        <media_url>http://<IP|DNS of your YUM server>/zenworks-yumrepo/OES2018-SP2-Updates-PRD</media_url>
        <product>OES2018-SP2-UPDATES</product>
        <product_dir>/</product_dir>
        <name>OES2018 SP2 Updates (PRD)</name>
        <alias>OES2018-SP2-UPDATES-PRD</alias>
      </listentry>
    </add_on_products>
  </add-on>
   :

Your modified control file should be stored in /data/autoyast/upgrade with a name that clearly identifies the version to which it will upgrade a system and where it will access the YUM repositories with the updates, for instance autoupgrade-oes2018sp2_ZCM.xml. The autoyast= boot option in your grub configuration file needs to point to this file along with the autoupgrade=1 option (Installation Boot Medium).

Just like an installation an upgrade consists of two phases. When the system has performed its reboot the YaST console will open and request the password for the OES installation user. If the system being upgraded is a DSfW server, YaST will also request the password for the DSfW Administrator.

When this happens you can simply enter the password(s) and the upgrade will complete. However, having to do so in the middle of the upgrade somewhat contradicts the purpose of an automated process. This can be avoided by Creating an Answer File to Provide the eDirectory and DSfW Passwords in the OES2018 SP2 Installation Guide.

To create the answer file for an OES2018 server you simply issue the following command:

yast /usr/share/YaST2/clients/create-answer-file.rb <eDirectory password>

WARNING:As there is absolutely no validation of the passwords entered you need to make sure that the passwords are correct. It may be a good idea to create two answer files and to verify they are identical.

If the password(s) you entered should not be correct, the upgrade will fail and the server that you are upgrading may become unrecoverable.

Note that the password you enter will appear in y2log! This can be avoided by setting the passwords in the variables OES_EDIR_DATA and OES DSFW_DATA before executing the YaST command to generate the answer file however, this will be logged in your bash history. Either way you will have to do some cleaning up to protect your password(s)!

The answer file is created in your current working directory and needs to be copied to the /opt/novell/oes-install directory of every server that will be upgraded. When this file is found at the beginning of stage 2 the required passwords will be retrieved from it and the upgrade will complete without administrative intervention. At the end of the upgrade the file is deleted automatically.

When the upgrade is completed successfully, the Add-On repositories for the earlier support pack have been replaced with those for the current support pack.

Figure 5-2 Zypper and ZCM Repositories After Upgrade to OES 2018 SP2

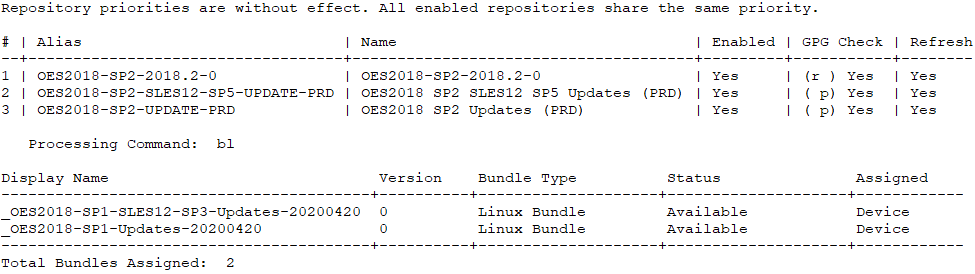
However, ZCM still has the updates from the previous support pack assigned to the system. This needs to be corrected as described in Assigning Update Bundles After a Server Upgrade.