33.2 Automated Migration to Hyper-V
-
Discover or refresh your source workload and your target VM host.
-
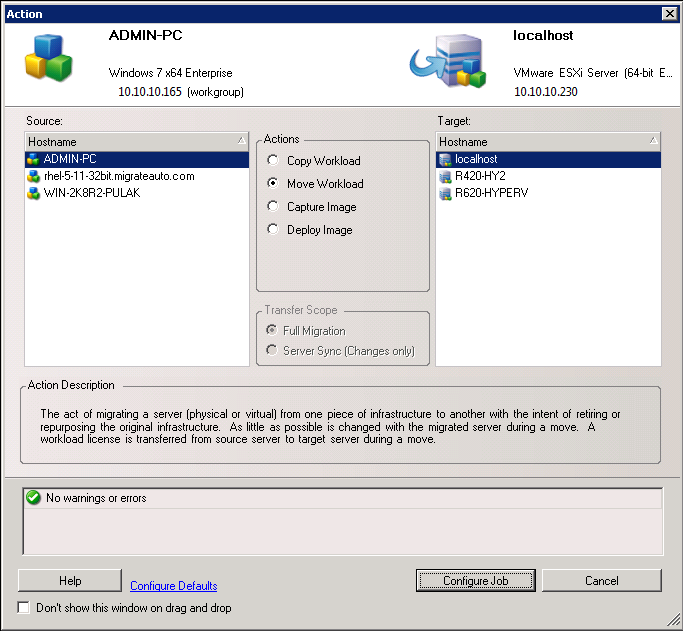
In the Migrate Client, initiate a peer-to-peer workload migration.
-
Expand the Tasks options, then select the conversion type, depending on your goals for the migration:
The Source and Target panes display workloads and targets applicable to the selected type of a migration job.
-
-
In the Source pane, select the workload you want to migrate.
-
In the Target pane, select target host for the migration.
-
Check the validation messages at the bottom of the window.
-
Click to access the Peer-to-Peer Migration Job window.
-
-
In the Job Configuration section of the Migration Job window, configure the following settings:
Setting Name
Description
License
PlateSpin Migrate automatically selects the best license key for a migration job. If you have multiple license keys, you can specify the license key to use for the workload, assuming licenses are available (neither expired nor exhausted).
To specify an alternate key to use:
-
Deselect , then select the appropriate license key from the menu.
-
Click .
The selected license key is displayed on the tab and its description is updated.
Conversion
Transfer Scope
Specify the scope of workload data to transfer from the source to the target as or ).
Transfer Method
Specify how data is transferred from source to target. The availability depends on your workload and migration job type.See Supported Data Transfer Methods.
Source Machine End State
Specify whether to shut down the source workload after a successful cutover. For a workload move, the shut down is selected by default.
Target Virtual Machine End State
Specify whether to power on, power off, or suspend the target workload after a successful cutover.
Network
Compression
Specify whether to compress data during transmission between the source and target workloads, and the level of data compression to apply: , , .See Compression during Data Transfer.
Encryption
Select to encrypt the data as it is transferred from source to target.See Security and Privacy.
Bandwidth Throttling
Specify whether to throttle bandwidth for data transfer traffic between the source and target machines. To enable throttling, select the option, specify the required maximum value in Mbps, and optionally a time period during which to enforce the throttling. If specified, the and time values are based on the source workload’s system time.
If no time interval is defined, bandwidth is throttled to the specified rate at all times by default. If time interval is defined and the migration job executes outside this interval, data is transferred at full speed.
IP Addresses
Specify additional IP addresses for source workloads to enable communication in environments that use network address translation (NAT).
For information on how to specify additional IP addresses for your PlateSpin Server, see Migrations Across Public and Private Networks through NAT.
Schedule
Schedule
Specify when to start the migration job:
-
Run immediately
-
Run at a later time
Use the calendar menu to specify the date and time to begin the migration.
NOTE:You must prepare the workload prior to the scheduled time.The full replication cannot run unless the target VM exists and the workload preparation is complete. Migrate skips the scheduled full replication and retries it at the next scheduled time.
Source Credentials
(Windows) Specify the account user name with local or domain-level administrative privileges and a valid password. Use this format:
-
For domain member machines: authority\principal
-
For workgroup member machines: hostname\principal
(Linux) Specify the root or root-level user name and a valid password.
Target Credentials
Provide Windows Domain or Administrator credentials.
Alerts
Receive Event Notifications
Specify whether to send email notifications for event conditions. You must configure an SMTP server to use this feature.See Notification Service Using Migrate Client.
Receive Progress Notifications
If you enable Event notifications, you can optionally receive progress notifications at a specified interval.
Send to Addresses
Add or remove valid email addresses for recipients of the notifications.
Take Control Settings
Target Virtual Machine
Under Target Virtual Machine, click Configure, then specify the options for the virtual network and the TCP/IP settings for the replication NIC, then click .
Post-Migration
Action
Specify a pre-configured action from the PlateSpin Migrate library.See Managing Post-Migration Actions (Windows and Linux).
Execution Parameters
Specify the command line command to run the selected action. You can specify a timeout for the execution.
Credentials
Specify the user name and password to use for the post-migration tasks. You can optionally use the source credentials.
-
-
In the Virtual Machine Configuration section of the Migration Job window, click , then configure the required settings.
PlateSpin Migrate displays target virtual machine configuration options specific to the selected target and also provides access to advanced configuration options. For information about host-specific configuration options, see
Target VM Configuration: Microsoft Hyper-V
. -
In the Network Configuration section of the Migration Job window, configure the following settings:
Setting Name
Description
Network Configuration
Network Identification Settings for Windows
Host Name
Specify the desired host name for the target machine.
Generate New SID
When this option is selected, the target workload is assigned a new System Identifier (SID). Credentials are required only for Windows 2008 systems, and must be the credentials for the local (embedded) Administrator account. If this account has been locally renamed on the source, provide the new name.
Member of Domain / Workgroup
Select the required option and type the name of the domain or workgroup that you want the target machine to join.
Preserve Source Server’s Domain Registration
Preserves domain registration and ensures that the source server domain registration remains intact during migration. If you disable this option, the source machine’s domain account is transferred to the target machine. The source server still appears to be on the domain, but does not have a valid connection.
Domain Credentials
If the target machine is to be part of a domain, specify valid credentials for a user account with permission to add servers to the domain, such as a member of the Domain Admins group or Enterprise Admins group.
Network Identification Settings for Linux
Host Name
On the Network Identification tab, specify the desired host name for the target machine.
DNS
Use the , , and buttons to manage DNS server entries for the new virtual machine.
-
In the Operating System and Applications Configuration section of the Migration Job window, configure the following settings:
Setting Name
Description
Operating System and Application Configuration
Windows Services (Target)
Select Windows services’ start conditions on the target VM after cutover. Start options are , , , and
To modify the settings:
-
Click the Status column for the service, then select from the Windows start options.
-
When you are done setting services start states, click .
Live Transfer Services (Source)
Specify the Windows services to stop on the source workload during live data transfers.
We recommend that all the non-VSS compliant services or antivirus are stopped temporarily on the source while the VSS snapshot is being captured on the source. Select the Windows services that you want to be temporarily stopped on the source workload while the VSS snapshot is being captured on the source. These services are restored as soon as the VSS snapshot creation completes.
To modify the settings:
-
Select next to the service to be stopped for live data transfer.
-
When you are done setting services to stop, click .
Linux Daemons (Target)
Specify the start states for daemons on the target VM after cutover.
To modify the settings:
-
Click the column for the daemon, then select from run levels 0 through 6 and Boot (B), then click .
-
When you are done setting daemon start states, click .
Live Transfer Daemons (Source)
Specify the daemons to stop on the source workload during live data transfers.
To modify the settings:
-
Select next to the daemon to be stopped for live data transfer.
-
When you are done setting daemons to stop, click .
-
-
In the Drive Configuration section of the Migration Job window, configure the following settings. For options specific Hyper-V, see Drive Configuration: Hyper-V.
Setting Name
Description
Drive Configuration
Hard Drives
Specify drive and volume configurations to be migrated.
Disks
Specify the path to the hard disk on the target virtual machine.
Volumes
Select volumes to be included in the target for migration.
NTFS Cluster Size
(For File-Based Windows Workloads) Specify the cluster size for the NTFS volume. For information about the default cluster size for an NTFS volume, see the Microsoft Support KB Article 140365.
Non-volume Storage
(For Linux Workloads) Specify a non-volume storage, such as a swap partition, that is associated with the source workload. This storage is re-created in the migrated workload.
Disks For Volume Groups
(For Linux Workloads) Specify the datastore name and the path where the virtual disk must be created on the target machine. You can choose to retain the path specified by default.
Volume Groups
(For Linux Workloads) Specify the LVM volume groups to be migrated with the LVM logical volumes listed in the Converted Logical Volumes section of the settings.
Converted Logical Volumes
(For Linux Workloads) Specify one or more LVM logical volumes to be migrated for a Linux workload.
-
In the Additional Items for Review section of the Migration Job window, review errors and messages about the workload configuration. You must resolve errors before you can submit the migration job.
-
Click .
33.2.1 Target VM Configuration: Microsoft Hyper-V
The following are configuration options specific to Hyper-V 2012 systems.
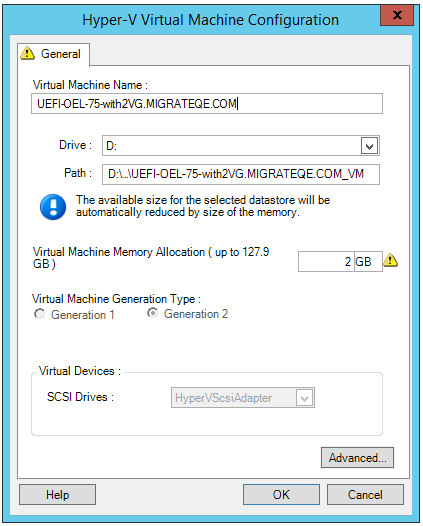
Specify the display name for the new virtual machine. Select the datastore where you want to create the *.vmx file. Specify a name and the directory path for the virtual machine’s *.vmx configuration file. Specify a value for the amount of virtual RAM to be assigned to the virtual machine. Specifies the generation type for the new virtual machine.
Select either or (the recommended option). : Click this button to view or modify advanced VM configuration settings. |
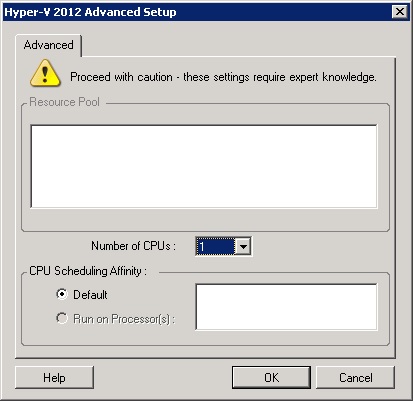
Select the required number of CPUs to assign to the target VM. For example, you can convert a single-processor workload to a multi-processor VM, or a multi-processor workload to a single-processor VM. NOTE:For Generation 1, you can create four legacy network cards and eight synthetic network cards (if integration service is enabled). For Generation 2, you can create eight 8 synthetic network cards. Represents which Hyper-V Server processors the virtual machine can run on (if your Hyper-V Server is a multiprocessor system). Specify the required processor or select (recommended). For details, see your Hyper-V documentation. |
33.2.2 Drive Configuration: Hyper-V
The following are drive configuration settings specific to Hyper-V:
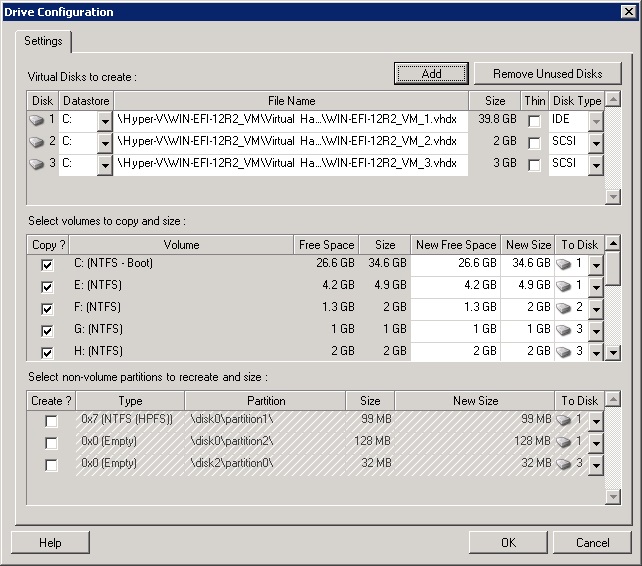
|
|
|
Select the datastore volume on the Hyper-V server where you want to place the .vhd and .vhdx files. : A Generation 1 disk containing the System/Boot volume should be on an IDE disk. (You can create a maximum of three IDE disks.) NOTE:For a Generation 1 disk, the values of second and third disk are chained. For example, if you select the third disk (from the top of the list) as , the second disk autoselects as . If you select the second disk as a then the third disk autoselects to . : Select the volumes to be copied during the migration. : To resize the volume during the migration, specify the desired amount of free space. PlateSpin Migrate automatically adjusts New Size. : To resize the volume during the migration, specify the desired size. PlateSpin Migrate automatically adjusts New Free Space. : Assign the volume to a disk or, if LVM is enabled, to a volume group. The volume is copied to this disk or volume group on the target machine. : Select any non-volume disk partitions that should be created on the target machine (for example, a Linux swap partition). : To resize the non-volume partition during the migration, specify the desired size. |