Customizing Your Web Application Tests
- To be able to record tests with Silk4J, a current version of Internet Explorer needs to be installed on your system. For a list of the supported versions, refer to the Release Notes.
- For a list of the supported browsers for replay, refer to the Silk Test Release Notes.
- To test against mobile browsers, you need to install an emulator on your system or connect a mobile device to your system. For additional information on testing mobile web applications, refer to the Mobile Testing Tutorial.
-
To open a project in Eclipse, perform one of the following:
- On the Silk Central Connect panel, click Open with Silk4J in the Action column that corresponds to the project.
- On the overview page of the project, click Open with Silk4J.
- src folder: The location where new tests are stored
- Lib folder: To use additional java libraries in your Silk4J project, add them to this folder. Silk Central Connect adds all jar files that are located in this folder to the classpath when executing the tests.
- build.xml: A preconfigured ANT build file that Silk Central Connect uses to build the tests before execution.
- Other Eclipse-related files
-
Record additional tests in
Silk4J.
- In the Package Explorer, select the project to which you want to add the new test.
-
On the toolbar, click
Record Actions.
- If a Silk4J test class is open in Eclipse, the recorded actions are recorded into this file.
- If no Silk4J test class is open in Eclipse, the recorded actions are recorded into a new Silk4J test class file.
The Web application and the Recording window open. Silk4J creates a base state and starts recording.
- Perform the steps that you want to record against the AUT.
-
Click
Stop Recording. The
Record Complete dialog box opens.
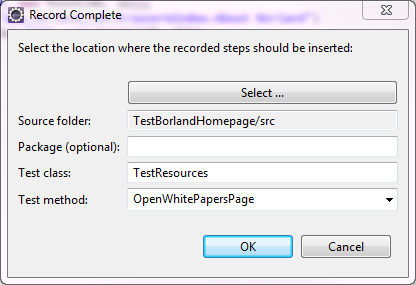
- The Source folder field is automatically populated with the source file location for the project that you selected. To use a different source folder, click Select and navigate to the folder that you want to use.
- Optional: In the Package field, specify the package name. To use an existing package, click Select and select the package that you want to use.
- In the Test class field, specify the name for the test class.
- In the Test method field, specify a name for the test method.
- Click OK.
For information about Silk4J, refer to the Silk4J User Guide.
-
Ensure that the test works as expected in
Silk4J.
- On the Silk4J toolbar, click Run selected Silk4J test(s).
-
On the
Select Browser dialog box, select the browser on which you want to replay the test.
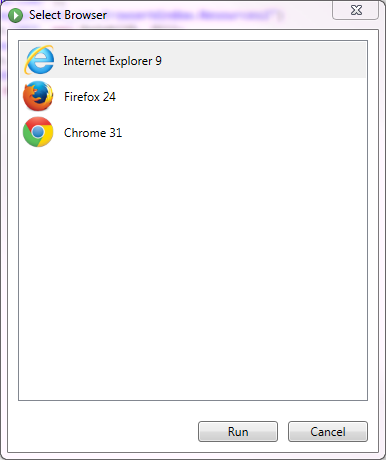
- Click Run. If the test passes and the test results look as expected, you can add the test to the test set for the project in Silk Central Connect.
- On the Silk4J toolbar, click Commit to commit the changes in the project to the repository.
- Back on the overview page of the project in Silk Central Connect, click Run Tests to execute all tests in the project.
-
Select the configurations.
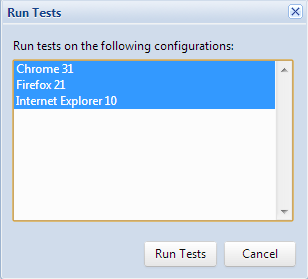
- Click Run Tests.
- When the execution is finished, click on the start time link. You can see the test result for every test and every configuration.

If all tests have run as expected on all configurations, you can further enhance the test set or schedule the project for repeated execution.