Sample Visual Test: Using ActiveData - Part 2 Details
Sample Visual Test
The following shows the sample visual test steps in the Test Steps pane based on the test scenario and highlights the progression of steps in the test.
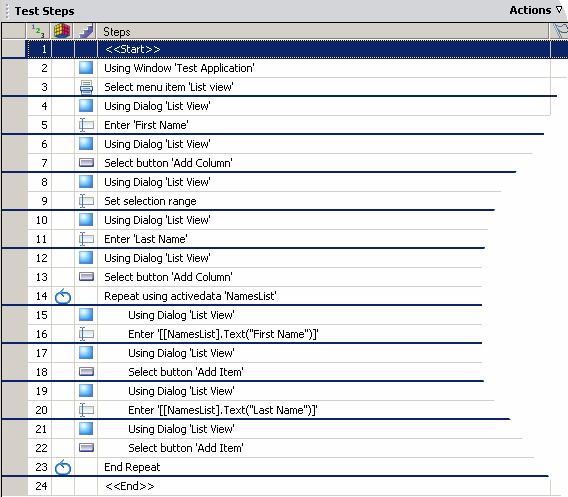
Step Details
Details of the visual test by steps is as follows:
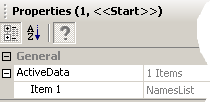
Step 1: The <<Start>> step. Properties for this step display the name of the ActiveData asset used in the visual test.
In this test scenario, the Step 1 Item 1 property in the ActiveData category shows the ActiveData asset association. This ActiveData asset contains the file Names1.xls. The visual test uses data in this file.
The graphic below shows the Item 1 property of the <<Start>> step for this visual test.
Steps 2-3: Recorded steps that access the ListView by selecting the List view menu item in the test application. This represents the starting point for the repeated steps that follow.
Steps 4-13: Recorded steps that create First Name and Last Name columns in the ListView. These columns set up the test for entering first and last names from the ActiveData file into appropriate columns.
- Steps whose description starts with "Using Dialog" coordinate the test to the window and control used to enter data.
- Other steps in this sequence name the columns and add them to the List view.
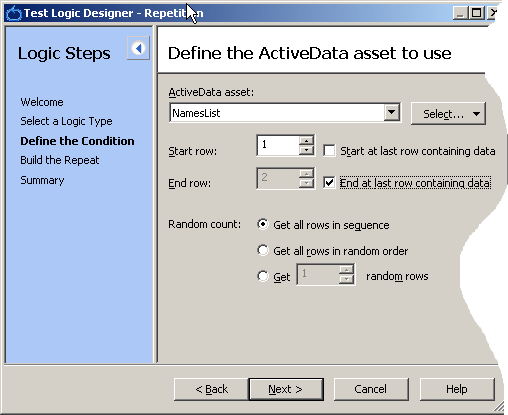
Step 14: The Repeat using activedata step begins the repetition logic. The tester creates the step after recording the test. All steps between this step and the End Repeat step (step 23) repeat in the visual test for each name record in the ActiveData file. The repetition logic type used is Repeating a sequence of steps using data from an ActiveData file.
The Start row, End row, and Random count information entered while building the repetition logic determines the number of repetitions. Settings also determine the rows in the ActiveData file to use for ActiveData testing.
For this scenario, the tester uses all the rows in the data file in sequential order for ActiveData testing. Assuming the data file contains 10 rows of data and all are used, the number of repetitions for the repetition logic steps is 10.
The following shows the Define the ActiveData asset to use page of the Test Logic Designer with the settings used to create the repetition logic for this visual test.
Steps 15-22: Recorded steps that have been modified after recording to use data from the ActiveData file. These steps enter data into the First Name and Last Name columns in the ListView control of the test application.
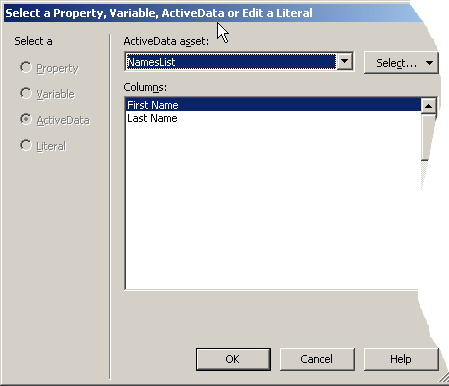
Modifying these steps to use data from the ActiveData file involves updating the input value to use an ActiveData value rather than a literal value. To do this, the tester clicks in the value area of the step's text property and selects ActiveData from the menu as shown in the following image.
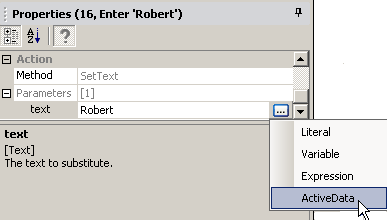
This opens a dialog box where the tester selects the ActiveData asset containing the data file, and a column in the data file whose values are mapped to the represent the input value for the text property. In step 16 of this scenario, the tester replaces the literal text for the First Name in the Windows test application with data from the First Name column in the ActiveData file. The following graphic shows these settings in the dialog box.
This modifies the step text to show:
-
The name of the ActiveData asset being used in the test.
-
The type of data used (Text).
-
The name of the column containing the data used in the step.
For more information about modifying automation test steps to use data from an ActiveData file, see Mapping Data in an ActiveData File to Data in a Visual Test.
Step 23: The End Repeat step created as part of the repetition logic for the visual test. This step closes the repetition logic loop.
Step 24: The <<End>> step. Concludes visual test playback.