Customizing Data Sets
Use the Customize option to map individual DMSII data sets (and their items) and customize the table layout of the relational database.
Customizations should be made before cloning a data source or your changes may require that you re-clone. If you want to make customizations that affect the entire data source, use the Configure option available from the Settings drop-down button on the data sources page. See Customize the Client Configuration for more information on customizations for the entire data source.
Note
The customize command is a cooperative process between the DBClntCfgServer program, the Client Manager service, the code in the Administrative Console server, and the browser. Do not use the back button in the browser or close the browser before you successfully exit the Customize command by using the back button and Done button provided in the Administrative Console user interface. Closing the browser will leave the DBClntCfgServer program in a bad state. When this happens, the program can timeout, or the process can be ended by using the Task Manager.
When Customize is selected, the data set view will be displayed. In this view, you can customize data sets, deselect data sets you do not wish to replicate, set data set specific options that override global parameters specified in the Client configuration file, and link virtual and real data sets from which they are derived.
From the data sets view, select a data set to load the DMS item tab where customizations on the data sets DMS items can be performed.
DMS Item Customization Examples: - Allow you to disable items that you do not wish to replicate. - Modify how an item is replicated (e.g. a date represented as a NUMBER(8) in DMSII can be replicated as a relational database date) - Items with an OCCURS table can be mapped to a secondary table (or it can be flattened with the table).
Clicking on the Relational tab in the DMSII page takes you to the relational view where you customize data tables and data items. The Done button in both views takes you back to the data sets view.
Relational Customization Examples: - Rename data tables and data items. - Changing the order of columns in a table. - Modify the data types of an item. - SQL Server Client: - Apply data masking to sensitive items.
To exit the Customize command return to the data set view and push the Done button in the bottom-right of the Administrative Console.
DMS Items Page
Getting there
Databridge Servers > Client Managers > Settings > Customize > (select a data set)
Selecting a data set in the data sets view opens the DMS items tab for the data set. The DMS items tab is a table of DMS items which has 4 columns. The entries have a Properties  icon to the left of the DMS item name that allows you to access the properties page for the item. This is followed by the "Name" column that contains the item name followed by the data type. The next column named "Key", contains a key icon for any item that is a member of the DMSII SET that is being used as the source of the index. The "Status" column reflects the value of the
 active column in the DMS_ITEMS Client control table, and the Customized column contains a checkmark when the value of a property for the DMS item has been changed.
Tip
Unlike the data sets view, the DMS items view can contain groups that need to be expanded to see the items.
Filters
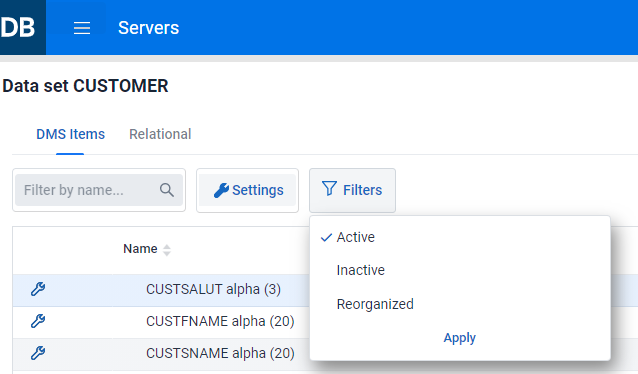
Since several DMSII data sets typically have hundreds of items, you can filter items to make it easier to locate specific items. Typing a set of characters in the Filter by name edit box will only show you the data sets whose names contain the string of characters entered. The Filters button, when selected, will present you with 3 filtering choices, Active (default), Inactive and Reorganized. When the filter is set to Active, only DMS items whose active column is 1 in the DMS_ITEMS Client control table will be shown. If you want to also see DMS items whose active column is 0, select Inactive in the Filters drop-down. Select Apply to view the DMSII items list results from the newly applied filter. The Reorganized option is used during the processing of DMSII reorganizations, where the view will be limited to data sets that have been affected by a reorganization. The Administrative Console will automatically enable this filter when it detects that it is processing a DMSII reorganization.
In addition to filtering, you can sort the table by Name (which is the default), Key, Status, or Customized by using the up and down arrows in the column headers.
Warning
The view that shows only what has changed from a DMSII reorganization will help prevent unnecessary changes to the layout of a dataset that was not affected by a reorganization.
Tip
For data sets that contain DMSII GROUP items the filtering will descend into the GROUPS, so if you have a naming convention ending the item name with "-DT" when they are dates, using this as a filter will find all the dates.
Customizing DMS Items
How to select a DMS Item
-
Do one of the following:
Select the properties icon
for the desired data item.-or-
Click on the DMS item table row for the desired DMS Item (the table row will be highlighted in blue) indicating that it is selected and select Properties from the Settings drop-down button in the menu bar.
Currently, there is not an Information page for DMS items, as all of the properties we display are editable.
Once a DMS item has been customized, return to the Data Sets page with the DMSII Items tab selected. Select the Relational tab to view the tables mapped from the data set in question and their columns. If the Client control tables have not yet been updated with the changes you made, pushing this button causes the data sets that need mapping to be mapped. You do not have to do this at this time; when you exit the Customize commend by navigating away from it using one of the provided links, this operation will be automatically performed. The Relational tab has a tab named DMS Items that gets you back to this page.
When you are done customizing the data set push the Done button to return to the data sets view. If you navigated to the relational view, you will be able to return to the DMSII item tab view or to the data sets view.
Relational Page
Getting there
Databridge Servers > Client Managers > Settings > Customize > (click on data set) > Relational
Selecting the Relational tab in the DMS items view opens the Relational tab for the data set. The relational tab is a table of objects, which has 4 columns. The term "object" will be used to denote data tables and data items throughout this section. The entries have two icons to the left of the object name that allow you to access the Properties and Information  pages for the object. This is followed by the Name column that contains table name or the column name followed by the data type. The Key column and contains a key icon for any item that is part of the index for the table it belongs to. The Status column reflects the value of the
 active column in the DATATABLES or DATAITEMS Client control table. Lastly, the Customized column contains a checkmark when the value of a property for the object has been changed.
Unlike the DMS items tab, the Relational tab is grouped by table, as there can be more than just one table associated with a data set.
Filters

Since several DMSII data sets typically have hundreds of items, you can filter items to make it easier to locate specific items. Typing a set of characters in the Filter by name edit box will only show you the data sets whose names contain the string of characters entered. The Filters button, when selected, will present you with 3 filtering choices, Active (default), Inactive and Reorganized. When the filter is set to Active, only DMS items whose active column is 1 in the DMS_ITEMS Client control table will be shown. If you want to also see DMS items whose active column is 0, select Inactive in the Filters drop-down. Select Apply to view the DMSII items list results from the newly applied filter. The Reorganized option is used during the processing of DMSII reorganizations, where the view will be limited to data sets that have been affected by a reorganization. The Administrative Console will automatically enable this filter when it detects that it is processing a DMSII reorganization.
In addition to filtering, you can sort the table by Name (which is the default), Key, Status, or Customized by using the up and down arrows in the column headers.
Warning
The view that shows only what has changed from a DMSII reorganization will help prevent unnecessary changes to the layout of a dataset that was not affected by a reorganization.
Tip
For data sets that contain DMSII GROUP items the filtering will descend into the GROUPS, so if you have a naming convention ending the item name with "-DT" when they are dates, using this as a filter will find all the dates.
Customizing Data Tables and Data Items
How to select a Data Table or Data Item
-
Do one of the following:
Select the properties icon
for the desired data table or data item.-or-
Click on the desired data item or data tables row (the table row will be highlighted in blue) indicating that it is selected. Select Properties from the Settings drop-down button on the menu bar.
Once you are done customizing an object, you will return to this page when you close the properties page by pushing one of the two buttons in the bottom-right corner of the page. Once you are done customizing the items in the relational view, you can select the DMS Items tab to return to the DMS items view, or you can select the Done button to return to the data sets view.