12.3 Upgrading an All-in-One (Small) Deployment

Before upgrading a Filr deployment, you must ensure certain requirements are met. See Before You Upgrade! and then complete the instructions in the following sections in order:

Before You Upgrade!

NOTE:As an additional resource to the information in this section, TID 7017288 has a “Pre-Flight Checklist” that can help you ensure a successful upgrade.

Failure to comply with the following critical points could result in a non-functional Filr system.

  • Review the Release Notes: Check Update Filr and Upgrading Filr known issues in the Filr 4.3.1 Release Notes before you start the upgrade process.

  • Ensure that the VM host has enough unformatted disk space:

    • System Disk (/): A 20 GB disk is created automatically.

    • Disk 2 (/vastorage): You make a copy of the appliance’s Disk 2.

    • Each Disk 3 (/var): You create this disk. The recommended size is 4 GB plus 3 times the appliance’s RAM allocation.

  • Check the version: Make sure that the existing appliance is running version 3.4 with the latest patches applied.

  • Remove VMware Snapshots: Before copying Disk 2, make sure to remove all VMware snapshots so that the /vastorage disk has the correct disk file and latest configuration settings.

  • Filr Database User Name Changed: If the earlier Filr database was configured with an user name other than ‘filr’, the upgrade fails. Ensure to reconfigure the earlier Filr appliance with Filr database user name as ‘filr’ before performing upgrade.

  • If the appliance has two network adapters: You should manually add them after upgrading the appliance.

After ensuring that you have met the prerequisites and cautions above, complete the instructions in the following sections in order.

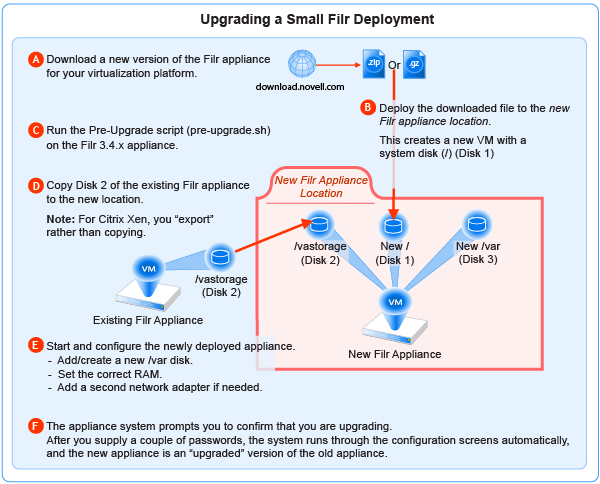
12.3.1 Small Filr Upgrade Process Overview

If you have upgraded a small Filr deployment before, the following reminder might be all you need.

Figure 12-2 Overview of the Small Filr Appliance Upgrade Process

12.3.2 Downloading and Preparing Software

Download and prepare the software for your virtualization platform as described in the following sections:

VMWare

  1. Download the Filr appliance software to your management workstation.

    IMPORTANT:Registration with Micro Focus is required to receive an email with a software-download link.

  2. Extract the .ovf.zip file on your management workstation until a Filr-version folder appears.

  3. Launch VMware and navigate to the datastore where you plan to host the upgraded VM.

  4. Create a folder for the new appliance with a name that is easily associated with (but not the same as) the VM name of the appliance being upgraded.

  5. Continue with Pre-Upgrade Script.

Hyper-V

  1. Log in to the Hyper-V host server either locally or from a remote workstation using Remote Desktop.

  2. Download the Filr appliance software to the location where you plan to host your upgraded VMs.

    IMPORTANT:Registration with Micro Focus is required to receive an email with a software-download link.

  3. Extract the .vhd.zip file in the directory where you downloaded it until an Filr-version.vhd archive file appears.

  4. Create a directory for the new appliance with a name that is easily associated with, but not the same as the VM name of the appliance being upgraded.

  5. Move the Filr-version.vhd archive file to the folder you just created.

  6. Continue with Pre-Upgrade Script.

Xen

  1. Log in to the Xen VM host server either locally or from a remote workstation.

    If you are connecting from a remote Linux workstation, use the following command:

    ssh -X root@host_ip_address

    The -X in the command in required for the GUI installation program upon which the steps in this section are based.

  2. Download the Filr appliance software to the Xen VM host server in the location where you plan to host your upgraded VM.

    IMPORTANT:Registration with Micro Focus is required to receive an email with a download link.

  3. Untar the *.gz file in the directory where you downloaded it.

    You can use the following command to untar the file:

    tar -Sxvzf Filr.x86_64-version.xen.tar.gz

    A Filr-version directory is created.

  4. Continue with Pre-Upgrade Script.

Citrix Xen

  1. On a workstation with Citrix XenCenter installed, download the Filr appliance software.

    IMPORTANT:Registration with Micro Focus is required to receive an email with a download link.

  2. Using a program such as 7-Zip, extract each .xva.tar.gz file on your management workstation until a Filr-version folder appears.

  3. Continue with Pre-Upgrade Script.

12.3.3 Pre-Upgrade Script

Prerequisites

  • Ensure that the /vastorage of the Filr appliance has enough disk space (equal to or greater than the Filr appliance database).

    To verify the size of appliance database, run the command: du -sh /vastorage/mysql

  • On execution of the script Filr service is stopped. Do not restart the Filr service.

Executing the Script

The Pre-upgrade script is available with 3.4.3 latest patch. This script is located in the folder /opt/novell/filr_upgrade/.

  1. Execute the script:

    sh pre-upgrade.sh

IMPORTANT:This script creates a dump of the MySQL database. This dump is used during upgrade for migrating to the PostgreSQL database. Ensure that the script is successfully executed else upgrade will fail.

12.3.4 Copying Each Appliance’s /vastorage Disk (Disk 2)

IMPORTANT:

  • VMware requires shutting down an appliance before copying a disk.

    This means that Filr services will be down while disk copying takes place.

  • On Citrix Xen you export rather than copying Disk 2.

  1. Using the tools provided by your hypervisor, copy the /vastorage (second disk) to its associated folder or directory that you created for your upgraded appliances in Downloading and Preparing Software.

12.3.5 Upgrading the VMs

Shutting Down the Appliance

  1. Shut down the Filr appliance using the Port 9443 Appliance Console.

  2. Continue with the instructions for your VM platform:

Upgrading a Filr VMware VM

Complete the steps in Table 12-6.

Table 12-6 Upgrading the Filr VMware VM

Page, Dialog, or Option

Do This


1 - Launching the Web browser.

  1. On a Web browser, enter the URL for the VMware server and login with the root credentials.

2 - Deploying the OVF Template and naming the VM.

  1. Right-click on the Virtual Machines and click Create/register VM.

  2. Select Deploy a virtual machine from an OVF or OVA file, then click Next.

  3. Name the appliance with the same name of the folder that you created for this upgraded appliance in Step 4.

  4. Upload the ovf and vmdk files that you downloaded and extracted in Step 4.

  5. Click Next.

  6. Choose the datastore and folder were you copied the appliance’s Disk 2.

  7. Click Next to accept the default for the disk format.

  8. Do not select Power on after deployment.

  9. Click Finish.

    The boot disk is created and the appliance is deployed as specified to this point.

3 - Editing the VM settings.

vSphere Client

  1. In the vSphere Client, right-click the VM and select Edit Settings.

    The Virtual Machine Properties dialog displays.

Virtual Machine Properties

  1. Set the Memory and CPU settings to match the appliance you are replacing, or increase them as planned.


4 - Configuring Disk 2 (/vastorage)

Virtual Machine Properties

  1. Click Add.

Add Hardware

  1. Select Hard Disk, click Next and select Use an existing Virtual disk.

  2. Click Next > Browse, then navigate to and select the copy of disk 2 that you made for this appliance.

  3. Click Next > Next > Finish.


5 - Adding and Configuring Disk 3 (/var)

Virtual Machine Properties

  1. Click Add.

Add Hardware

  1. Select Hard Disk.

  2. Click Next > Next.

  3. Adjust the Disk Size to the same size as disk 3 (/var) on the appliance you are replacing.

  4. Under Disk Provisioning, select either:

    • Thick Provision Eager Zeroed

      or

    • Support clustering features such as Fault Tolerance

    Depending on the VMware version that you are running.

  5. Under Location, select Specify a datastore or Datastore cluster

  6. Click Browse.

  7. Select the datastore and folder for this appliance.

  8. Click OK.

  9. Click Next.

  10. Under the Virtual Device Node section, select SCSI.

    NOTE:Ensure that the SCSI controller number is same as what you had used during installing Filr.

  11. Click Next.

  12. Click Finish.

  13. If you need to add network adapters, continue with 6 - (Optional) Adding a Network Adapter.

    Otherwise, click OK and skip to continue with Deploying the Upgraded Filr VM.


6 - (Optional) Adding a Network Adapter

You can add a network adapter if your Filr deployment accesses a separate network for one or more of the following reasons:

  • Appliance administration.

  • Security of Memcached.

    IMPORTANT:Bonding or teaming NICs is not supported with Filr.

Virtual Machine Properties

  1. Click Add.

Add Hardware

  1. Select Ethernet Adapter.

  2. Click Next.

  3. Under Network Connection, select the secondary network associated with the Filr installation.

  4. Click Next > Finish > OK.

vSphere Client

Upgrading a Filr Hyper-V VM

Complete the steps in Table 12-7.

Table 12-7 Upgrading a Filr Hyper-V VM

Page, Dialog, or Option

Do This

1 - Open Hyper-V Manager.

Hyper-V Host Server

  1. Open the Hyper-V Manager.


2 - Create a new VM.

Hyper-V Manager

  1. In the left pane, right-click the server where you have planned to create the new virtual machine, then click New > Virtual Machine.

    The New Virtual Machine Wizard displays.

  2. Click Next.

Specify Name and Location

  1. Name the appliance with the name of the directory that you created for it in Step 4.

  2. Click Next.

Specify Generation

  1. Make sure that Generation 1 is selected.

  2. Click Next.


3 - Specify memory

Assign Memory

  1. In the Startup RAM field, specify the same amount of memory (in MB) of the appliance that you are replacing, or increase the memory as planned.

  2. Click Next.

4 - Assign network adapter

Configure Networking

  1. On the Configure Networking page, select the networking card for this VM.

  2. Click Next.


6 - Identify the system disk

Connect Virtual Hard Disk

  1. Select Use an existing virtual hard disk.

  2. Browse to and select the .vhd file in the folder you created for this appliance.

  3. Click Open.

  4. Click Next.

Summary

  1. Click Finish.

    The VM is created and appears in the list of Virtual Machines.


7 - Specify processors

Hyper-V Manager

  1. In Hyper-V Manager, right-click the VM that you just created.

  2. Click Settings.

Processor

  1. Click Processor.

  2. In the Number of virtual processors field, specify the number of processors for the VM.

  3. Click Next.


8 - Use existing copy of hard Disk 2 (/vastorage).

Settings for VM on Host Server

  1. Add the copy you made of disk 2 to this VM.

  2. When you have added the disk, review the VM summary information and click Finish.


9 - Add hard Disk 3 (/var).

Hyper-V Manager

  1. In Hyper-V Manager, right-click the VM that you just created.

  2. Click Settings.

  3. Create a new blank virtual disk the same size as disk 3 on the appliance you are upgrading.

Summary

  1. Review the summary information.

  2. Click Finish > OK

10 - (Optional) Add a Network Adapter

  1. If the appliance you are upgrading has a secondary network adapter, add that now.

Hyper-V Manager

11 - Deploy the upgraded appliance

Upgrading and Deploying a Filr Xen VM

Complete the steps in Table 12-8.

Table 12-8 Upgrading and Deploying a Filr Xen VM

Page, Dialog, or Option

Do This

1 - Launch the installer.

Terminal prompt on Xen VM Host Server

  1. Run the following command to launch the GUI configuration menu:

    virt-manager

    NOTE:The vm-install command is deprecated from SLES 12 releases.

Create a new virtual machine

  1. Click File > New Virtual Machine.

    The Create a new virtual machine wizard is displayed.

  2. Select Import existing disk image.

  3. Click Forward.

Storage path and Operating System

  1. Browse and select the existing disk image.

  2. Select SUSE Linux Enterprise Server 12 SP4.

  3. Click Forward.

Choose Memory and CPU settings

  1. Set the amount of memory (in MB) to match that of the VM you are upgrading.

  2. Specify the CPUs to match the number of the VM you are upgrading.

  3. Click Forward.


2 - Name the VM.

Name of Virtual Machine

  1. Specify the name of the appliance.

  2. Select Customize configuration before install.

  3. Click Finish.


3 - Configure Disk 2 (/vastorage)

Hardware

  1. Click Add Hardware at the bottom left of the screen.

  2. Select the option Select or create custom storage.

  3. Navigate to the contents of the folder for the appliance you are creating.

  4. Select the .raw file.

  5. Click Open > Finish.


4- Configure Disk 3 (/var)


  1. Click Add Hardware at the bottom left of the screen.

  2. Select the option Select or create custom storage.

  3. Navigate to the contents of the folder for the appliance you are creating.

  4. Select the .raw file.

  5. Click Open > Finish.


5 - (Optional) Add a Network Adapter

You can add a network adapter if your Filr deployment accesses a separate network for one or more of the following reasons:

  • Appliance administration.

  • Security of Memcached.

    IMPORTANT:Bonding or teaming NICs is not supported with Filr.

Summary

  1. Click Network Adapters.

Network Adapters

  1. Click New.

Virtual Network Adapter

  1. Specify the settings for the adapter.

  2. Click Apply.

Network Adapters

  1. Click Apply.

Summary

  1. Click OK.

    The virtual machine is created, the appliance starts, and the configuration process begins.

Console

6 - Deploy the Appliance

  1. Access the appliance’s console.

  2. When prompted, enter the root and vaadmin passwords for the appliance.

    The upgrade process proceeds automatically.

  3. When the appliance displays the final screen in the console window, open your management browser and log in to the appliance on port 9443 as the vaadmin user.

Port 9443 Admin Console

  1. Check the following:

    • Filr:

      • Click the Filr configuration icon.

      • Ensure that all of the settings are in place as expected.

      • If the configuration wizard displays, there was a problem with the configuration.

      • Resolve the configuration issues, then click Finish to reconfigure the system.

        Common configuration issues include:

        • If your system is not using DNS, the most likely problem is unresolvable DNS names and missing /etc/hosts entries.

        • If the appliance doesn’t have access to the database, ensure that all of the settings are as expected.

  2. When the appliance is running, continue with Performing Filr Post-Upgrade Tasks.

Upgrading Citrix Xen VMs

Complete the steps in Table 12-9.

Table 12-9 Upgrading a Citrix Xen VM

Page, Dialog, or Option

Do This


1 - Launch XenCenter.

Management Workstation

  1. Start XenCenter.

XenCenter

  1. Connect to the Citrix XenServer where you planned to deploy Filr.

  2. Right-click the server and select Import.


2 - Import the system disk

Locate the File you want to import

  1. Browse to and select the .xva file on your management workstation.

  2. Click Open.

  3. Click Next.

Select the location where the imported VM will be placed

  1. Select the XenServer.

  2. Click Next.

Select target storage

  1. Select the storage repository for the VM that you used in Step 2.

  2. Click Import.


3 - Select the network adapter

Select network to connect VM

  1. Select the virtual network adapter.

  2. Click Next.

Review the import settings

  1. Deselect Start VM(s) after import.

  2. Click Finish.

    IMPORTANT:Depending on network latency and other factors, it can take a while to import the system disk.


4 - Specify Memory

  1. If you need to adjust the memory to the amount of memory, select the newly created VM in the left pane.

  2. Click the Memory tab.

  3. Click Edit, change the setting, and click OK.


5 - Specify Processors

  1. If you need to adjust the CPUs, right-click the newly created VM in the left pane.

  2. Select Properties.

  3. Click CPU, change the setting, and click OK.


6 - Link to Disk 2 (/vastorage)

  1. With the newly created VM selected in the left pane, add the copy of disk 2 for this appliance.


8 - Add Disk 3 (/var)

Virtual Disks

  1. Click Add....

Add Virtual Disk

  1. Type a disk name that reflects the appliance name and that this is disk 3. For example, Filr-1-disk-3.

  2. Change the Size field value to match that of the appliance you are replacing.

  3. Click Add.

9 - (Optional) Add a Network Adapter

You can add a network adapter if your Filr deployment accesses a separate network for one or more of the following reasons:

  • Appliance administration.

  • Security of Memcached.

    IMPORTANT:Bonding or teaming NICs is not supported with Filr.

  1. With the newly created VM selected in the left pane, click the Networking tab.

  2. Select the secondary network associated with the Filr installation..

XenCenter

12.3.6 Deploying the Upgraded Filr VM

  1. Power on the appliance.

  2. Access the appliance’s console.

  3. When prompted, enter the root and vaadmin passwords for the appliance.

    The upgrade process proceeds automatically.

  4. When the appliance displays the final screen in the console window, open your management browser and log in to the appliance on port 9443 as the vaadmin user.

  5. Check the following:

    • PosgtgreSQL :

      • Click the phpPgAdmin icon.

      • Verify that the database is populated as expected.

    • Filr:

      • Click the Filr configuration icon.

      • Ensure that all of the settings are in place as expected.

      • If the configuration wizard displays, there was a problem with the configuration.

      • Resolve the configuration issues, then click Finish to reconfigure the system.

        Common configuration issues include:

        • If your system is not using DNS, the most likely problem is unresolvable DNS names and missing /etc/hosts entries.

        • If the appliance doesn’t have access to the database, ensure that all of the settings are as expected.

  6. When the appliance is running, continue with Performing Post-Upgrade Tasks.

12.3.7 Performing Filr Post-Upgrade Tasks

After upgrading to a new version of Filr, you should perform the following tasks to ensure a fully functional Filr system:

Install Your New Filr License

Upgraded Filr appliances have a 60-day evaluation license installed. The evaluation license is expired in most of the cases because it considers the day of deployment as the day when it was installed with the earlier version.

To prevent a service interruption, you must install your new license by following the instructions in Installing/Updating the Filr License in the Filr 4.3: Administrative UI Reference.

Java Heap

For optimal performance of Filr appliance, the minimum Java heap space should be 9 GB. After upgrading the appliance, the Java heap space is overwritten with the value that was set for the earlier Filr appliance. If new value is less, then ensure to update it to 9 GB or greater.

Rebuilding a Single Search Index

  1. Log in to the Filr site or zone as the Filr administrator. For example, https://Filr_hostname:8443.

    Replace Filr_hostname with the host name or fully qualified domain name of the Filr server that you have set up in DNS.

  2. Click the admin link in the upper-right corner of the page, then click the Administration Console icon .

  3. In the Management section, click Search Index.

    Manage the Search Index page
  4. You need to reindex the entire Filr site, select Re-Index Everything.

    The time to reindex varies depending on the size of your Filr site.

    IMPORTANT:If you have users across multiple zones, ensure to perform reindexing on every zone.

  5. Click OK to start the indexing.

    Users can still access the Filr site during the indexing process, but search results might not be accurate until the index has been completely rebuilt.

    To view when indexing is complete, keep the Search Index dialog box open to see the status. Alternatively, a message is displayed in either of the appserver.log files stating that reindexing is complete.

  6. To ensure that the rebuild was successful, verify that the following messages appear in the appserver.log file:

    Completed indexing of tree with xxx binders. Time taken for indexing is xxx.xxx msAdministrative reindexing completed on binders [1]

    For information about how to access the appserver.log file, see Accessing Filr System Log Files in the Filr 4.3: Administrative UI Reference.