Auditing analysis results
The following procedure describes how to audit analysis results from the AUDIT tab. If you are working with open source results, you can audit the analysis results from either the AUDIT or the OPEN SOURCE page.
To display the issues you want to audit:
Upload analysis results for the application version you want to audit.
For instructions, see Uploading scan artifacts.
Open the AUDIT page for the application version.
The table in the AUDIT page lists issues based on their assigned folders (by default, critical to low).
To selectively display the issues you want to audit, apply filters to the issues list.
For more information, see Filtering issues for display and Viewing issues based on folders.
In the issues table, if you have selected an attribute to group by, expand a group to view the issues it contains.
To audit an issue:
To expand an issue and view its details, click its row in the table.
For information about viewing OpenText DAST results, see Viewing OpenText DAST scan results in Application Security.
To view the details for the issue in a new browser window, click the Open in a new tab button
 . To copy the issue link so that you can easily access it later, click the Copy issue link to clipboard button
  .
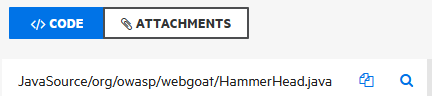
.The CODE tab displays the path the tainted data has taken in the source code associated with the issue.
To view summary details about a step along the course that tainted data has taken, under Analysis Trace, point to that step.
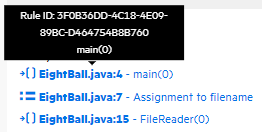
To view code associated with a step, click the step under Analysis Trace.
The corresponding line of code is highlighted on the CODE tab.
To search for a specific string in the code associated with the issue:
On the CODE tab, click the search button
 .
.In the Search for box, type a search string.
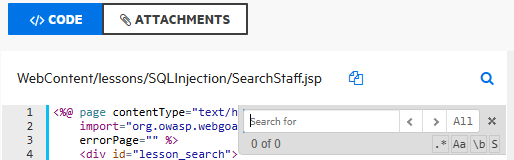
Use the Next
 and Previous
 buttons to move through the search results.
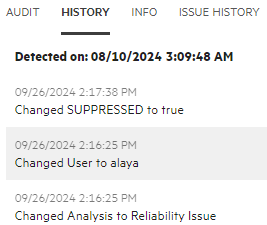
To view any audit history available for the issue, in the right pane, select the HISTORY tab.
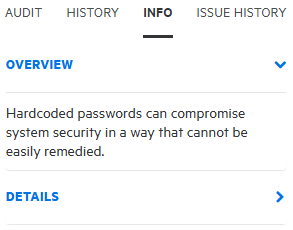
To view an overview of the issue, details about the finding, recommendations for remediation, issue metadata, references to additional resources, and implications for your application version, in the right pane, select the INFO tab.
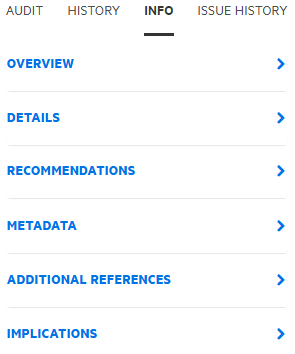
To expand a row and view a category of information, click the corresponding arrow (
 ).
).
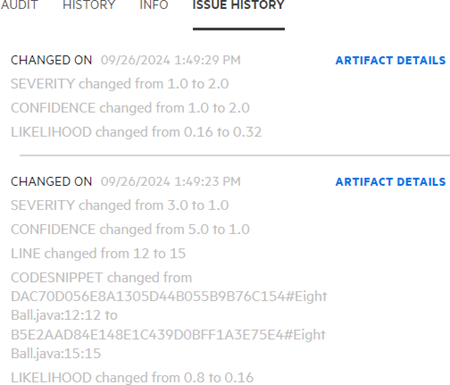
To view attribute changes for an issue, select the ISSUE HISTORY tab.
Click ARTIFACT DETAILS to view the list of artifacts from the scan history. For more information, see Audit Issue History.
When you have enough information to start your audit, select the AUDIT tab.
(Optional) To exclude an issue from display because you know it is fixed or it is not of immediate concern, click SUPPRESS.
(Optional) If your Administrator has configured application security training, click GET TRAINING to get contextually-appropriate guidance on how to mediate the selected issue.
The application security training website opens in a new browser tab that displays training content based on the category, subcategory, and language of the selected issue.
To attach a file to the issue:
Click ATTACHMENTS.
- Click CLICK HERE TO ADD.
In the UPLOAD ATTACHMENT dialog box, click BROWSE, and then select the file you want to upload.
The file size must not exceed 3 MB.
(Optional) In the Description box, type a description of the file.
Click SAVE.
If you attached an image file, Application Security displays a preview of the image on the right, under Image Preview.
After a file is attached to an issue, you can modify only its description.
Click CODE, and then select the AUDIT tab.
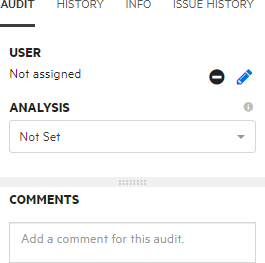
To assign a user to the issue:
Under USER, click the Edit assigned user button
 .
.To locate a user to assign to the issue from the SELECT USER dialog box, in the Find user box, type part or all of a user's name, and then click FIND.
In the list of returned names, click the name of the user to assign to the issue.
Click DONE.
To remove the assigned user, click the Unassign User button
 . Alternatively, to change the assigned user to a different user, select the Edit assigned user button and select the preferred user.
The AUDIT tab now displays the selected user name and avatar (if available).
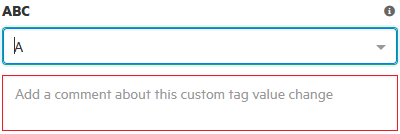
From the Analysis list (or other defined primary custom tag), select a value that reflects your assessment of this issue.
If you do not provide a value, Application Security treats the issue as unaudited.
If additional custom tags are associated with the application version, specify the values for those tags.
If your Administrator specified that a comment is required for a custom tag you assign, then you must type a comment in the box outlined in red, which appears under the custom tag box.
If Fortify Audit Assistant assessed the issues, the additional tags AA_Prediction, AA_Confidence, and AA_Training are displayed. For information about how to use these fields, see Reviewing Fortify Audit Assistant results.
In the COMMENTS box, type a comment about this issue audit.
Click SAVE.
See Also