Extending the Web Client
You can update, modify, and customize the presentation of the web client by using your own HTML, CSS, or JavaScript from within the browser.
You can take advantage of extensions to make visual changes to the web client and to customize the application. The web client hosts your custom HTML or CSS code, making it easy to modify and support.
Learn more about:
Adding an extension
Before proceeding keep in mind that although Host Access for the Cloud provides the ability to plan and use custom code, the code itself must be supported by the team that produced it.
Warning
During a product upgrade extensions are disabled. This means that, after an upgrade, you must verify that the product is working as expected without extensions, and then re-enable the extensions using the steps to add custom code.
When you add extensions to the web client, the modifications are visible to all your users and apply to all sessions.
To add an extension
-
Open
<install_dir>/sessionserver/microservices/sessionserver/service.yml. -
Append extensions-enabled to the existing value of the SPRING_PROFILES_ACTIVE property. Use a comma to separate the values.
For example:
env: - name: SPRING_PROFILES_ACTIVE value: tls,extensions-enabled -
Restart the session server.
-
Create
<install_dir>/sessionserver/microservices/sessionserver/extensions/client/index.htmlto act as your entry point. This is where you add any HTML, CSS, or JavaScript (including references to external scripts).
Making extensions available without client authentication
Files within the /client directory are protected using the level of authentication you selected in MSS.
To share files without requiring authentication:
Create <install_dir>/sessionserver/microservices/sessionserver/extensions/public/ Place your code in that directory, calling it using the URL /public/*
Extension sample
In this example, once extensions are enabled (see Step 2 above), you can add some custom CSS and JavaScript code to change the menu label font color and print text to the JavaScript console.
You will create three files; custom.css, custom.js, and index.html
Step 1
Locate index.html, which you created in step 4 above.This is where you will be placing your extension files, creating an entry point:
<!-- Define the link to the external style sheet -->
<link href="client/custom.css" rel="stylesheet">
<!-- Define the external JavaScript file -->
<script src="client/custom.js"></script>
Step 2
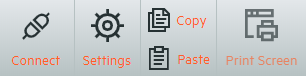
Change the default black menu labels to orange:

Create custom.css to change the color to orange:
/* Change link text to Orange */
a span {
    color: #ff5d28;
}
Step 3
Create custom.js to send text to the JavaScript console:
//Print message to the JavaScript console
console.log('Hello World!');
Step 4
When the files are in place, <install_dir>/sessionserver/microservices/sessionserver/extensions/client/index.html, the results should look like this:
And the “Hello World” text is visible in the JavaScript console:

More Information: