Issue Details Page
In the menu, click
, select an
Inbox from the list in the toolbar, and then click
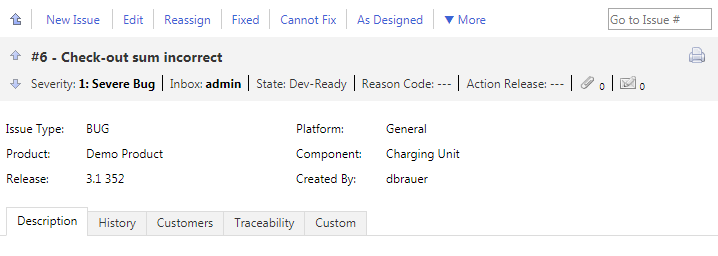
 (View Issue) in the grid. The
Issue Details page shows detailed information about an issue.
(View Issue) in the grid. The
Issue Details page shows detailed information about an issue.
Toolbar
A list of actions is displayed on the toolbar at the top of the page. Click the links to work on a certain issue. The available links vary depending on the state of the issue and on your permissions and privileges. For a list of all available links, see Actions for Working with Issues.
Click
 (Back to Inbox) to get back to the list of issues on the
Issue Tracking page. You can also use the
Backspace key for this.
(Back to Inbox) to get back to the list of issues on the
Issue Tracking page. You can also use the
Backspace key for this.
Enter an issue number in the Go to Issue # toolbar field and press Enter to quickly move to a certain issue.
Issue Details
| Name | Description |
|---|---|
| Previous Issue in Inbox | Shows the data of the previous issue in the list of issues in the selected inbox. You can also use the Up and Left keys for this. |
| Next Issue in Inbox | Shows the data of the next issue in the list of issues in the selected inbox. You can also use the Down and Right keys for this. |
| Attachments | Allows you to add files with additional information concerning the issue. You can edit and remove the files with the buttons in the Actions column. Does not require to click Edit first. |
| Notifications | Allows you to configure email notifications. Issue Manager notifies you when certain values of an issue change. Does not require to click Edit first. |
| Show printable version | Shows a printable view of the data of the selected issue. |
Issue Details Tabs
| Name | Description |
|---|---|
| Description | Contains a
Synopsis and a
Description of the issue.
Note: Silk Central supports HTML formatting and cutting and pasting of HTML content for
Description fields.
|
| History | Tracks all changes concerning the issue. For example: When the issue was created, who created it, actions like reassigning, fixing, verifying, addition of customers, files, testcases, and so on. |
| Customers | Allows you to add information about customers who reported the issue. You can edit and remove the customers with the buttons in the Actions column. |
| Traceability | Shows the tests that are associated with the Issue Manager issue. Click the name of a test to get to the Tests Details View. On the Issues tab of the Tests Details View you can see all issues that were assigned to the test. |
| Custom | Contains any custom fields and lists the Issue Manager Administrator set up. |
| Testcases | Allows you to add
Silk Test test cases. QA and development personnel can directly execute the test cases by clicking
 (Run Testcase) in the
Actions column.
Silk Test test cases can also be imported with the
Silk Test Intelligent Assistant. This tab is only displayed if the
ShowTestcasesTab tag in the
SRFrontendBootConf.xml file is uncommented and set to
true. (Run Testcase) in the
Actions column.
Silk Test test cases can also be imported with the
Silk Test Intelligent Assistant. This tab is only displayed if the
ShowTestcasesTab tag in the
SRFrontendBootConf.xml file is uncommented and set to
true.
|