Enable Your Emulator for Automated Sign-On
Settings are specific to the emulator you are using. Click your emulator (and session type), and then follow the steps for that setup.
- Reflection or InfoConnect Desktop Workspace Automated Sign-on
- Reflection or InfoConnect Desktop Managed Sessions
- Host Access for the Cloud
- Reflection for the Web
- Rumba+ Desktop
Reflection or InfoConnect Desktop Workspace Automated Sign-on
This session type in Reflection or InfoConnect Desktop enables the administrator to implement automated sign-on for users who create and save mainframe sessions on their desktops.
The Workspace Automated Sign-on session type requires Reflection or InfoConnect Desktop version 16.2 or higher.
- Enable Reflection or InfoConnect Desktop to use Workspace Automated Sign-on
- Create an IBM 3270 session for Workspace Automated Sign-on
Enable Reflection or InfoConnect Desktop to use Workspace Automated Sign-on
The administrator must:
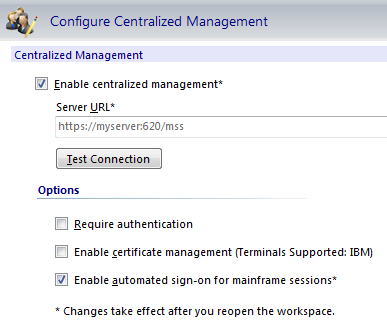
Configure centralized management
This global setting establishes a connection between the client and the MSS Administrative Server, which is needed to request and deliver the PassTicket for automated sign-on.
-
In Reflection or InfoConnect Desktop, open the Workspace Settings.
-
Click Configure Centralized Management.
-
Check Enable Centralized Management.
-
Enter the URL for your MSS Administrative Server (Management and Security Server). Click OK.
-
Check Enable automated sign-on for mainframe sessions.
This setting is needed to use Automated Sign-on for Mainframe when sessions are created by users and saved on their individual desktops. When enabled, the automated sign-on macro inserts a time-limited PassTicket to log the user on to the mainframe session.
Create an automated sign-on macro and save the session
Create a macro that uses methods and properties on the IbmTerminal object.
To automatically log on a user to a mainframe session, the macro must:
-
Send a host application ID to the MSS Administrative Server so that the Administrative Server can request a PassTicket from DCAS.
-
Insert the user's RACF credentials (PassTicket and mainframe user ID) that are returned from the MSS Administrative Server (to the client) into the data that is transmitted to the host. This action logs the user on to the mainframe application.
Follow these steps, heeding the required naming conventions.
-
For the macro, gather the application ID and valid logon credentials for the mainframe application.
-
In Reflection or InfoConnect Desktop, create a session and configure it to connect to the host that users will automatically log on to.
-
From the Macros tab, click Record VBA.
-
Log on to the mainframe host application with valid credentials, and then click Stop Recording.
-
In the Recording Complete dialog, save the macro in the current document’s project. Name the macro according to these requirements:
-
To apply the macro to all sessions connecting to this mainframe, name it SignOn.
-
To apply this macro only to sessions connecting to a specific port on this mainframe, you must append the name with underscore
[_]<port number>.
For example: SignOn_623.
Note
If you want to specify different logon information for different ports on the same host, you can create a macro for each port and save these macros in the same VBA module.
For example, if you connect to a mainframe on port 623 and on port 723 with a different logon, create different macros named SignOn_623 and SignOn_723. When the session connects, the port-specific macro is used.
-
-
To ensure the session VBA Project component has the required name, save the session document file with the required name:
ASM.rd3x. -
In the VBA Editor, open the ASM Project > Modules. Open the Recorded module.
-
Edit the macro code to use PassTickets:
-
Add this line after the variable declarations:
ibmCurrentTerminal.GetDASOPassTicket("APPID")whereAPPIDis replaced with the host application ID (noted in step 1). -
Replace your user name with the
DASOUserIDretrieved by theGetDASOPassTicketfunction:ibmCurrentScreen.SendKeys(ibmCurrentTerminal.DASOUserID)sending your DASOUserID instead of your user name. -
Comment out or delete the line that uses the PasswordBox function to prompt the user for the password.
hiddenTextEntry = ibmCurrentTerminal.Macro.PasswordBox("", "") If (hiddenTextEntry = "") Then Err.Raise 5002, "Hidden TextEntry", "No Value Provided.", "VBAHelp.chm", "5002" End If ibmCurrentScreen.SendKeys(hiddenTextEntry) -
Replace that line with one that contains the DASOPassTicket that was retrieved by the GetDASOPassTicket function call, like this:
ibmCurrentScreen.SendKeys(ibmCurrentTerminal.DASOPassTicket)
-
-
Save the macro. Close the VBA editor and save the session document.
Hint
To add another macro for a specific port on this mainframe, disconnect this session and connect on that port. Then repeat the steps in this procedure to record another SignOn macro and save it with the port number appended to the SignOn name (for example, SignOn_623).
Create an IBM 3270 session for Workspace Automated Sign-on
To create an IBM 3270 session for Workspace Automated Sign-on, the MSS administrator must create a workspace sign-on session in MSS and then upload the session document that contains the automated sign-on macro.
Create a workspace sign-on session in MSS
-
Open the Administrative Console to Manage Sessions, and click +Add.
-
Select Reflection/InfoConnect Desktop as the Product.
-
Select Workspace Automated Sign-on as the Session type.
-
Enter a Session name that exactly matches the name of the host to which the session document files are configured to connect.
For example, if the host name is myHost, then the Session name must be myHost.
If your environment has session documents that are configured to connect to variations of host names (such as fully qualified names or IP Addresses), create a separate Workspace Automated Sign-on session for each name. For examples, see the Manage Sessions Help.
Upload the session document containing the automated sign-on macro
-
Click Browse. Select the Reflection or InfoConnect Workspace session document file (ASM.rd3x) that contains the automated sign-on for mainframe login macro.
The Reflection or InfoConnect Desktop administrator created this session document during Initial Setup.
-
Click Save to upload the settings file and save the session.
The session is added to the Manage Sessions list and is available to be assigned.
Reflection or InfoConnect Desktop Managed Sessions
This session type in Reflection or InfoConnect Desktop uses Management and Security Server to create mainframe sessions and save them on the MSS Administrative Server, where they can be centrally updated and maintained. Managed sessions can be deployed via the Assigned Sessions list.
Automated Sign-on for Mainframe is available with Reflection or InfoConnect Desktop version 16.0 or higher.
- Enable Reflection or InfoConnect Desktop for automated sign-on
- Create an IBM 3270 Workspace session and add an automated sign-on macro
Enable Reflection or InfoConnect Desktop for automated sign-on
In brief, the administrator must enable centralized management in Reflection or InfoConnect Desktop.
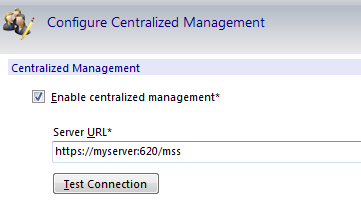
Enable centralized management
This global setting establishes a connection between the client and the MSS Administrative Server, which is needed to request and deliver the PassTicket for automated sign-on.
-
In Reflection or InfoConnect Desktop, open Reflection Workspace Settings.
-
Click Configure Centralized Management.
-
Check Enable Centralized Management.
-
Enter the URL for your MSS Administrative Server (Management and Security Server). Click OK.
Create an IBM 3270 Workspace session and add an automated sign-on macro
In brief, the administrator must
- Create an IBM 3270 Workspace session in MSS
- Record and edit a macro in a Reflection Workspace session
Create an IBM 3270 Workspace session in MSS
-
Open the Administrative Console to Manage Sessions, and click +Add.
-
Select Reflection/InfoConnect Desktop as the Product.
-
Select Workspace as the Session type.
-
Enter a Session name.
-
Click Launch to open the session.
-
Create a new 3270 terminal session. In the Create New Document dialog, 3270 terminal should be selected. Click Create.
-
If the session will connect through the Security Proxy Server, continue with steps 8-11 to configure security.
Otherwise, enter the name or IP address of the host computer, click OK, and proceed to step 12.
-
In the Create New 3270 Terminal Document dialog, check Configure additional settings (at the bottom of the dialog), and click OK.
-
On the Settings dialog, under Host Connection, select Set Up Connection Security and click the Security Settings button.
-
On the SSL/TLS tab in the Security Properties dialog, check both Use SSL/TLS security and Use Security Proxy. Configure the Security Proxy settings. Click OK.
(The Security Proxy server name and port are listed on the Administrative Console > Security Proxy panel.)
-
Accept the connection security settings and click OK. Continue to configure the features you want users to be able to access or edit. Click Help for guidance.
-
Keep the session open and connected to the host. Continue to record and edit a macro in a Reflection Workspace session.
Record and edit a macro in a Reflection Workspace session
The logon macro is initiated when an authenticated user launches the session to connect or reconnect to the host. Keeps these notes in mind when creating the macro.
Note
The automated sign-on macro must:
-
Send a host application ID to the MSS Administrative Server so that the Administrative Server can request a PassTicket from DCAS.
-
Insert the user's RACF credentials (PassTicket and mainframe user ID) that are returned from the MSS Administrative Server (to the client) into the data that is transmitted to the host. This action logs the user on to the mainframe application.
-
These instructions are guidelines to enable Automated Sign-On for Mainframe. Although error- checking is omitted for brevity and clarity, the macro author should check for errors as required by the application. These settings are needed for testing, and can also be used in production.
-
In the 3270 session you just created, start the macro recorder (Macros > Record VBA).
-
Connect to the host and log on to the appropriate host application using a valid user name and password.
You will edit the macro to remove specific user information and replace it with values that support logon by any authenticated user.
-
Stop the macro recorder (Macros > Stop Recording).
-
In the Recording Complete dialog, name the macro (for example TSO_logon). Click OK.
-
Save the macro with the current document (session) or in the common project.
By saving the macro with the current document, it will be transferred to the MSS Administrative Server when the session is saved in the Administrative Console, and then distributed to users who run this session.
-
Open the Visual Basic Editor (Macros > Visual Basic). Locate your macro: open Project > Modules, and double-click Recorded (or right-click > View Code).
-
After retrieving the ibmCurrentTerminal object, add this line:
ibmCurrentTerminal.GetDASOPassTicket("APPID")whereAPPIDis replaced with the appropriate host application ID. -
Edit the statement that sends your user name. Remove your user name and replace it with the mainframe user name that was retrieved by the
GetDASOPassTicketfunction call.The edited line should look like this:
ibmCurrentScreen.SendKeys(ibmCurrentTerminal.DASOUserID) -
Comment out or delete the line that uses the PasswordBox function to prompt the user for the password.
   hiddenTextEntry = ibmCurrentTerminal.Macro.PasswordBox("", "")
   If (hiddenTextEntry = "") Then
       Err.Raise 5002, "Hidden TextEntry", "No Value Provided.", "VBAHelp.chm", "5002"
   End If

   ibmCurrentScreen.SendKeys(hiddenTextEntry)
Replace that line with one that looks like this:
ibmCurrentScreen.SendKeys(ibmCurrentTerminal.DASOPassTicket) -
Save the macro. Click Yes to send settings to the MSS Administrative Server. Close the Visual Basic editor, and keep the session open.
-
Open Document Settings (File > Settings > Document Settings). Under Host Connection, click Configure Advanced Connection Settings.
-
In Configure Advanced Connection Settings, under Connection Action, check the boxes to
-
Run a macro or other action after the initial connection.
Select the logon macro and click OK.
-
Run when reconnecting.
Select the logon macro and click OK. The macro will be initiated when a user connects to a mainframe session.
-
-
Save the session. (Click Save or Exit.) Click Yes to send the settings to the MSS Administrative Server.
Host Access for the Cloud
Host Access for the Cloud uses Management and Security Server for centralized management, so no additional setting is required.
However, be sure the Automated Sign-on for Mainframe activation file is installed on MSS. To verify or install the activation file, Activate the Automated Sign-On for Mainframe Add-On.
Briefly, to enable HACloud for automated sign-on:
-
Record and edit a macro in a Host Access for the Cloud
Note
These instructions are guidelines to enable Automated Sign-On for Mainframe. Although error- checking is omitted for brevity and clarity, the macro author should check for errors as required by the application.
-
The logon macro is initiated when an authenticated user launches the session to connect or reconnect to the host.
-
In the IBM 3270 session you just created, create a macro to log on to this mainframe session. See Creating Macros in Host Access for the Cloud User Guide.
-
Name the macro, for example ASO_logon.
-
Edit the macro to contain the AutoSignon object that provides the methods needed to create a Host Access for the Cloud login to use with Automated Sign-on.
See the example in Automatic Sign-On Macro for Mainframe in the Host Access for the Cloud User Guide.
-
Save the macro and send the settings to the MSS Administrative Server.
-
Save the session and send the settings to the MSS Administrative Server.
-
Reflection for the Web
Reflection for the Web uses Management and Security Server for centralized management, so this requirement is met.
However, be sure these prerequisites are met:
-
Compatible versions. The version of Reflection for the Web must be compatible with Management and Security Server. See the Reflection for the Web Release Notes.
-
Activation file. The Automated Sign-On for Mainframe activation file must be installed on MSS.
To verify or install the activation file, Activate the Automated Sign-On for Mainframe Add-On.
Create a Reflection for the Web IBM 3270 session
-
Open the Administrative Console to Manage Sessions, and click +Add.
-
Select Reflection for the Web as the Product.
-
Select IBM 3270 as the Session type.
-
Enter a Session name.
-
Accept or edit the default settings, and click Launch to open the session.
-
In Connection Setup, enter the name or IP address of the Host computer. Click OK.
-
Continue to configure the features you want users to be able to access or edit. Click Help for guidance.
-
Verify that the session connects to the host.
-
Keep the session open and continue with 7B. Record and edit a macro in a Reflection for the Web session.
Record and edit a macro in a Reflection for the Web session
The logon macro is initiated when an authenticated user launches the session to connect or reconnect to the host. Keep these notes in mind when creating the macro
Note
The automated sign-on macro must:
- Send a host application ID to the MSS Administrative Server so that the Administrative Server can request a PassTicket from DCAS.
- Insert the user's RACF credentials (PassTicket and mainframe user ID) that are returned from the MSS Administrative Server (to the client) into the data that is transmitted to the host. This action logs the user on to the mainframe application.
These instructions are guidelines to enable Automated Sign-On for Mainframe. Although error- checking is omitted for brevity and clarity, the macro author should check for errors as required by the application. These settings are needed for testing, and can also be used in production.
-
In the open IBM 3270 session you created, start the macro recorder (Macro > Start recording).
-
Connect to the host and log on to the appropriate host application using a valid user name and password.
You will edit the macro to replace specific user information with values that support logon by any authenticated user.
-
Click Macro > Stop Recording...
-
Enter the macro name, such as TSO Logon.
-
Save the macro and click OK to acknowledge the alert message, which tells you that the macro will be saved to the MSS Administrative Server only after you save and exit the session.
-
Click Macro > Macros... Select the macro you just created and click Edit.The macro opens for editing in a Macro Editor window.
-
Below the variable definitions at the top of the recorded macro, add the following line:
var credentials = eclcredentials.getDASOPassTicket( "APPID" );where "APPID" is replaced with the appropriate host application ID.
-
In the macro’s “performAction” function, edit the statement that sends your user name.
Remove your user name and replace it with the mainframe username that was retrieved by the getDASOPassTicket method. The edited line should look like this:
ps.SendDASOUserID( credentials ); -
In the macro’s “performAction” function, comment out or delete the lines that use the SendCredential method to transmit the mainframe password. Replace it with a new line that transmits the passticket retrieved from the MSS Administrative Server.
The modified line should look like this:
ps.SendDASOPassTicket( credentials ); -
Save the macro and close the Macro Editor window.
-
To configure the macro to run on session startup, or to run on each connection, click Macros > Macros…
-
In the Macros dialog box, select “Run at startup” if you want the automated sign-on macro to run after the session launches.
Click the Events button, then assign the macro as the “On connect macro” if you want the automated sign-on macro to run every time the session connects.
-
Close the Macros dialog box, and then Save and Exit the session to send the settings to the MSS Administrative Server.
Rumba Desktop
Automated Sign-on for Mainframe is available with Rumba+ Desktop 9.4.1 (or higher). Automated sign-on configuration is also documented in the Rumba+ Desktop System Administrator Guide. Search for “ MSS Automated Sign-On” for the prerequisites and configuration steps.
Enable Rumba+ Desktop for automated sign-on
In brief, the Rumba administrator must:
-
Ensure the prerequisites are met
-
Management and Security Server is installed.
-
The Automated Sign-On for Mainframe Add-On activation file is installed.
-
Centralized Management is enabled in Rumba Options on each user’s local machine.
-
-
Create an automated sign-on on connection macro
See “Creating a connection macro” in the Rumba+ System Administrator Guide.
Note
The automated sign-on macro must:
-
Send a host application ID to the MSS Administrative Server so that the Administrative Server can request a PassTicket from DCAS.
-
Insert the user's RACF credentials (PassTicket and mainframe user ID) that are returned from the MSS Administrative Server (to the client) into the data that is transmitted to the host. This action logs the user on to the mainframe application.
-
-
Create a session profile that contains the macro
See “Creating a session profile” in the Rumba+ System Administrator Guide. Note where the session profile is saved.
Create a Rumba Desktop session with the automated sign-on macro
The MSS administrator must:
-
Create a Rumba+ session in MSS
- Open the Administrative Console to Manage Sessions, and click +Add.
- Select Rumba+ Desktop as the Product.
- Enter a Session name.
-
Upload a Rumba+ Session Profile
-
On the Add New Session panel, click Browse. Locate and select the Rumba+ session profile (created in step 6C) that contains the automated sign-on connection macro.
-
Click Save to upload the profile and save the session.
The session is added to the Manage Sessions list and is available to be assigned.
-