Creating a Table Definition
- In the Catalog Explorer, double-click the
File Definitions node.
The catalog's file definitions are displayed.
- Expand the relevant file definition, right-click
Table Definitions and select
New Table Definition.
Note: The Catalog Explorer also contains a Table Definitions node, where all tables (regardless of which file definition they are derived) are listed; you can also right-click this node and select New Table Definition.
The Table Definition Source dialog box is displayed.
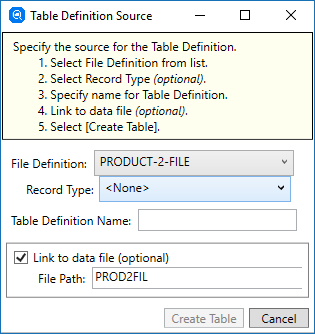
- Define the table properties:
- If you invoked the dialog box from the File Definitions node, the appropriate file definition is already specified, but if
required, in the
File Definition field, click
 and select the file definition.
- If the file definition contains record types, in the
Record Type field,
and select a record type. (If you select a record type, only the fields within the record type are available to select as
table columns; this step is optional.)
- In the Table Definition Name field, type a name for the table definition.
- If there is COBOL data file information available in the file definition, the Link to data file (optional) tick-box is selected, and the File Path field displays the file name of the COBOL data file name. If Link to data file (optional) is selected, a table instance is created automatically with the same name as the table definition, and a file name using the File Path value. Do not select this option if you do not want to create a table instance immediately; however, note that a table instance is necessary to supply the records for the rows of the table.
- The
File Path field has defaulted to the file path and name of the data file specified for the file definition in the COBOL source; if
required, update the path and file name for the data file that is to supply the data for the table.
Note: You can clear the Link to data file option and create a table definition with no data file defined; you can add one or more data files later, when defining a table instance.
- Click
Create Table.
At this point, the table definition is created. If Link to data file (optional) was selected, a table instance with the same name is created. Note that when you specify a table name in a SQL statement, you are specifying a table instance name. It is possible to create multiple table instances on the same table definition, each with a different COBOL data file name. This is one way that you can support multiple companies using one Relativity catalog; see Supporting Multi-file Tables for another method.
The Add Columns to Table Definition grid is displayed.

- If you invoked the dialog box from the File Definitions node, the appropriate file definition is already specified, but if
required, in the
File Definition field, click
- Select or clear the following tick-boxes, as appropriate:
- Show Group Items - all group items, including 01-level items, from the file definition are available.
- Show 88s - All condition items are available.
- Allow Duplicates - Allows a data item to be added to the table definition more than once; subsequent data items (and their corresponding column
names) are appended with
_n where
n is the incremental count of that data item's frequency.
Note: Allowing duplicates within a table precludes it from being writable; see Same Item Rule.
- In the left-hand column, select each COBOL name to include in the table. (Remember: each selected COBOL name equates to a
table column.)
Note: If you select two COBOL names that result in duplicate column names, you must edit one of the column names.
- Click
Add Selected Columns.
The table definition grid, with its selected columns, is displayed.
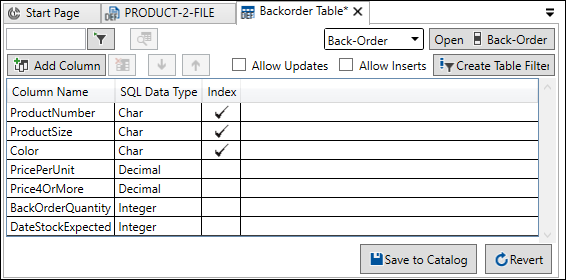 At this point, there are a number of edits you can make before the table definition is saved to the catalog:
- Rename the column names
- Double-click the required cell in the Column Name column and amend the text, as appropriate, then press Enter.
- Change the order of the columns:
- Select a row in the grid, then use
 (Move Column Down) and
 (Move Column Up) to change the order of the column in the finished table.
- Select a row in the grid, then use
- Add or remove columns:
- To add a column, click Add Column, then select one or more columns from the Add Columns to Table Definition section and click Add Selected Columns.
- To remove a column, select the appropriate row in the grid, then click
 (Remove Selected Column).
- Set update and insert permissions:
- To allow SQL UPDATE statements to be performed on the table, click Allow Updates.
- To allow SQL INSERT or DELETE statements to be performed on the table, click Allow Inserts.
These settings are in addition to the privileges you are required to set for a user. Both must be set before the statements can be successfully executed.
Note: If you select either of these options on a table that is not writable, a warning is displayed, and the reason that the table is not writable is displayed in the Status pane; see Building Writable Tables for more information. - Create a table filter based on a conditional variable:
- See Defining Table Filters.
- Apply a column filter:
- To limit the columns displayed in the table definition grid, in the text box to the left of
 (Column Filter), enter the text that is common to the desired column names, then click
or press
Enter.
(Column Filter), enter the text that is common to the desired column names, then click
or press
Enter.
- To limit the columns displayed in the table definition grid, in the text box to the left of
- Rename the column names
- Click
Save to Catalog.
Once the table definition has been saved to the catalog, you can preview the table data.