Server Setup and Connectivity
Connecting to a Web Application Server
When you first bring up the workbench after installing the ZMF for Eclipse plug-in, you need to create a connection to the Web application server where you installed the ZMF Web Services. This is a prerequisite for connecting to a ChangeMan ZMF software repository.
The plug-in connects to only one Web application server at a time.
Creating or Changing a Connection
To create or change the plug-in connection to a Web application server, perform the following steps.
-
Open the Serena perspective in the workbench.
-
From the workbench menu bar, select Window | Perspective | Open Perspective | Other.
-
When the Open Perspective window displays, select Serena and click OK.
-
-
From the workbench menu bar, select Window | Preferences. The Preferences window displays.
-
In the left pane of the Preferences window, expand the ZMF/Eclipse node and then click Settings.

-
Enter the Web services host name and port number in the Web services host and Web services port text fields. If you do not know these values, contact your network administrator.
Note
By default, the plug-in assumes the Web application server is listening on port 8080 of the local server. However, the port number should identify the HTTP port that is configured for the Web application server that is being connected to. A remote server on the network can also be used as the Web application server supporting ZMF for Eclipse.
-
Enter the location of the .war file into the Web services context field.
-
Enter the Notification port.
-
Select or deselect preferred settings for this Web application server as follows:
-
Select Activate notify view when messages received (selected by default) to show each notification message as it is received from ZMF. These messages inform you of progress on work initiated in ZMF, such as build jobs submitted and promotions. You can view the messages at any time in the ZMF Notifications view. For information on this view, see the ChangeMan ZMF for Eclipse User’s Guide.
-
Select Launch Build on editor close (deselected by default) to launch the build dialog after a save.
-
Select Launch build if component history exists (deselected by default).
-
Select Prompt for Change Description (if optional) (selected by default) to prompt for a change description upon checkin even if the ZMF SSV, or Staging Versions, option for a particular library type is configured as optional.
-
Select Display Resource Filters (selected by default).
-
Select Sort Packages Descending on Serena Explorer (deselected by default).
-
Adjust other Settings as desired.
-
-
In the left pane of the Preferences window, select Jobcard Options.
-
Select Maintain Job Card for each Server (deselected by default) if you run several different ZMF systems and need custom job cards for each server. All functions that use a job card, such as build, promote, and audit, will use the server-specific job card if this option is set. If it is not set, only one job card is used for all servers.
-
Select Translate Job Card to Uppercase (selected by default) to convert all job cards to uppercase.
-
Adjust other settings for Jobcard Options as desired.
-
-
In the left pane of the Preferences window, select Checkouts.
-
Select Display checkout results dialog (selected by default) to see these.
-
Select Display Batch Checkout Warning Message (selected by default) to see these messages.
-
Adjust other settings for Checkouts as desired.
-
-
In the left pane of the Preferences window, select Trace
-
Deselect Trace IBM Developer for z Systems API calls (deselected by default). This should only be necessary if requested by Micro Focus Support.
-
Deselect Trace High Level Language Exit cals (deselected by default) - This should only be necessary if requested by Micro Focus Support.
-
Select Run High Level Language Exits with Progress Monitor (selected by default).
-
Select Display ZDDOPTS parsing errors (selected by default).
-
-
Click on Restore Defaults to go back to the product defaults, note this is including the four text fields at the top.
-
Click Apply and Close to save the settings, or Cancel.
-
Explore the other preferences options for ZMF/Eclipse to decide if any more require changing - Allocate, Data Validation, Display Options, Language Mapping and Site Data.
Verifying the Connection
A direct method does not exist for testing the connectivity between the ZMF for Eclipse plug-in and a particular Web application server. However, you can verify that the host DNS name and port number for your Web application server are correct as follows:
-
Verify that the Web application service is started in Windows.
-
Go to Start | Control Panel | Administrative Tools | Services and scroll to the name or your application server (for example, Apache Tomcat or IBM WebSphere Application Server).
-
If the service is not listed as Running in the services panel, select it and click Start or Restart.
-
-
In your Web browser, type the URL you defined in the ZMF for Eclipse preferences for the Web application server. An example of a typical location is:
<http://RM8553:8080/>
If the server is running at this location, the home page for that server should display in the browser.
For Apache Tomcat, that home page looks something like this:

Connecting to a ChangeMan ZMF Server
For each ZMF repository that you want to work with in the workbench, you must define a connection in ZMF for Eclipse. A single workbench may connect to multiple ZMF sites or repositories concurrently.
ZMF Server Connection Prerequisites
Workbench Connectivity to the Web Application Server
Before you attempt to connect to a ZMF software repository, be sure you have a working connection between the workbench and the Web application server where the ZMF Web Services reside.
Note
Start the Web application server from the Windows Start | Control Panel | Administrative Tools | Services** panel if it is not already started.
TCP/IP Connectivity to z/OS
A TCP/IP connection must be established between the Web application server system and the z/OS host where ChangeMan ZMF resides before you can create a ZMF connection in ZMF for Eclipse.
On the Web application server host you can use the Windows ping command to verify TCP/IP connectivity with z/OS.
-
Select the Windows Start | Run option and type the cmd command to request a command-line interface window. Press Enter or click OK.
-
When the command-line window displays, enter the following command at the prompt:
ping lpar.company.comwhere
lpar= the network name of the z/OS host or LPARcompany.com= the domain name for the network where the z/OS mainframe resides -
Verify that the ping command returns a response similar to the following:
C:\Users\>ping q001.microfocus.com

Pinging q001.microfocus.com [151.155.151.104] with 32 bytes of data:
Reply from 151.155.151.104: bytes=32 time=541ms TTL=55
Reply from 151.155.151.104: bytes=32 time=513ms TTL=55
Reply from 151.155.151.104: bytes=32 time=535ms TTL=55
Reply from 151.155.151.104: bytes=32 time=511ms TTL=55

Ping statistics for 151.155.151.104:
Packets: Sent = 4, Received = 4, Lost = 0 (0% loss),
Approximate round trip times in milli-seconds:
Minimum = 511ms, Maximum = 541ms, Average = 525ms
Important
If the ping command is unsuccessful, contact your network administrator and correct the problem before attempting to create a connection between ZMF for Eclipse and ChangeMan ZMF.
Creating a New ZMF Connection
A ZMF connection in the Serena perspective is all you need to work with mainframe resources from the workbench. However, users of Rational Developer for z Systems (IDz) will typically want to use IDz projects to manage personal development libraries on the mainframe as well. A separate IDz connection to the mainframe is required for this purpose.
See Creating a New z/OS Connection in IDz for more information about IDz connection setup.
To create a new connection to a ZMF repository in ZMF for Eclipse
-
Open the Serena perspective in the workbench.
-
From the workbench menu bar, select Window | Open Perspective | Other.
-
When the Open Perspective window displays, select Serena and click OK.
-
-
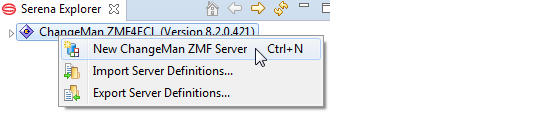
In the Serena Explorer navigation panel, right-click on the ChangeMan ZMF node to bring up its contextual menu.
-
From the contextual menu, select New ChangeMan ZMF Server.
-
When the ZMF Server Properties window displays, enter the following information:
ZMF Server Properties Window:

-
Name — Node name to display in Serena Explorer for the ZMF server site.
-
Address — IP address or DNS name of mainframe LPAR where ZMF resides. The DNS server name takes the form
lpar.company.com where lpar = network name of the z/OS system or LPAR company.com = domain name for the network where the z/OS LPAR resides -
ZMF Port — Port number for the particular ZMF instance where the desired software repository resides. This is the value entered as CMN=nnnn when ChangeMan ZMF was installed. You will log on to this port when you access libraries managed by ChangeMan ZMF.
-
XCH Port — Port number for the SERNET network server that routes messages among ZMF instances and z/OS system services. This is the value entered as XCH=nnnn when ChangeMan ZMF was installed. You will log on to this port when you access your personal development libraries or other data sets on z/OS that are not managed by ChangeMan ZMF.
-
Connections Secured via TLS — Select if you wish to use Transport Layer Security (TLS) for an encrypted connection, and it is enabled on the z/OS server. Connection to the server will fail if the TLS setting for ZMF4ECL does not match the TLS configuration on the z/OS server.
-
Overide Default Web Services Address — Select if you wish to override the supplied defaults.
If you do not know these values, contact your ZMF administrator.
-
-
Click Finish to create the connection in ZMF for Eclipse. Skip the remaining setup steps at this time.
-
Verify that the name of the new ZMF repository is listed under the ChangeMan ZMF4ECL node when you expand it in Serena Explorer.

-
Repeat these steps as needed to add more ZMF sites, such as a test site or a production site, to the Serena Explorer view.
Important
If you are using IDz, a z/OS connection must be configured in the Remote Systems Explorer perspective of IDz for each ZMF server connection created in the Serena perspective. This is necessary to integrate ZMF checkouts with IDz projects. See your IDz documentation for more information.
Viewing or Changing Connection Properties
To display the properties of an existing connection (such as port numbers) to a ChangeMan ZMF server, perform the following steps.
-
In the Serena Explorer view, expand the ChangeMan ZMF4ECL node to show all ZMF sites with defined connections.
-
Right-click on the desired ZMF site to bring up its contextual menu, then select Properties to see the ZMF Server Properties window.

-
The ZMF Server Properties window displays connection properties.
Use this dialog to change connection properties if needed, as previously described in "Creating a New ZMF Connection" (Step 4 to Step 5). Options you may want to change are unable to be changed when you are connected, disconnect to change these settings.
Deleting a ChangeMan ZMF Connection
To delete an existing ZMF connection from ZMF for Eclipse:
-
In the Serena Explorer view, expand the ChangeMan ZMF4ECL node to show all ZMF sites with defined connections.
-
Right-click on the ZMF site you want to delete to bring up its contextual menu, then select Delete.
Exporting and Importing ZMF Connection Settings
So that you can create and deploy a common ZMF server configuration across workstations, configure one workbench with the ZMF server settings you want, export the configuration, and import the configuration into each additional workbench.
Exporting Connection Settings
To export workbench connection settings, perform the following steps.
-
In the Serena Explorer navigation panel, right-click on the ChangeMan ZMF4ECL node to bring up its contextual menu.
-
From the contextual menu, select Export Server Definitions...
-
When the Select ZMF Server Definitions for Export window displays, do the following:
-
Select the servers for which you want to export the settings.
-
Browse to the directory where you want to save the settings.
-
Click Finish.
-
-
Upon Export Complete to fullpath\server.xml confirmation, click OK to close the dialog.
Importing Connection Settings
To import previously exported workbench connection settings, perform the following steps.
-
In the Serena Explorer navigation panel, right-click on the ChangeMan ZMF4ECL node to bring up its contextual menu.
-
From the contextual menu, select Import Server Definitions.
-
When the ZMF Server Import window displays, do the following:
-
Browse to the directory where you saved the exported settings.
-
Select and open the server file.
-
Select the Replace duplicate server definitions option if you want any existing server definitions of the same name to be replaced.
-
Click Finish.
-
-
Upon confirmation, click OK to close the dialog.
Refreshing ZMF Connection Settings
If you update the ZDDOPTS parameter library on a ZMF server while using ZMF for Eclipse, you must disconnect and reconnect to that server for those settings to take effect.
Note
It is not necessary to restart the ZMF started task when you make changes to ZDDOPTS.
Logging On to a ChangeMan ZMF Server
Automatic Logon Prompts:
ZMF for Eclipse automatically prompts you to log on to the selected ZMF server when you first open its node in Serena Explorer. You may also be prompted to log in again when switching between the z/OS native and z/OS Unix File systems.
Contextual Menu Logon:
You can also log on from a contextual menu at any time. To log on to a ZMF server from a contextual menu:
-
Open the Serena perspective in the workbench.
-
From the workbench menu bar, select Window | Open Perspective | Other.
-
When the Open Perspective window displays, select Serena and click OK.
-
-
In the Serena Explorer navigation view, right-click on the desired ZMF site to bring up its contextual menu, and then select Connect.
-
The ZMF Logon dialog displays the name of the server you are accessing and prompts for your mainframe logon credentials.
Type your mainframe user ID and password in the Userid and Password fields. Password phrases (as well as standard passwords) are supported. -
To save your mainframe logon credentials on your local computer for automatic reuse with this dialog check Save Userid or Save Password.
Important
Do NOT save your mainframe logon credentials on a shared machine. Check Save Userid and Save Password only if you are the sole authorized user of your PC and access to the PC is password-protected. The ability to save credentials can be allowed or disallowed through the corresponding ZDDOPTS field commands. See Appendix A, "COMMAND Member Parameters" on page 81.
-
Click OK to log on to the host.
-
A message dialog displays your logon status.
Logging Off from a ChangeMan ZMF Server
Logging off from a ChangeMan ZMF repository is similar to logging on.
-
In the Serena Explorer navigation view, right-click on the desired ChangeMan ZMF site to bring up its contextual menu.
-
Select Disconnect.