Checking Out a Component
Checkout to a ZMF Change Package
Software components may be checked out for revision from a baseline library or a promotion library and copied to staging libraries in a change package under the control of ChangeMan ZMF. This is done from the workbench using the Checkout function of ZMF for Eclipse. See the ChangeMan ZMF User’s Guide for rules governing Checkout.
Checkout to a Personal Library
If personal development libraries are enabled in ZMF, the Checkout function in ZMF for Eclipse may also be used to copy components from a package staging library to a PDS or zFS personal development library on the mainframe. The personal development library feature also enables checkout of components from a package to an IDz subproject.
Downloads with Retroactive Checkout
In addition, an entire baseline library, promotion library, or change package managed by ZMF on the mainframe can be copied to a desktop project managed by the workbench using ZMF for Eclipse. Later, when you open a component in this set for revision, ZMF for Eclipse automatically invokes the Checkout function retroactively. Retroactive checkout can be initiated from contextual menus as well. See Dynamic Integration with ChangeMan ZMF for details.
Externally created components, components imported from another repository, or revisions made to a component outside a change package are checked in to a package using the Checkin function. See Checking In a Component for details.
Workbench Differences
The Checkout function works the same way in ZMF for Eclipse as it does in native ChangeMan ZMF, with these exceptions:
-
You can check out components from a package library to a PDS or zFS personal development library on the mainframe or to an IDz subproject.
-
If you check out a component in a library type for which Component Activity File (CAF) support is enabled, the corresponding component in the Component Activity File Type is not checked out. If you do not check out the corresponding component manually, the Audit function will detect a SYNCH6! error in the package. See the ChangeMan ZMF User’s Guide for additional information about the rules governing checkout.
Invoking the Checkout Function
The Checkout function can be accessed from the following menus in ZMF for Eclipse:
-
Serena perspective — In the Serena Explorer view, expand the ZMF Applications node. Below it, expand the desired node for Baseline libraries, Packages, or Promotion libraries. Navigate through the tree of libraries until you find the desired component(s) and select one or more of them to check out. Then right-click on the selection to bring up its contextual menu and choose the Checkout option. See Working with ZMF Components for more information.
-
Java perspective — In the Package Explorer view, expand the desired project node and navigate through the folder tree until you find the desired component. Right-click on the component to bring up the contextual menu, select the Team submenu, then choose ZMF Checkout. Alternatively, navigate to a component in a project you created by download from ZMF and open that component. The Checkout function will be invoked automatically. See Component-Level ZMF Functions for more information.
Procedure for Checking Out a Component
To check out a component from a baseline, package, or promotion library, perform the following steps:
-
Invoke the Checkout function from the Serena Explorer, the Package Explorer, or by opening a component in a project created by download from ZMF.
-
When the Checkout Parameters window displays, identify the library to check out from, the package to check out to, and (optionally if you check the box) a personal development library on the mainframe (click browse to get a list, or new to create a new library) where the checked out component should be copied.
-
Optionally, click the History button on the Checkout Parameters window to bring up the Component History list. This list shows all the packages and promotion sites containing versions of the component(s) named in the Component(s) field of the Checkout Parameters window. This information can help you decide where the desired components should be checked out from. See Viewing Component History for details.
-
Click Next to display the next window, and then click Finish to perform the checkout.
Checkout Parameters Window
When you invoke the Checkout function, the Checkout Parameters window displays.
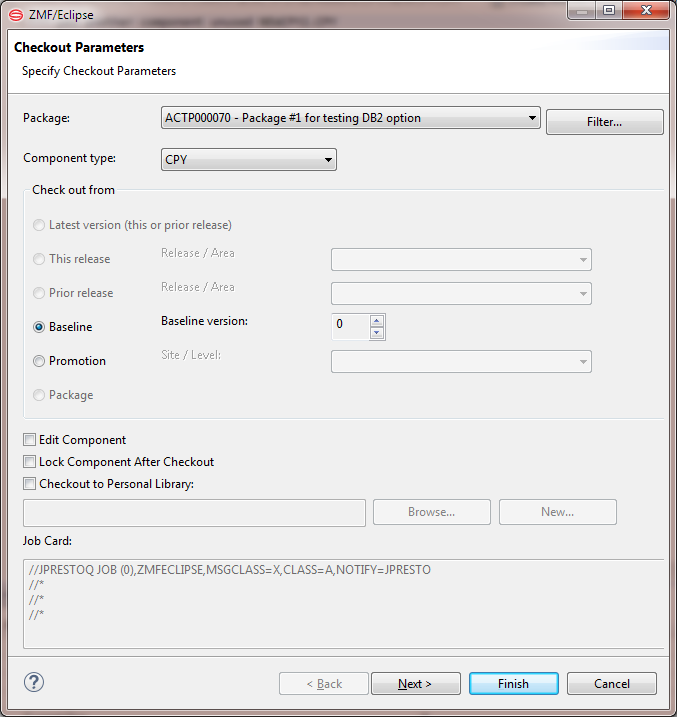
Fill in the fields as described in the following table.
| Field or Box | Description |
|---|---|
| Package | Select the package to which the named component should be checked out. Only packages with a current or future install date are displayed. Alternatively, click the Filter button to filter the package list by Creator, Work Request, or Department, thus producing a more manageable list |
| Component type | This pull down allows you to select the type. |
| Check out From | This section of the window allows you to simply use radio buttons and drop-down lists as appropriate to decide from where to check out the named component(s). |
| Edit Component | Check this box to open the component(s) for editing after checkout. |
| Lock Component After Checkout | Check this box to lock the components after checkout. You cannot lock a component that is already locked by another user. |
| Checkout to Personal Library | If the checked out components should be copied to a personal development library on the mainframe, check this box. To update the text field, enter a library name or click the Browse button to bring up the Select File window. You may also click the New button to display the Allocate Data Set dialog box to create a new library. |
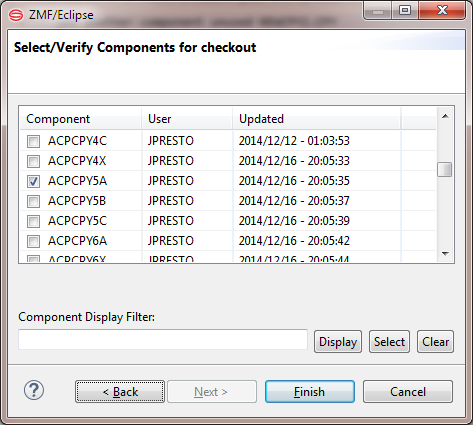
The second window asks you to select or verify components for checkout
Select File Window
If you click the option to Checkout to Personal Library in the Checkout Parameters window, and then click the Browse button, the Select File window displays. This window lets you select a personal development library on the mainframe using filename filters.
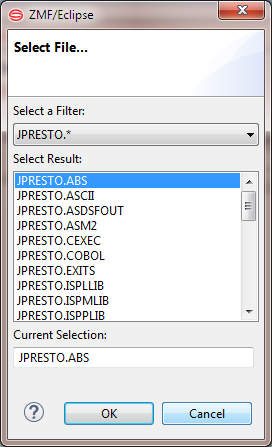
Fill in the fields as described in the following table, and click OK to action.
| Field or Box | Description |
|---|---|
| Select a Filter | From the drop-down list, select the desired mainframe filename filter. Libraries that meet the filter criteria display in the text box. |
| Select Result | This text box shows all libraries on the mainframe that meet the naming criteria of the selected filter. Select the desired library from this list. |
| Current Selection | Shows the personal development library currently selected. The checked out component will be copied to this library. |
Note
If the component is already present, you will receive a alreadyMultiple Checkout Item Warningalready window, where you can decide what to do further.
