Checking In a Component
Checkin to a Staging Library
After creation or revision outside ChangeMan ZMF, software components may be checked in to a staging library in a ZMF change package using the Checkin function. Checkin works with components that reside in a PDS or zFS (USS) personal development library on the mainframe, in an IDz subproject on the mainframe, or in a desktop workspace managed by the workbench. Multiple components may be checked in concurrently.
The Checkin function in ZMF for Eclipse is also known as the Staging function in the ISPF interface to ChangeMan ZMF.
Building components
By default, a source code component is built automatically at Checkin (in other words, it is transformed into an executable module). However, you have the option to check the component into a package without building it.
Checkin Rules
In general, if a component was checked out of a ZMF repository for revision outside of change control, the revised version must be checked in to the same repository, application, package, and library type that was associated with it at checkout. On the other hand, if a component is created outside of ZMF, its initial checkin to change control may target any compatible location.
The following rules apply when checking in a component:
- The file extension must match one of the library types defined for the ZMF application.
- The version of the component in the repository must not be locked by another user.
- The component must not be a generated component in the target package.
- The target package for checkin must be in development (DEV) status.
- The install date for the target package must be today's date or later.
See the ChangeMan ZMF User’s Guide for additional rules governing checkin/staging.
Invoking the Checkin Function
The Checkin function can be invoked from the following menus:
-
Serena perspective — In the Serena Explorer navigation view, expand the Data Sets node or the z/OS Unix Files node and navigate to the desired component, then right-click on it to bring up its contextual menu. Select the Checkin option. See Checking In and Building a Data Set Member for more information.
-
Java perspective — In the Package Explorer navigation view, navigate the project tree to the desired component(s), right-click on the selection to bring up its contextual menu, select the Team submenu, then select the Checkin option. See Component-Level ZMF Functions for more information.
-
z/OS Projects perspective (IDz only) — In the z/OS Projects navigation view, expand the appropriate subproject node and right-click on the desired component to bring up its contextual menu. Select the Checkin option. See Checking a Component into ZMF from an IDz Project for more information.
Procedure for Checking In a Component
To check in a component to a package staging library, perform the following steps:
-
Invoke the Checkin/Stage function from the Serena Explorer, the Package Explorer, or the z/OS Projects navigation views.
-
When the Checkin ZMF Components window displays, identify the component to check in; the library to check in from; the server, application, package, and staging library to check in to, and provide a change description. Optionally, you can turn off component build and/or component locking in ChangeMan ZMF at this time.
-
Optionally, click the History button on the Checkin ZMF Components window to bring up the Component History list. This list shows all the packages and promotion sites containing versions of the component named in the Component(s) field of the Checkin ZMF Components window. This information can help you decide where the new component(s) should be checked in. See Viewing Component History for details.
-
Click OK to perform the checkin.
Caution
Existing package components with the same name as your new component will be overwritten at checkin. No warning message is displayed.
-
If you selected the option to Launch Build Process, the Build dialog box displays. Supply the requested information and click OK to initiate the build. SeeBuilding a Component for information on completing the Build dialog box.
Note
The Launch Build Process option is enabled only for LIKE-SRC and LIKE-OTH library types.
Component Checkin Wizard - Main Window
When you invoke the Checkin function in ZMF for Eclipse, the Checkin ZMF Components window displays.
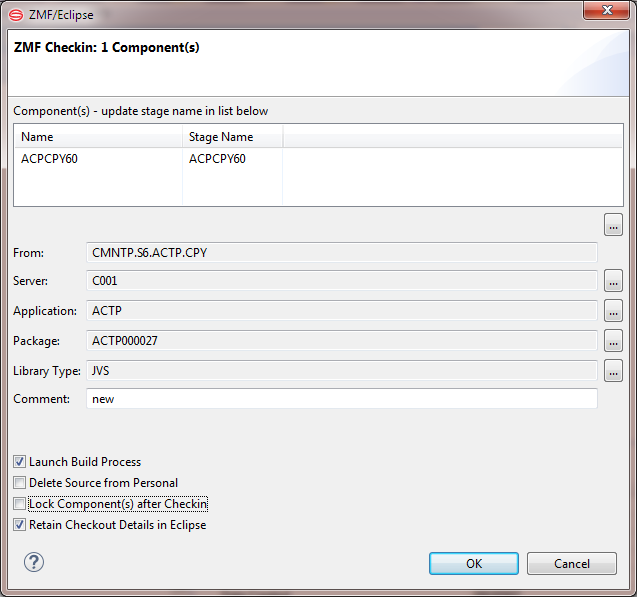
Fill in the fields as described:
Component
Displays the component(s) selected for checkin. Edit the text field as desired to add or remove components for checkin. All components must be of the same library type. Click the History button at right of this field to bring up the Component History list.
Source library
Displays the library in which the selected component(s) currently reside.
Server
Displays the server hosting the ZMF repository where the checked in components will reside after checkin. If any components in the Component(s) field:
- Were originally checked out from a ZMF repository, the server hosting that repository is shown and cannot be changed.
- Originated outside ZMF, your currently connected server displays. This value may be changed. Click the Servers button to select from a list of ZMF servers in a pop-up window.
Application
Supply the 4-character name of the application to associate with the checked-in components. If any components in the Component(s) field:
- Were originally checked out from ZMF, the application from which they were checked out is shown and cannot be changed.
- Are newly created or otherwise originated outside ZMF, no application is displayed. Click the Applications button to list available applications in a pop-up window for selection.
Package
Supply the ID of the change package where the components should be checked in. If any components in the Component(s) field:
- Were originally checked out from ZMF, the package from which they were checked out is shown. This value cannot be changed.
- Are all newly created or otherwise originated outside ZMF, no package is displayed. Click the Packages button to bring up a list of available packages in a pop-up window, then select the target package for checkin.
Library Type
Supply the library type to receive the checked-in components. All selected components must share the same library type. If any components in the Component(s) field:
- Were originally checked out from a ZMF repository, their library type at checkout is shown. This library type cannot be changed.
- Are newly created or originated outside ZMF, no library type is shown. Click the Library Types button to bring up a list of library types in a pop-up window for selection.
Comment
Type a component change description for ZMF. At least one character is required.
Launch Build Process
Check this box to automatically launch the component Build process after checkin. You will be prompted to supply build parameters when checkin completes.
Note
This option is enabled only for LIKE-SRC and LIKE-OTH library types. See Building a Component for details.
Lock Component(s) After Checkin
Check this box to lock the component(s) after checkin.
Note
You cannot lock a component that is already locked by another user.
Retain Checkout Details in Eclipse
Check this box to retain component checkout/checkin metadata as component defaults for future Checkout dialog boxes.