Customizing the Terminal
A quick way to customize the terminal is to create a model using a pre-configured settings file provided with Host Integrator. The settings file has defaults appropriate for the terminal session you are modeling.
- Customizing the 3270 Terminal
- Customizing the 5250 Terminal
- Customizing the VT Terminal
- Customizing the HP Terminal
Customizing the 3270 Terminal
You can control various aspects of the Design Tool's behavior as a 3270 terminal. First, configure a 3270 session and then configure any of the options available from the Settings menu to customize your 3270 terminal.
3270 Terminal Setup
-
National character set
The values identify the various host character sets that Host Integrator supports. The Design Tool uses this setting to choose a conversion table that it uses to convert host characters (EBCDIC) into PC characters (ANSI). This setting should match the national character set used by your host system. If it doesn't match, then some characters, such as accents, may not display correctly. See your host documentation for definitions of the characters in each set. The default value is US English.
You can also define a custom code page. After creating the custom code page file, select Custom in the national character set list. A set of examples is included with Host Integrator; see Creating a Custom Code Page for details.
-
Country Extended Graphics Code
When this check box is selected, additional characters are available in the configured National character set. See your host documentation for details. By default this box is selected.
You can change the settings in the Terminal Setup dialog box if you have opened a model but you are not connected to it.
-
If you have no model open, this dialog box is unavailable.
-
If you are connected to a model, the settings in this dialog box can be viewed but cannot be changed.
-
Default 3270 keyboard mapping and functions
| Function | Keystroke | Environment | Function |
|---|---|---|---|
| Alt Cursor | Alt+6 | host | |
| Attention | Ctrl+F1 | host | Interrupts the host application program. Not all host Telnet programs support the Attention key. |
| Backspace | Backspace | host | |
| Backtab | Shift+Tab | host | |
| Clear | Ctrl+F2 or Scroll Lock | host | When you first log on, your host connection is in implicit state, meaning that there is only a single partition. In implicit state, Clear erases all data in the partition. When there are multiple partitions, Clear erases all data in all partitions, and returns the emulator to implicit state. When there are multiple partitions, use the Clear Partition function to clear only the current partition. Most host applications use only a single partition. |
| ClearPartition | Ctrl+F4 | host | Erases all data in the current partition. |
| Connect | Alt+C | Design Tool | |
| Copy | Ctrl+C | Design Tool | |
| Cursor Blink | Alt+8 | host | Changes the blink rate of the cursor, cycling through two options (Blinking Disabled and Windows System). |
| Cursor Select | Ctrl+F3 | host | Simulates a light pen select in the field containing the cursor. Sets or clears the attribute indicating that a field has been modified. You can use the right mouse button in selectable terminal fields to perform a cursor select; in this way, the mouse can be used to simulate a light pen. |
| Delete Character | Delete | host | Deletes the character the cursor is on. |
| Delete Word | Alt+Delete | host | Deletes one word of text from an input field. |
| Disconnect | Alt+D | Design Tool | |
| Down | Down Arrow | host | |
| Duplicate | Ctrl+Page Up | host | Inserts a dup character into the buffer. The cursor moves to the first position of the next unprotected field if the screen is formatted, or to row 1, column 1, if the screen is unformatted. |
| Enter | Enter | host | |
| EraseEOF | End | host | Erases all data from the cursor location to the end of the current field. |
| Erase Input | Alt+F5 | host | Erases all unprotected fields in the current partition. |
| Field Delimit | Ctrl+Alt+F | host | Toggles IBM standard and extended field delimiters on or off during a host session. Toggling can be useful for troubleshooting. |
| Field Mark | Ctrl+Page Down | host | Inserts a field mark character. |
| Home | Home | host | |
| Insert | Insert | host | |
| Keyclick | Alt+7 | host | Toggles the keyclick on or off. When this function is on, the PC emits a low-pitched sound in numeric fields, a high-pitched sound in alphabetic fields, and no sound in protected fields. |
| Left | Left Arrow | host | |
| Left, double speed | Alt+Left Arrow | host | |
| New Line | Shift+Enter | host | |
| Next Window | Alt+N | Design Tool | |
| NumLock | Num Lock | host | |
| PA1 | Page Up | host | |
| PA2 | Page Down | host | |
| PA3 | Ctrl+3 | host | |
| Pan Left | Ctrl+Left Arrow | host | Moves the portion of the current partition visible on the screen so that a different part of the partition is visible. The distance panned is determined by the host upon establishment of the partition. If Host Integrator can display the entire partition on the terminal screen, this function has no effect. |
| Pan Right | Ctrl+Right Arrow | host | Moves the visible portion of the current partition so that a different part of the partition is visible. The distance panned is determined by the host upon establishment of the partition. If Host Integrator can display the entire partition on the terminal screen, this function has no effect. |
| Partition Jump | Ctrl+Tab | host | Moves the cursor to the next partition. Continuing to use this function cycles you through all available partitions. |
| Paste | Ctrl+V | Design Tool | |
| PF1-PF12 | F1-F12 | host | |
| PF13-PF24 | Shift+F1+Shift +F12 | host | |
| Reset | Esc | host | |
| Right | Right Arrow | host | |
| Right, double speed | Alt+Right Arrow | host | |
| Scroll Down | Ctrl+Down Arrow | host | Moves the visible portion of the current partition so that a different part of the partition is visible. The distance scrolled is determined by the host upon establishment of the partition. |
| Scroll Up | Ctrl+Up Arrow | host | Moves the visible portion of the current partition so that a different part of the partition is visible. The distance scrolled is determined by the host upon establishment of the partition. |
| Show Command Line | Alt+L | Design Tool | |
| SysReq | Alt+Print Screen | host | The definition of this key and its values vary by host application. |
| Tab | tab | host | The definition of this key and values vary by host application. |
| Toggle Terminal Keyboard | Alt+K | Design Tool | |
| Toggle Toolbar | Alt+B | Design Tool | |
| Up | Up | host |
Customizing the 5250 Terminal
You can control various aspects of the Design Tool's behavior as a 5250 terminal. First, configure a 5250 session and then configure any of the options available from the Settings menu to customize your 5250 terminal.
5250 Terminal Setup
-
National character set
The values identify the various host character sets that Host Integrator supports. The Design Tool uses this setting to choose a conversion table that it uses to convert host characters (EBCDIC) into PC characters (ANSI). This setting should match the national character set used by your host system. If it doesn't match, then some characters, such as accents, may not display correctly. See your host documentation for definitions of the characters in each set. The default value is US English.
You can also define a custom code page. After creating the custom code page file, select Custom in the national character set list. A set of examples is included with Host Integrator; see Creating a Custom Code Page for details.
You can change the settings in the Terminal Setup dialog box if you have opened a model but you are not connected to it.
- If you have no model open, this dialog box is unavailable.
- If you are connected to a model, the settings in this dialog box can be viewed but cannot be changed.
Default 5250 keyboard mapping
| Function | Keystroke | Environment | Description |
|---|---|---|---|
| Alt Cursor | Alt+6 | host | |
| Attention | Esc | host | Interrupts the host application program. Workstation operators use the Attn key to alert the AS/400 system that a requested function (such as Enter) is not being honored. The Attn key is allowed whether the keyboard is locked or unlocked. |
| Backspace | Backspace | host | Moves the cursor back to the previous position in which data can be entered. If the cursor is already in the first position of an input field, Backspace moves back to the last position in the preceding input field. |
| Backtab | Shift+Tab | host | Moves the cursor back to the first position in the current input field. When the cursor isn't on an input field, Backtab moves it to the first position in the previous input field. If the screen doesn't contain input fields, Backtab moves the cursor to row 1, column 1. |
| Begin Bold | Ctrl+B | host (word processing) | |
| Begin Underline | Ctrl+U | host (word processing) | |
| Bottom of Page | Ctrl+Down Arrow | host (word processing) | |
| Carrier Return | Left Ctrl, Right Ctrl | host (word processing) | |
| Center | Ctrl+C host (word processing) | ||
| Clear | Pause | host | Signals the host to erase all user-entered text from the current screen. |
| Connect | Alt+C | Design Tool | |
| Delete | Delete | host | Deletes the character at the cursor position. All characters to the right of the cursor (in the same input field) shift one position to the left. Null characters are inserted at the right end of the field as characters are deleted. If you invoke this function when the cursor is not in an input field, the input inhibit symbol appears in the status line. (In the 5250 status line, the input inhibit indicator is the letters II in inverse video.) Press Reset (Left Ctrl) to clear the symbol and enable input. |
| Disconnect | Alt+D | Design Tool | |
| Down | Down Arrow | host | |
| Down Double | Alt+Down Arrow | host | Moves the cursor down one or more lines. The number of lines the cursor moves is determined by the value of Vertical speed in the Terminal Setup dialog box. The default is two lines. |
| Duplicate | Shift+Insert | host | Uses the data from the equivalent field in the previous record as the contents of this field. If a field is programmed to allow duplication, you'll see a symbol at the cursor position when you invoke this function. Invoking this function when the cursor is not in an input field or not in a field that supports this function causes the input inhibit symbol to appear in the status line. (In the 5250 status line, the input inhibit indicator is the letters II in inverse video.) Press Reset (Left Ctrl) to clear the symbol and enable input. |
| End Bold | Ctrl+J | host (word processing) | |
| End of Line | Ctrl+Right Arrow | host (word processing) | |
| End Underline | Ctrl+J | host (word processing) | |
| Enter | Enter | host | Transmits any data you have typed in the Terminal window to the host application. |
| Erase EOF | End | host | Erases all data from the cursor position to the end of the current field, without moving the cursor. |
| Erase Input | Alt+End | host | Erases the contents of all input fields on the screen and moves the cursor to the beginning of the first input field. If the screen has no input fields, Erase Input moves the cursor to row 1, column 1 on the screen, and no data is erased. |
| Extended Graphics | Alt+Right Shift | host | The following special characters are available in extended graphics mode:  Host Integrator remains in extended graphics mode until you press Alt+Right Shift again or Reset (Left Ctrl). Host Integrator remains in extended graphics mode until you press Alt+Right Shift again or Reset (Left Ctrl). |
| F1-F12 | F1-F12 | host | |
| F12-F24 | Shift+F1-Shift+F12 | host | |
| Field Exit | Right Ctrl | host | Moves the cursor out of an input field, inserting null characters from the current cursor location to the end of the field. The cursor moves to the first position of the next input field. If you use Field Exit in a right-adjust field, the data to the left of the cursor shifts to the right. The vacated positions are filled with zeros or blanks as specified by the program, and the cursor advances to the next input field. |
| Field Minus | Numeric keypad – | host | Moves the cursor out of a signed-numeric or numeric-only field, inserting a minus sign in the last position of a signed-numeric field, or changing the last position in a numeric-only field to an alphabetic character that tells the system that this field has a negative value. |
| Field Plus | Numeric keypad + | host | Except in a signed-numeric or numeric-only field, this function is identical to Field Exit. In a signed-numeric field, this function moves the cursor to the next field, removing a minus sign if there is one in the last position. In a numeric-only field, this function moves the cursor to the next field, changing the last position to an alphabetic character that tells the system that this field has a positive value. |
| Half Index Down | Ctrl+H | host (word processing) | |
| Half Index Up | Ctrl+Y | host (word processing) | |
| Help | Scroll Lock | host | Provides help from the system or, when an error condition exists, an explanation of the error condition. See your host documentation for information on error codes. |
| Hex Mode | Alt+F7 | host | Use this function before entering a hexadecimal value for a character. To enter a hexadecimal value, type two characters. These characters can be 0-9 or a-f. No other input is allowed in hex mode. When you press Alt+F7 to put Host Integrator in hex mode, a small h appears on the 3488 status line (default), a little to the right of center. Reset (Left Ctrl) causes Host Integrator to exit hex mode. When you enter the first character of your hex value, the h in the status line becomes a capital H. If Preserve entry mode is selected, pressing Left Ctrl at this point takes the character out of the buffer but doesn't exit hex mode. (This is a way of retracting the character you typed. To show this, the capital H becomes a small h once again. Host Integrator now expects you to enter two characters for your hex value.) Press Left Ctrl again to back completely out of hex mode. |
| Home | Home | host | Moves the cursor to the first input position on the screen. If the screen contains no input fields, Home moves the cursor to row 1, column 1. If you use this function when the cursor is already in the first input position on the screen, Host Integrator transmits a record backspace aid key instead. |
| Insert | Insert | host | The insert symbol appears in the 3488 status line (default). (In the 5250 status line, the letters IM are displayed in inverse video when Host Integrator is in insert mode.) Characters you type when the terminal is in insert mode are inserted at the cursor position. As you type, existing characters at and to the right of the cursor position shift one position to the right for each character you type. There must be a null character at the right end of the insert field for each character you type in insert mode. If you attempt to insert more characters than there are nulls, an X appears in the status line and input is inhibited. Press Reset Left Ctrl to remove the symbol and enable input. |
| Insert Symbols | Ctrl+A | host (word processing) | |
| Left | Left Arrow | host | |
| Left Double | Alt+Left Arrow | host | Moves the cursor one or more columns to the left. |
| New Line | Shift+Enter | host | Moves the cursor to the first input position on the next line. If there are no input positions on the next line, the cursor moves to the first input position on the next line with an input field. If you execute Newline when there are no lines between the current line and the end of the screen that contains input fields, it wraps back to the first line in the screen. Newline differs from Tab in that it can be used to drop to the second line of a multi-line field. Tab always moves to the next field. |
| Next Stop | Ctrl+N | host (word processing) | |
| Next Text Column | Ctrl+D | host (word processing) | |
| Next Window | Alt+N | Design Tool | |
| PA1-PA3 | Alt+F1-Alt+F3 | host | |
| Page Down | Page Down | host | Scrolls down one page in the current host screen (equivalent to Roll Up). |
| Page End | Ctrl+P | host (word processing) | |
| Page Up | Page Up | host | Scrolls up one page in the current host screen (equivalent to Roll Down). |
| Plus CR Mode | Alt+F12 | host | Execute this function once and Host Integrator shows hexadecimal codes in front of each field in the Terminal window. These codes indicate the field and display attributes for each field. If you've configured Host Integrator to use the 3488 status line (default) or the debug status line, then d appears in the status line. Execute this function again and Host Integrator shows different two-character hexadecimal codes indicating the extended character buffer values for each field. A c appears in the 3488 or debug status line. Execute this function a third time and Host Integrator shows two-character hexadecimal codes indicating the character attributes for each character in the Terminal window. An a appears in the 3488 or debug status line.Press Reset Left Ctrl twice to exit Plus CR mode. |
| no mapping | host | Sends an image of the screen to the host. How and where that image is printed depends on the configuration of the host session. | |
| Print Screen | Print Screen | Design Tool | Prints the contents of the Terminal window. |
| Required Carriage Return | Right Ctrl | host (word processing) | |
| Required Space | Ctrl+Spacebar | host (word processing) | |
| Required Tab | Ctrl+Tab | host (word processing) | |
| Reset | Left Ctrl | host | Press Reset once to exit from various modes and clear operator errors. Press Reset twice to exit Plus CR mode. |
| Right | Right Arrow | host | |
| Right Double | Alt+Right Arrow | host | Moves the cursor one or more characters to the right. |
| Roll Down | Shift+Down Arrow | host | Scrolls up one page in the current host screen (equivalent to Page Up). |
| Roll Up | Shift+Up | host | Scrolls down one page in the current host screen (equivalent to Page Down). |
| Rule | Alt+Page Down | host | Toggles the rule line into or out of view. The rule line can be a horizontal line, a vertical line, or both, indicating the row and/or column containing the cursor. |
| Show Command Line | Alt+L | Design Tool | |
| SLP Auto Enter | not mapped | host | The full name of this key is Selector Light Pen Auto Enter. It simulates a light pen select at the cursor location. |
| Stop | Ctrl+S | host (word processing) | |
| SysReq | Alt+Print Screen | host | The SysReq key is allowed whether the keyboard is locked or unlocked. Use this function to: select and start an alternate job, notify the host system that the terminal is ready to select a new program, or request that the keyboard be unlocked. |
| Tab | Tab | host | Moves the cursor from the current position to the first input position in the next input field. If there are no input positions after the current cursor position, Tab moves the cursor to the first character position in the first input field on the screen. If the screen doesn't contain input fields, Tab moves the cursor to row 1, column 1 on the screen. |
| Tab Advance | Ctrl+T | host (word processing) | Moves the cursor from the current position to the next defined Tab stop. If there are no Tab stops in the current field, Tab Advance moves the cursor to the first Tab stop in the next input field on the screen. Tab Advance is defined for Text Assist mode only. |
| Toggle Toolbar | Alt+B | Design Tool | |
| Toggle Terminal Keyboard | Alt+K | Design Tool | |
| Top of Page | Ctrl+Up | host (word processing) | |
| Test Request | Alt+Scroll Lock | host | Signals the host to enter test request mode, a set of test programs created by IBM and provided by the AS/400. This function is only available in the sign-on screen. |
| Up | Up | host | |
| Up Double | Alt+Up | host | Moves the cursor up one or more lines. |
| Word Underline | Ctrl+W | host (word processing) |
Customizing the VT Terminal
You can control various aspects of the Design Tool's behavior as a VT terminal. First, configure a VT session and then configure any of the options available from the Settings menu to customize your VT terminal.
- Configuring VT Emulation Settings
- Advanced VT SSH Options
- Advanced VT or HP Telnet
- VT Control Functions
- Default VT Keyboard Mapping
- VT Screen Setup
Configuring VT Emulation Options
From the Settings menu, click Terminal. The Emulation tab includes the following:
-
Host Character Set
The Host Integrator VT terminal supports the following character sets:
- DEC Supplemental
- ISO ISO Latin-1 (ISO-8859-1) This is the ISO-8859-1 character set
- ISO Latin-9 (ISO-8859-15)
- PC English (437)
- PC Multilingual (850)
- Windows Latin (1252)
The default value for the Host character set depends on the type of terminal you are emulating. This setting reflects the current terminal state of VT Host Character Set, which can be changed by the host. The associated default setting, saved with the model is VT Host Character Set Default.
- When a soft reset is performed, or when initially connecting, the default host character set is used.
- The current terminal state for the host character set can be altered by invoking the DECSTR sequence. The Host character set may also be specified by the Select Character Set (SCS) sequence.
-
Terminal ID
The setting in this list determines the response that Host Integrator sends to the host after a primary device attributes (DA) request. This response lets the host know what terminal functions it can perform. Host Integrator's response for each Terminal ID is exactly the same as the VT terminal's response; some applications may require a specific DA response. This terminal ID setting is independent of the Terminal type setting.
The options are VT100, VT220, VT320, VT420, and VT52.
This setting reflects the current terminal state of VT Terminal ID, which can be changed by the host. The associated default setting, saved with the model, is VT Terminal ID Default.
-
Online
Host Integrator is always in either remote or local mode. Keeping this check box selected means that Host Integrator can communicate with the host as a terminal; this is known as remote mode. Host Integrator transmits each character typed from the keyboard to the host. As Host Integrator receives characters from the host, it displays them on the screen.
When Host Integrator is in remote mode, but is not connected to a host computer, characters typed at the keyboard do not appear on the screen.
When you clear this check box, Host Integrator can no longer communicate with the host; this is known as local mode. In local mode, Host Integrator does not attempt to communicate with a host computer. Characters entered from the keyboard appear on the screen, but are not transmitted to the host; nor is any data from the host (for example, notification of a mail message) received by Host Integrator.
-
Newline
Selecting this check box causes Host Integrator to send both a carriage return and linefeed when you press Enter (known as new line mode). When Host Integrator receives a linefeed, form feed, or vertical tab, it moves the cursor to the first column of the next line. When this check box is left cleared (linefeed mode), the Return key sends only a carriage return. A linefeed, form feed, or vertical tab received from the host moves the cursor down one line in the current column.
If lines on the display is being overwritten (that is, the host is not sending a linefeed along with a carriage return), select this check box. If the New line check box is selected but the host does not expect to receive a linefeed with each carriage return, lines will be double-spaced on the display.
This setting reflects the current terminal state of VT New Line, which can be changed by the host. The associated default setting, saved with the model, is VT New Line Default.
-
Autowrap
Selecting this check box causes characters to wrap to the next line automatically when the cursor reaches the right margin of the display. This setting is different from the VAX host's terminal wrap characteristic, which is set with this DCL command: SET TERMINAL/[NO]WRAP
The host command determines whether characters wrap automatically when they reach the maximum terminal width set by the host's SET TERMINAL/WIDTH command. Host Integrator's Autowrap option, in contrast, determines whether characters wrap when they reach the right margin of the display. When Host Integrator is communicating with the host:
If... Then... If terminal wrap is set on the host Characters wrap when they reach the maximum terminal width, regardless of the setting of the Autowrap check box. If terminal wrap is not set and the Autowrap check box is selected Characters wrap at the right margin of the display If terminal wrap is not set and the Autowrap check box is cleared Characters never wrap when they reach the right margin of the display. New characters overwrite the character at the right margin until a carriage return is entered When Host Integrator is not communicating with the host (that is, the Online check box is not selected), the Autowrap check box works as described in the last two items above, as if the host's terminal wrap characteristic is not set.
-
National Replacement Character Set
This setting specifies a set of character translations that occur between the local computer and the host in 7-bit mode. This setting affects how characters entered from the keyboard or from a local file are transmitted to the host, and how characters sent from the host are written to local files, to the screen, or both.
Translations are not performed unless the Use NRC setting is set to Yes.
This setting reflects the current terminal state of the National Replacement Set, which can be changed by the host. The associated default setting, saved with the model, is VT National Replacement Set Default.
-
Use NRC (7-bit) Set
This setting specifies whether the translations specified by the National Replacement Set setting should be performed.
This setting reflects the current terminal state of VT Use NRC, which can be changed by the host. The associated default setting, saved with the model, is VT Use NRC Default.
-
Answerback message
This setting allows you to enter an answerback message if the host expects an answer in response to an ENQ character.
This setting reflects the current terminal state of VT Answerback Message, which can be changed by the host. The associated default setting, saved with the model, is VT Answerback Message Default.
Select the Insert special characters check box to include escape sequences and ASCII control codes in the message.
Select Auto answerback to specify whether the answerback message is automatically sent to the host after a communications line connection.
-
User Features Locked
This setting specifies whether certain features can be changed by the host. When this setting is set to Yes, the following properties cannot be changed by the host: - Tab stops - The Keyboard Locked setting which specifies whether or not the keyboard is locked (that is, it cannot be used). - The Inverse Video setting which specifies whether the foreground and background colors for screen attributes are reversed.
-
User-defined keys locked
When this setting is set to Yes, the Host Integrator locks the user keys to prevent the host from clearing or redefining them. When user-defined keys are locked, the only way they can be redefined is to first unlock them, and the only way to unlock them is by selecting No. This setting is not saved to a Host Integrator settings file.
If you want to define new user keys or allow the host to define them, the keys must be unlocked. If user keys are locked and an application tries to redefine a key using a DECUDK sequence, Host Integrator ignores the sequence.
This setting reflects the current terminal state of VT User-defined Keys Locked, which can be changed by the host. The associated default setting, saved with the model, is VT User-defined Keys Locked Default.
Advanced VT SSH Options
-
User authentication
Click in the box next to any authentication method to clear or enable that method. You must select at least one authentication method. You can use the arrows to specify your order of preference. The first method you select that is supported by the server is used.
-
Cipher list
Use this list to specify the ciphers you want to allow for connections to the current host. When more than one cipher is selected, the SSH client attempts to use ciphers in the order you specify, starting from the top. To change the order, select a cipher from the list, then click the up or down arrow. The cipher used for a given session is the first item in this list that is also supported by the server.
-
HMAC list
Specifies the HMAC (hashed message authentication code) methods you want to allow. This hash is used to verify the integrity of all data packets exchanged with the server. When more than one HMAC is selected, the SSH client attempts to negotiate an MAC with the server in the order you specify, starting from the top. To change the order, select an HMAC from the list, then click the up or down arrow.
-
Key exchange algorithms
Specifies which key exchange algorithms the client supports, and the order of preference. In some cases, you may need to change the order of the key exchange algorithms to put DH Group14 SHA1 ahead of the other values. This is required if you want use the hmac-sha512 HMAC, or if you see the following error during key exchange: "Unable to exchange encryption keys."
-
Host key algorithms
Specifies the host key type the client will accept from the server. You must select at least one host key type. The SSH client will use a key type from the server in the order you specify, starting from the top. To change the order, select an algorithm from the list, then click the up or down arrow.
-
Keep alive
When Keep Alive is selected, Host Integrator sends NOOP messages to the server through the secure tunnel at the specified interval. Use this setting to maintain the connection to the server. Use Interval in seconds to specify how frequently server alive messages are sent. If this setting is not enabled, the SSH connection will not terminate if the server dies or the network connection is lost.
The SSH Keep Alive setting is not related to the TCP keep alive setting that can be set in the Windows registry to keep all TCP/IP connections from being timed out by a firewall. To change the TCP/IP keep alive behavior, you need to edit the Windows registry.
-
Enable compression
When Enable compression is selected, the client requests compression of all data. Compression is desirable on modem lines and other slow connections, but will only slow down response rate on fast networks.
-
Only show FIPS validated values
Select this to filter the Cipher and HMAC lists to show only FIPS validated values. SSH only uses the values you configure. If you choose a non-FIPS value while running in FIPS mode an error message asking to you to specify a valid cipher displays.
Federal Information Processing Standards (FIPS) are guidelines established by the United States government to standardize computer systems. To use FIPS 140-2 validated encryption, in a Windows environment, you must first define an environment variable, VHI_FIPS = 1.
Advanced VT or HP Telnet
You can configure the following options in this dialog box:
-
Terminal ID
When Host Integrator connects to a Telnet host, the Telnet protocol negotiates a Telnet terminal ID with the host. In general, this negotiation results in the selection of the correct terminal ID. However, if you are having trouble running a host application, the negotiation between Telnet and the host could be the issue.
This setting determines:
- which screen control sequences the host sends to Host Integrator to format the screen.
- the position of the cursor
- what characters to display in a host application
To override Host Integrator's election of a terminal, select a terminal ID from the list (because this list box is editable, you can just type in any value). If you enter a terminal ID that the host does not recognize, Host Integrator reverts to a list of default values until one is found that the host supports. The default terminal ID values are VT100, VT 220, VT 320, VT 420 and VT52 and HP and HP2392A. The terminal type and the settings are independent of each other. If you enter a terminal ID string, it may be up to 40 characters long taken from a set of uppercase letters, digits, and the two punctuation characters, hyphen and slash. It must start with a letter and end with a letter or digit.
-
Location (Optional)
Specifies to the host where the connection originated. Can also be used to provide informational messages to the host from the PC. Usage conventions vary by site. Supports up to 260 characters. You cannot change this value while you're connected to a gateway.
-
Send LF after CR
A "true" Telnet host expects to see a CrNu (carriage return/null) character sequence to indicate the end of a line sent from the Design Tool. There are some hosts on the Internet that are not true Telnet hosts, and they expect to see a Lf (linefeed) character following the Cr at the end of a line. If you're connecting to this type of Telnet host, select this check box.
-
Initiate Option Negotiation
Specifies whether certain connection options, including whether to always request a binary mode connection, should be negotiated when the Telnet connection is established. Connections to some hosts on the Internet are expedited if this check box is cleared so that the Design Tool does not attempt to initiate negotiations for Telnet options.
-
Request Binary
Telnet defines a 7-bit data path between the host and the terminal (Host Integrator). This type of data path is not compatible with certain national character sets. Fortunately, many hosts allow for 8-bit data without zeroing the 8th bit, which resolves this problem. Select this check box to force the host to use an 8-bit data path.
-
Set Host Window Size
Sends the number of rows and columns to the Telnet host whenever they change. This enables the Telnet host to properly control the cursor if the window size is changed.
-
Ctrl-break Character
Specifies what happens when you press the following keys:
- ATTN key (Ctrl-F1 by default) in a 3270 session
- Ctrl-break in a VT or HP session
Options to send to the host are:
- Telnet Abort Output
- Telnet Break
- Telnet Interrupt Process
-
Send Keep Alive Packets
In some cases, Host Integrator may become aware of Telnet communication problems only after a significant delay or when it attempts to send data to the host. This can cause problems if you enter a large amount of data on one screen or if you keep your connection open during periods of inactivity.
To become aware of connection problems as they occur, you can configure your model to send Keep Alive packets. Four methods are available:
- None - No keep alive packets are sent (default)
- Send NOP Packets - Periodically a No Operation (NOP) command is sent to the host. The gateway and host are not required to respond to these commands, but the TCP/IP stack can detect if there was a problem delivering the packet.
- System - The TCP/IP stack keeps track of the host connection. This method requires less system resources than Send Timing Mark Packets or Send NOP Packets, but most TCP/IP stacks send Keep Alive packets infrequently.
- Send Timing Mark Packets - Periodically a Timing Mark Command is sent to the host to determine if the connection is still active. The gateway or host should respond to these commands. If a response is not received or there is an error sending the packet, it will shut down the connection. To view the average amount of time has waited for a response to a Timing Mark Command in the Design Tool, open the View Settings dialog box and select the Telnet Average Keep Alive Roundtrip setting.
-
Keep Alive Timeout
The Keep Alive Timeout is the interval between the keep alive requests sent by the Design Tool. The range of values is 1-9999 seconds, and the default is 600 seconds.
-
Local Echo
Controls how the Design Tool responds to remote echo from a Telnet host: - Automatic - (Default) Attempts to negotiate remote echo, but does what the host commands. - Yes - Negotiates local echo with the host, but always echoes. - No - Negotiates remote echo with the host, but does not echo.
VT Control Functions
Control functions cause Verastream to perform certain actions, such as move the text cursor, add a line of text, assign character attributes, and change character sets. Typically, the host application sends control functions to Verastream to perform the desired actions. There are three symbols used in this section that describe a sequence:
| Symbol | Description |
|---|---|
| ESC | Stands for the Escape character, and begins an escape sequence |
| CSI | Stands for the Control Sequence Introduction character. When Verastream receives this character, it recognizes the string that follows as a control sequence |
| DCS | Stands for the Device Control String character, and begins a device control sequence |
Control Function Notation
The following notation is used throughout this section:
- Most control functions have a mnemonic identifier. You will never need to enter the mnemonic; it’s simply a convenient word to help you remember the name of the control function. For example, DECCOLM is the Digital mnemonic for setting the number of display columns.
- Control functions are case sensitive, and must be typed exactly as shown.
- Where appropriate, a slash is used through a zero (Ø) to distinguish it from the uppercase letter O.
- Note the difference between a lowercase L (l) and the number 1 (1). References are occasionally given to a character’s decimal value in the character set charts. For example, the space character is ASCII decimal 32. Control characters are always in the same positions in the charts, and can be located uniquely by their decimal value; the word “ASCII” is omitted.
- This topic shows control functions in their 8-bit format. You can always use the 7-bit equivalent escape sequence to represent the 8-bit control, as shown in the Recognized C0 Control Characters Table.
- Parameters you supply for a sequence are enclosed in angle brackets. For example, when using the
CSI<n>Ccontrol function, replace<n>with the number of spaces you want the cursor to move. If<n>is omitted, the default is used. For most sequences, the default is 1 (when there is not a corresponding Ø sequence). - Numeric parameters are represented by ASCII strings. For example, in the sequence CSI10;13H the numbers are the strings 10 and 13, not the decimal values 10 (LF character) and 13 (CR character). Numeric parameters are constrained to the range 0–9999, inclusive. Any numeric parameter with a value greater than 9999 is interpreted as 9999. The plus sign (ASCII decimal 43) and the minus sign (ASCII decimal 45) are not within the range of legal control characters. Therefore, signed numbers, for example “+10” or “-12,” cause a control sequence or a device control string to be rejected. Do not include signs with numeric parameters.
Single-Character Control Functions
A single-character control function is made up of one control character (in contrast to multiple-character control functions). There are two sets of single-character control functions available on VT200, VT300, and VT400 terminals:
-
C0 control characters have decimal values 0–31. Verastream supports only the C0 characters shown in the Recognized C0 (7-Bit) Control Characters Table. Each C0 character is encoded in 7 data bits, with the high-order bit always 0. C0 codes, therefore, can be used in both 7-bit and 8-bit operating environments. LF and CR, for example, are single-character C0 control functions.
-
C1 control characters have decimal values 128–159. Verastream supports only the C1 characters shown in the Recognized C1 (8-Bit) Control Characters Table. Each C1 character is encoded in 8 data bits, with the high-order bit always 1. C1 characters provide a few more functions than C0 characters, but can only be used directly in an 8-bit operating environment. DCS, for example, is a single-character C1 control function.
In 7-bit operating environments, C1 characters must be converted to a two-character escape sequence equivalent.
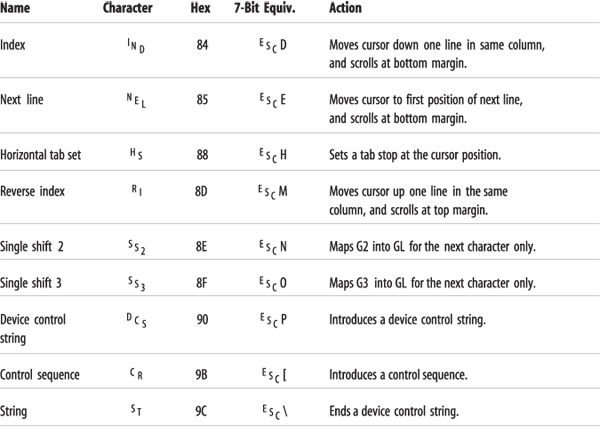
Recognized C0 (7-Bit) Control Characters Table
The following table lists the C0 control characters that Verastream recognizes. C0 controls can be used in both 7-bit and 8-bit environments. To represent C0 controls in a Verastream macro, use the Chr$(<n>) syntax, where <n> is the decimal value of the C0 control. See the “Decimal” column in the following table:
| Name | Character | Octal | Keystroke | Action |
|---|---|---|---|---|
| Null | NUL | 0 | ^@ | Ignored when received |
| Enquiry | ENQ | 5 | ^E | Transmits the answerback message |
| Bell | BEL | 7 | ^G | Sounds a bell |
| Backspace | BS | 10 | ^H | Moves cursor left one position on the current line |
| Horizontal tab | HT | 11 | ^I | Moves cursor to the next tab stop, or to the right margin. |
| Linefeed | LF | 12 | ^J | Causes a linefeed or new line operation. |
| Vertical tab | VT | 13 | ^K | Same as linefeed |
| Form feed | FF | 14 | ^L | Same as linefeed |
| Carriage return | CR | 15 | ^M | Moves the cursor to the left margin of the current line |
| Shift out (locking shift 1) | SO | 16 | ^N | Maps the G1 character set into GL. G1 is designated by using a Select Character Set (SCS) sequence. |
| Shift in (locking shift 0) | SI | 17 | ^O | Maps the G0 character set into GL. G0 is designated by using a Select Character Set (SCS) sequence. |
| Device control 1 (XON) | DC1 | 21 | ^Q | Continues sending characters when transmit is set to Xon/Xoff. |
| Device control 3 (XOFF) | DC3 | 23 | ^S | Stops sending characters when transmit is set to Xon/Xoff. |
| Cancel | CAN | 30 | ^X | Cancels the sequence when received during an escape or control sequence. |
| Substitute | SUB | 32 | ^Z | Same as cancel;displays a backwards question mark. |
| Escape | ESC | 33 | ^[ | Introduces an escape sequence and cancels any escape sequence or control sequence in progress. |
| Delete | DEL | 177 | (none) | Ignored when received. |
Recognized C1 (8-Bit) Control Characters
In 8-bit environments, C1 controls can be sent directly. In a 7-bit environment, you can send an 8-bit C1 control character by converting it to an equivalent 7-bit escape sequence. The 8-bit controls are single character codes (such as CSI), whereas their 7-bit equivalents are two-character sequences (such as ESC[).
To form an equivalent 7-bit escape sequence from an 8-bit control character:
- Subtract the hexadecimal value 40 from the C1 control code’s value.
- Precede the result with the ESC character.
For example, the IND character (decimal 132) has a hexadecimal value of 84. To convert IND to a 7-bit equivalent, first subtract hexadecimal 40: 84 hex - 40 hex = 44 hex. Hexadecimal 44 is the letter D. Therefore, to represent the IND character in a 7-bit environment, you would use ESCD.
These are the C1 control characters that Verastream recognizes:
Multiple-Character Control Functions
The C0 and C1 codes listed in the Recognized C0 (7-Bit) Control Charactersand Recognized C1 (8-Bit) Control Characters tables are single-character control functions, performing simple functions.
Multiple-character control functions, in contrast, can perform many more functions than the C0 and C1 controls, and are formed by a sequence of characters. There are three types of multiple-character control functions, introduced by the following single-character C0 and C1 controls:
- Escape sequences - introduced by the ESC character
- Control sequences - introduced by the CSI character
- Device control strings - introduced by the DCS character
Multiple-character control functions include both control characters and normal ASCII text, such as letters, numbers, and punctuation. For example, the multiple character device control string DCSØ!u%5ST assigns a user-preferred supplemental character set.
-
Escape Sequences
An escape sequence begins with the C0 character ESC (decimal 27). To enter the ESC character in the Design Tool, press the ESC key. After receiving an ESC character, Verastream interprets the next characters as part of the sequence.
-
Control Sequences
A control sequence begins with the C1 control character CSI (decimal 155). To enter the CSI character in the Design Tool, press the ESC key plus the [ key.
Control sequences usually include variable parameters. The format is:
CSI P...P I...I FP...P- Zero or more parameters. You can have up to 16 parameters per sequence, using a semicolon (;) to separate each one.I...I- Zero or more intermediate characters.F- The final character indicating the end of the control sequence.For example, the following control sequence sets the scrolling region, where the top margin is at line 7 and the bottom margin is at line 18:
CSI7;18rIn this example, 7 and 18 are the parameters and r is the final character. This sequence does not have any intermediate characters.
-
Device Control Strings
A device control string begins with the C1 control character DCS (decimal 144). To enter the CSI character in the Design Tool, press the ESC key plus the P key. Device control strings always include a data string. The format is:
DCS P...P I...I F <data string> STP...P- Zero or more parameters. You can have up to 16 parameters per sequence, using a semicolon (;) to separate each one.I...I- Zero or more intermediate characters.F- The final character indicating the end of the device control string.<data string>- A data string of zero or more characters. Use a semicolon to separate individual strings. The particular range of characters included in a data string is determined by the individual device control string. Any character except ST (decimal 156) can be included in a data string.ST- The string terminator. TypeChr$(27)& "Ëfor 7-bit mode, orChr$(156)for the 8-bit equivalent. (You can also presse-\in the terminal window.) -
APC, OSC, and PM
The application program command (APC), operating system command (OSC), and privacy message (PM) are also C1 controls. However, VT terminals—and Verastream—ignore them. The controls have the same format as device control strings and end with an ST. When Verastream receives an APC, OSC, or PM introducer, it discards all following characters until receiving a string terminator (so the whole sequence is discarded).
-
Interrupting Control Sequences
You can use the following C0 control characters to interrupt a control function or recover from an error:
ESCCancels a sequence in progress, and begins a new sequence.CANCancels a sequence in progress. Verastream interprets the characters that follow the CAN character as usual.SUBSame as CAN, except displays a backwards question mark.
Using Nonprintable Characters
Some host application models require you to use nonprintable characters within strings. For example, they may be required when waiting for cursor positioning sequences sent from a VT or HP host using the Host Communication string event WaitForCommString, or sending control sequences via the TransmitANSI command. To represent nonprintable control characters when defining your model in Host Integrator dialog boxes, use the standard C programming convention of encoding each character as a \nnn sequence, where nnn is the octal numeric value of the ASCII character, or use one of the \x sequences that have been defined for the more common control characters. For example, the escape character (0x1B), which prefixes VT cursor positioning sequences, is encoded as \033; carriage returns can be encoded using \r.
When a model file is read by Host Integrator, the \nnn sequences are parsed into their literal nonprintable character equivalents. Because backslashes () are interpreted as the beginning of a nonprintable character sequence, Host Integrator represents literal backslashes in strings with two backslashes. For example, if you want to wait for the display string "Enter a backslash () to continue" in an operation, what you will see in the Operation Edit dialog box for WaitForDisplayString is "Enter a backslash (\) to continue". If you modify a model file in XML format or the model file itself, you must follow this syntax to embed literal backslashes within string arguments.
| Alphabetic Sequence | Equivalent Octal | Also Known As |
|---|---|---|
\a |
\007 |
Control-G (BEL) Bell |
\b |
\010 |
Control-H (BS) Backspace |
\t |
\011 |
Control-I (TAB) Horizontal tab |
\n |
\012 |
Control-J (LF) Linefeed |
\v |
\013 |
Control-K (VT) Vertical tab |
\f |
\014 |
Control-L (FF) Formfeed |
\r |
\015 |
Control-M (CR) Carriage return |
Default VT Keyboard Mapping
To find a VT keystroke's default mapping, click the key and click the Default button and note the corresponding Action in the lower half of the dialog box. Click Cancel if you do not want to revert the key's mapping to its default value.
VT Screen Setup
These settings reflect the current terminal state, which can be changed by the host.
-
Display columns
This setting specifies the number of columns displayed in the Terminal window.
-
Display columns
This box sets the number of lines on the display, not including the status line. The maximum number of rows you can enter depends on the display resolution.
When you change the number of rows, characters are scaled vertically to fit the desired number of rows in the Terminal window. The display is erased before the new setting takes effect.
-
Status Line Type
The VT status line at the bottom of the Terminal window is a one-line display that shows information about the current session. When the Status line is set to Indicator it shows the current row and column of the text cursor.
When the Status line is set to Host Writable, host applications can display messages on it. The control function DECSASD selects whether the Terminal window or the status line is the active area for displaying text.
-
Interpret controls
The VT terminal character set includes 65 control characters with decimal values 0-31 and 127-159. This option determines whether Host Integrator should interpret or display control characters.
Customizing the HP Terminal
You can control various aspects of the Design Tool's behavior as an HP terminal. First, configure an HP session and then configure any of the options available from the Settings menu to customize your HP terminal.
See Configuring Sessions for information on how to configure the HP terminal.
A quick way to customize the terminal is to create a model using a pre-configured settings file provided with Host Integrator. The settings file has defaults appropriate for the terminal session you are modeling.
Configuring HP Emulation Options
These settings reflect the current terminal state, which can be changed by the host. The associated default setting, saved with the model, is HP Field Separator Default.
| Emulation Options | Description |
|---|---|
| Field Separator | When the Host Integrator is transmitting in block, page, and format modes, it sends a field separator character after each field of the formatted screen except the last one. The value selected here specifies which ASCII character is sent. The values are ASCII decimal 0-127. The default is US (ASCII decimal 31). |
| Block Terminator | Under certain conditions, the Host Integrator transmits a block terminator character at the end of each block of data transmitted. The value selected here specifies which ASCII character is sent to indicate that the end of the block has been reached. The values are ASCII decimal 0-127. The default is RS (ASCII decimal 30). |
| Return Definition | Type a character in these boxes to be generated whenever Return is pressed. If the second character is a space, only the first character is generated. The values are ASCII decimal 0-127. The default is CR (ASCII decimal 13). |
| Host Prompt | An HP 3000 sends a DC1 character to indicate that it is ready to accept a line or block of characters. This character is sent immediately after the MPE colon prompt is sent. This list allows you to change which character is expected. Most hosts either use the DC1 (^Q) character or no prompt (which shows up simply as a space). Select the appropriate host prompt from this list (turn on DISPLAY FUNCTIONS to see the control codes sent by the host before changing this value). The values are ASCII decimal 0-127. The default is D1 (ASCII decimal 17) |
| Start Column | For every line in display memory, the Host Integrator attempts to remember the leftmost column that was entered from the keyboard, as opposed to that received from datacomm. This way, the Host Integrator can distinguish the host prompt portion of each line from the user-entered portion. This information is used when you enable LINE MODIFY or MODIFY ALL to determine the leftmost column that should be transmitted to the host when you press Enter or Return. Under some circumstances, it is impossible for the Host Integrator to tell which column was the first user-keyed column; when that happens, it uses the value you enter in this box to determine the leftmost column to be transmitted. When Display Columns are set to 80, enter a value from 0 to 79. When you're in 132-column mode, enter a value from 0 to 131. The values are 0-131. The default is 0. |
| Host Character Set | The available host character sets for HP terminals are HP Roman 8 and HP Roman 9. The default is HP Roman 8. |
| Online (Remote Mode) | Specifies whether Host Integrator transmits each number, letter, or special character typed at the keyboard to the host. As characters are received from the host, Host Integrator displays them on your screen. |
| Inhibit EOL Wrap | When cleared, the Host Integrator automatically returns the cursor to the left margin in the next line when the cursor reaches either the right margin or the right screen edge. When selected, the cursor is not automatically advanced when you reach the right margin. As you type additional characters, each one overwrites the character at the right margin until you explicitly move the cursor by pressing Return or using an arrow key. |
| Enq/Ack | Some HP 3000 and HP 1000 computers use a form of handshaking called Enq/Ack (Enquire/Acknowledge) to prevent the terminal (or in this case, the Host Integrator) from falling too far behind the host system and losing data. With Enq/Ack pacing, the host system sends 80 characters followed by an ASCII Enq character and stops transmitting. When the Host Integrator has processed all of the characters preceding the Enq, it sends an ASCII Ack character, which tells the host it is ready for more data. "Classic" HP 3000 architecture uses this form of pacing. MPE\iX systems do not; the Enq/Ack setting is disregarded in this environment. |
| Use Host Prompt | Clear this check box if you want the Host Integrator to ignore the host prompt. Clearing the Use host prompt check box has the same effect as selecting the Inhibit Handshake and Inhibit DC2 check boxes. Ignoring the host prompt forces the Design Tool to behave as though both inhibits are on, thus preventing handshaking. Over an X.25 network, this prevents communications problems caused by applications that use handshaking. When the Use host prompt check box is cleared, the Design Tool always responds to a primary status request from the host that both Inhibit handshake and Inhibit DC2 are enabled. This can affect a host application that explicitly changes one of these inhibits. |
| Inhibit Handshake | This check box, along with Inhibit DC2 and some other factors, determines the type of handshaking that precedes each block transfer of data from the Host Integrator to the host system. When selected, the DC1 handshake for block transfers is inhibited. |
| Transmit Functions | Most keyboard keys have an associated ASCII character. Several keys perform functions for which there is no character defined; for example, Home and PgUp. Certain host software programs, such as HP Slate, need to be informed when you press one of these non-ASCII keys. Selecting this option signals the Host Integrator to inform the host system whenever you press one of these keys. When this check box is selected and the Design Tool is operating in character/remote mode, each time you press one of those keys the associated escape sequence is transmitted to the host. Most applications that require this feature automatically send the escape sequences to enable and disable the feature, so you probably will never need to enable it manually. |
| SPOW | Ordinarily, the Spacebar overwrites and erases existing characters. When the SPOW (SPace OverWrite) check box is selected, spaces entered from the keyboard (not spaces echoed from the host), move the cursor over existing characters, but do not overwrite them with spaces: the SPOW latch is turned on by a carriage return and off by a linefeed, tab, or home up. |
| Block Transfer Unit | When operating in block mode, a block of one or more characters is transmitted when you press Enter or when the host requests a block transfer from terminal memory. This option determines how much data Host Integrator transmits on each block transfer. When set to Line, data is transmitted one line at a time, or one field at a time in format mode. When set to Page, data is transmitted one page at a time. |
Configure HP Keyboard Options
To find a HP keystroke's default mapping, click the key and click the Default button and note the corresponding Action in the lower half of the dialog box. Click Cancel if you do not want to revert the key's mapping to its default value.
HP Terminal Function Key Configuration
The Function Keys tab lets you select which set of key labels are displayed along the bottom of your screen, and lets you customize eight user keys. A user key definition consists of the following:
- A 16-character label (eight characters per line)
- A string of up to 80 characters that is produced when the key is pressed
- An attribute determining how the Design Tool processes the string when the key is pressed
To reconfigure a function key:
-
Select the key to configure by clicking it with the mouse or by pressing the key on the keyboard.
-
Enter a key string of up to 80 characters to be processed when you press the function key in the Key string box.
These characters may be handled as if they were entered into the keyboard, or to specify Host Integrator commands. Use the Home, End, arrow keys, or the mouse, to quickly edit a long string. To delete characters, use Backspace or Delete.
To include escape sequences and ASCII control codes in the user key string, select Insert special characters. If you're using the Tab key to tab through the dialog box fields, you must clear the Insert special characters check box; otherwise you'll insert the ASCII tab character each time you press the Tab key.
The following table shows some examples of keys and key combinations that create certain escape sequences (shown by the two-letter mnemonic that appears on your screen):
Press this... To include this sequence Enter CR Tab HT Backspace BS Esc EC Ctrl+Q D1 Ctrl+S D3 Ctrl+E EQ Ctrl+X CN
Note
To remove a special character, you must first clear the Insert special characters box.
-
In the two lines provided in the Label box, type up to eight characters per line for the user key label. Use spaces to position and center text in the label. You can also use the editing keys (for example, Ins and Del).
-
Assign an attribute to the user key in the Attribute box
Normal — The key string is treated exactly as if it had been typed from the keyboard; a carriage return is not automatically transmitted.
If the Host Integrator is in local mode, the string displays on the screen and any embedded escape sequences are executed locally. In remote mode with local echo off, the string is transmitted to the host. It executes and displays only if the host system echoes. For example, use this attribute to store commands that have changing parameters (like the phone number needed to dial different modems).
Local — The key string is executed locally, and not transmitted to the host. For example, you could assign a user key to home the cursor and clear the display.
Transmit — In remote mode, the Host Integrator sends the key string to the host after completing a block transfer handshake, automatically transmitting a carriage return. For example, use this attribute to store commonly used commands (such as program run commands) in a user key. In local mode, pressing a user key with this attribute has no effect.
-
If you don't want the Host Integrator to display the function keys and labels along the bottom of the screen, clear the Show function keys check box.
Advanced HP Telnet
See Advanced VT or HP Telnet in the Customizing VT section.
Port Number
Select one of the following depending on which transport type you selected in the Session Setup or New Model dialog box:
-
Telnet port
Specifies the host port or socket number that the Telnet session should use. You can enter any number between 0 and 65,535 in this field. You can configure Port in either the Session Setup or View Settings dialog boxes.The default port number for Telnet is 23.
-
NS/VT portion
Specifies the host port or socket number that the NS/VT session should use. You can enter any number between 0 and 65,535 in this field. You can configure Port in either the Session Setup or View Settings dialog boxes. The default port number for NS/VT is 1570.
!!! note NS/VT is a proprietary HP protocol that connects to HP3000 hosts only.
Identifying Commands
A command can be a host keystroke, a Design Tool command, or any combination of these.
Creating a Custom Code Page
You can create a custom code page for 3270 and 5250 models by modifying any of the sample code page files provided with Host Integrator. By default, these examples are located in <VHI folder>\codepage folder for the Design Tool.
The basic steps for creating and implementing a custom code page are:
- Create a text file that includes the customization. The easiest way to create this file is to open an appropriate code page sample and make a modification.
- Save the modified file as custom.codepage in the same folder as the code page samples for the Design Tool. For a server version, add custom.code page in a codepage directory beneath the server directory.
- After saving custom.codepage, restart the Host Integrator server or Design Tool.
Editing a Code Page
A code page is a text file that includes character mappings or property values that differ from the default set (US English).
The property values at the top include the character set ID, the IBM code page, and, in the case of a 5250 model, the keyboard type. Additional information for specifying the Windows font when displaying international characters in the Design Tool can be included. The CanadianFrench.codepage.sample is used in the example below.
Example
//=======================================================================
// VHI Custom 3270/5250 character translation table sample file.
// IBM EBCDIC codepage (CanadianFrench)
//
// Note: To enable this national character set for 3270 and 5250 sessions,
// copy and rename this file to "custom.codepage"
//
// Copyright...... Copyright (c) 2019 Micro Focus
// All Rights Reserved.
//======================================================================
IBMCCSID=697 // IBM Character set ID
BMCodePage=37 // IBM codepage
IBMAS400Keyboard=CAI // AS/400 Keyboard type
WindowsFontCharSet=0 // (ANSI)
If, for example, you want to create a custom code page that has Canadian French settings except for the keyboard type, you could change the keyboard type from CAI to USB and then save it as custom.codepage.
BMAS400Keyboard=USB // AS/400 Keyboard type (custom)
The lower portion of the code page sample is a series of character mappings. A character mapping consists of 3 values on a single line, separated by spaces or commas:
- Host (EBCDIC) value, prefixed with H. They can be specified as decimal or hexadecimal numbers.
- Windows single-byte value used to display a given character in the Design Tool, prefixed with W. They can be specified as character literals, decimal values, or hexadecimal values.
- 6 bit Unicode character, prefixed with U. They can be specified as character literals when they are 8 bits or less, decimal, or hexadecimal values.
In the samples, mappings that are the same as the US English default are commented out with // at the beginning of the line. For example, the French.codepage.sample has H44 mapped to W '@' and U '@' for the 'commercial at' sign and is not commented out. (In US English, H44 is mapped to lowercase a with a grave accent sign.) You could create a custom code page based on the French code page, with a modification that returns H44 to the US English default.
Using the Custom Code Page Log File
After creating and saving the code page and then restarting the Host Integrator server or Design Tool, look at the log file for the code page: <Host Integrator install folder>\codepage\codepage.log.
When the code page is deployed successfully, the log looks like this:
---------------------------------------------------------------------------
    Custom codepage logfile opened: Thu Jun 22 08:17:18 2006
---------------------------------------------------------------------------


Info Duplicate character mapping: We8 ==> U0e48
Info Duplicate character mapping: We9 ==> U0e49
Info Duplicate character mapping: Wea ==> U0e4a
Info Duplicate character mapping: Web ==> U0e4b
Info Duplicate character mapping: Wec ==> U0e4c
Info === Read 221 Lines of text
Info === Found 99 host character mappings
Info +Added Mapping: H41 <==> Wa0
 …
 …
 Info === Found 94 unicode character mappings
 Info +Added Mapping: : W1d <==> U00a2
 Info +Added Mapping: : W1e <==> U00a6

 ---------------------------------------------------------------------------
 Custom codepage logfile closed: Thu Jun 22 08:17:18 2006
 ---------------------------------------------------------------------------
Warn Line 11 Unrecognized property "MyProperty"
Warn Line 20 !Host value invalid or out-of-range.
Warn Line 20 !Windows value invalid or out-of-range
Warn Line 20 !Unicode value invalid or out-of-range.
Warn Line 20 !Character mapping ignored "H3F U10000"
Warn Line 22 !Host value invalid or out-of-range.
Warn Line 22 !Windows value invalid or out-of-range
Warn Line 22 !Unicode value invalid or out-of-range.
Warn Line 22 !Character mapping ignored "HH WW UU"