Operation Tab
Use the Operation tab to edit or define operations on a selected entity. If you've just added a new operation to your model, the following options are available:
| Option | Description |
|---|---|
| Name | The name or names of the currently defined operations. When adding a new operation, a default name, such as Operation_1, is generated. You can edit the name. You can add, copy, delete, check advanced operation properties, or test your new operation using the toolbar buttons associated with the Name field. If you want to test an operation that is related to a recordset, use the Test Recordset dialog box instead of the Execute button. |
| Destination | Select the default destination for the current operation from this list. Once you select a destination entity, the Design Tool expects that the selected operation will traverse to it. If the commands in the operation do not lead to the specified destination, a runtime error will occur unless any alternative destinations are selected in the Operation Destination dialog. |
| Use for navigation commands to this destination | Two entities can have several operations defined to traverse between them; however, for a given entity, there should be at least one "default" operation defined to all adjacent entities. This means that when a dynamic traversal is requested and that traversal needs to jump from the current entity to an adjacent entity, the corresponding default operation will be used. To designate this default operation for a given destination entity, select the Use for navigation commands to this destination check box when the desired operation is selected in the Name field. |
| Command list | The list of commands used to navigate between entities. You can edit, test and debug, or copy the list. When you copy the list and paste it in a text editor, the entire list is visible. |
| Properties | Timeout - Specify in seconds how long a given operation should take to execute before a error message appears. Wait for host update when selected (default), the operation waits for the host to update any area of the screen before trying to recognize the screen and test for its arrival at a destination. |
Operation Conditions
Click Conditions to open the Operation Conditions dialog. Use this dialog to configure options that verify that certain conditions, such as pre-conditions, required attributes, and/or error patterns, have been satisfied before an operation is evaluated during execution.
The CheckOperationConditions command will fail if the condition fails during evaluation, which results in an operation exception at runtime. In order for these conditions to be verified, the CheckOperationConditions command is required as the first command in the operation. To cancel any changes and return to the default settings, click the Revert button.
The following options are available:
-
Pre-condition
Assigning a pre-condition to an operation means that the pre-condition will have to be satisfied in order for this operation to be executed. To create a pre-condition for this operation, click the Edit button to open the Condition Edit dialog.
-
Required attributes
To require that certain attributes are written to before validation of an operation, select the Required check box for one or more attributes.
-
Error patterns
Error patterns enable you to set up user-defined errors in your model. A pattern is a candidate for being an error pattern if it is not considered to be part of an entity signature. By default, all auto-generated and manually created patterns are configured to be a part of the entity signature. To change this setting, clear the Use in entity signature box on the Pattern tab.
A good candidate for an error pattern might be an error message that appears on the terminal screen when a nonexistent account number is sent to the host.
-
Select a pattern and add it to the Error patterns list, creating return text that displays when the error pattern is encountered.
-
Select Return attribute contents to return one or more attribute values as the contents of your error message.
You will see an exception of the type 'user defined' indicating that an error pattern was trapped, followed by the name of the pattern and the contents of the attribute. Attributes are returned in listed order.
-
-
Post-condition
Assigning a post-condition to an operation means that the post-condition must be satisfied after the operation has been executed so that it can be evaluated during operation execution. If the post-condition fails during evaluation, an operation exception is issued at runtime. To create a post-condition for an operation, click the Edit button to open the Condition Edit dialog.
Note
Post-conditions can only be used when the origin and destination of an operation are the same entity, for example, a page down operation. Defining a post-condition allows a final check to make sure the operation has navigated to the correct location.
Advanced Operation Properties
The Advanced Operation Properties dialog box provides the following options:
Event Handler
Use the options below to create, edit, attach, and view properties of an operation event handler.
 - Click this button to create a new event handler for the attribute. Use the list to select an existing attribute event handler. The selected event handler is attached to the attribute when you click OK.
 - Click the Edit button to open the event handler in your default editor.
 - Click the Properties button to view event handler properties.
Operation description
Type a description of the selected operation. This data is included in Web Builder projects or in any exported XML- or HTML-based documentation documentation.
Operation Destinations
The Operation Destinations dialog contains settings that supply the Design Tool with methods of reaching alternative entities using the selected operation. Click the Destinations button on the Operation tab to open this dialog box.
| Setting | Description |
|---|---|
| Unassigned entities | The names of all entities in the model that are not assigned to be navigated to with the selected operation. To enable any of these entities to be navigated to with the selected operation, move them to the Valid alternates box. |
| Right/Left arrows | Use to add or remove entities from unassigned list. |
| Valid alternates | Valid alternates are entities that can be traversed to during navigation of an operation. If an operation is executed and an entity in this box is its destination, the operation will be considered successful. It's an alternative outcome that is still valid. |
| Intermediate entities | Intermediate entities are considered to be a part of the operation but not a destination of the operation. For example, a Splash screen that is encountered during the operation, but is not the origin or destination of an operation, could be a good candidate for an intermediate entity. You can further define intermediate entities using the Execute operation and Issue these commands options. Select the Execute operation option to choose an operation to execute when this entity is encountered. Select Issue these commands to define commands that will bypass the intermediate entity in order for the operation to reach its destination. For example, define a terminal key command, such as rcIBMEnterKey, for the intermediate entity so the host recognizes that when the Enter key is pressed, it should immediately bypass this screen. |
| User-defined error entities | An error entity is a location that constitutes an error condition if it's detected during an operation. You can create a custom error message by selecting Return text and entering the text to be displayed when the error entity is encountered. Select Return attribute contents to return an attribute value as the contents of your error message. |
Notes
If you are using table procedures, you can choose to add the error entity to your procedure. To define a custom error message when using table procedures, use the Procedure Editor. The error message feature within the Procedure Editor does not allow you to assign the contents of an attribute to an error message. If the starting entity for your operation is also your error entity, be sure to clear the Wait for host update check box on the Operation tab. Otherwise, the error entity will not be recognized and you will not get an error until the operation times out. In this scenario, error patterns are strongly recommended as an alternative solution.
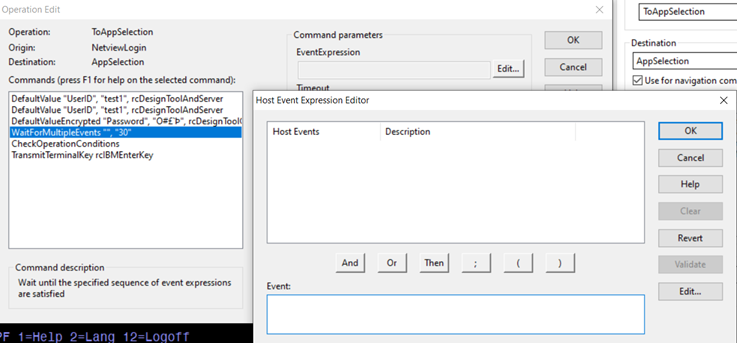
Operation Edit
Use the Operation Edit dialog, available from Operation > Command list >Edit, to add, edit, copy, or delete commands in a command list. See Operation Command Summary for a description of each command.
Host Event Expression Editor
To open this dialog: In the Operation Edit dialog, select a command and click  Host Events > WaitForMultipleEvents > Edit.
The events described are used to synchronize the Host Integrator server with the state of the host application. These host synchronization events should be distinguished from event handlers, which perform or extend actions in the model file itself.
Use the Host Event Expression Editor dialog box to string together several events into one WaitForMultipleEvents command using the following event operand buttons:
| Button | Description |
|---|---|
| And | Use And to conjoin two events to create a conditional event that is not satisfied until both events have occurred. |
| Or | Use Or to conjoin two events to create a conditional event that is not satisfied until at least one of the two events has occurred. |
| Then | Use Then to conjoin two events or expressions to create a conditional expression that is not satisfied until both events have occurred in order from left to right. |
| ; | Use ; to separate one statement from the next. Statements are evaluated sequentially. |
| () | Use () to group or combine events. |
For example, if the following three global events are listed as follows:
| Events | Description |
|---|---|
| Event A | WaitForCommString\033EnterData |
| EventB | WaitForCursorEnterPosition 5, 10 |
| EventC | WaitForCursorExitPosition 24, 2 |
You could then select one or more of the above events to formulate the following WaitForMultipleEvents command using the event operand buttons And, Or, Then, ;, and ():
WaitForMultipleEvents "EventA and (EventB or EventC)","30"
This means that Host Integrator will wait for EventA, and either EventB or EventC. If this series of events is not satisfied within the 30 second timeout period, an error will occur. It does not matter whether these events occur in a single host packet or across any number of multiple packets. These events may be received in any order.
Host events are processed in the order in which they are received from the host.If the order of events is critical, use the Then operator. The Then operator will not change the order of events received from the host, but it will ignore events or expressions on the right before events or expressions on the left are satified. For example:
EventA Then EventB
In the above example, the host could send events that might satisfy EventB, but those events will be ignored until EventA is satisfied. To further illustrate: EventA Then EventA Then EventA will be satisfied on the third occurance of EventA.
And, Or, and Then expressions may be combined in any arbitrary order in a statement, for example:
(EventA Then EventB) And (EventC Or EventD) Then (EventE Then EventF Then EventG)
This is a valid statement.
The semicolon can be used to separate statements, as in Java and C++. Statements will be considered separately and sequentially. By separating statements, a statement separator may behave somewhat like the Then operator. However, the Then operator can be used within statements and combined with the other operators, And and Or.
Other options:
Validate - Click to perform syntax checking of the expression.
Event Edit — Click to close this dialog and open the Host Event Edit dialog.
Import
This dialog, from Operation Edit > Import, provides a comprehensive list of existing model templates that can be reused during the modeling process.
To import an existing command list template:
-
Expand the Command list directory tree and select either an existing Operation, Command List, or Template to copy into the Commands box on the Operation Edit dialog box. If a green dot appears in front of the template name, it is ready to use.
-
Click OK to return to the Operation Edit dialog box and complete the configuration of the current command list.