Learn to Use Host Integrator
To get the most benefit from this tutorial, review the following topics before you begin:
You will need to install the Developer Kit to run this tutorial.
Goal
The goal of this tutorial is to produce a Host Integrator application.
You will work with a simulation of a 3270 (CICSAccts) host application and use Verastream tools and utilities to build a simple Host Integrator application. This is a demonstration application, consisting of limited navigation and a database of generic customer data for eight fictitious customers. It is a useful tool for learning to create a model.
This tutorial walks you through these steps:
Let's get started.
Defining the Business Need
Often the business needs of a project have already been defined before the development process ever begins. Although you may not have been a part of the decision, understanding the business problem is important to building a successful application.
In this CICSAccts project, the business goal is to make specific customer information available to users over the Internet and to other business processes using Web services and other programmatic component interfaces. You will access the data through the CICSAccts application on a 3270 host.
To accomplish the goal you will: automate the login to the host, retrieve the host data, and display the data in a simple Web application.
Developing Model Requirements and Mapping the Data
Now that you understand the goal and the deliverables of the project, you are ready to use the Host Integrator Design Tool to build a model of the application. The model contains all the information required for host application navigation, screen recognition, data storing, and data retrieval.
During this phase, either working on your own or with someone familiar with the host application, you will navigate through the application and document each host screen's inputs, outputs, navigation path, and other quirks. This will result in a model requirements document that identifies the intricacies of each of the host screens that will be required to access the data.
The model requirements document contains two important features: the list of entities (unique host application screens) that need to be modeled, and a chart mapping the project data to the screen where the data will be retrieved.
In our application, in order to retrieve the necessary data, the main screen in the CICSAccts application needs to be treated as two distinct entities: One for input of information to do the search (Main) and one for output of the search (NameSearchResults). The output is a listing of information about each customer; this is the data that you need from the application.
This is a map of the data our model needs for inputs and outputs:
| Attribute Name | Used for | Screen | Screen Field Name |
|---|---|---|---|
| LastName | input | Main | SURNAME |
| FirstName | input | Main | FIRST NAME |
| AcctNum | input | Main | ACCOUNT |
| RequestType | input | Main | REQUEST TYPE |
| LastName | output | NameSearchResults | SURNAME |
| FirstName | output | NameSearchResults | FIRST |
| MiddleInitial | output | NameSearchResults | MI |
| Title | output | NameSearchResults | TTL |
| Address1 | output | NameSearchResults | ADDRESS |
| AcctNum | output | NameSearchResults | ACCT |
| Reason | output | NameSearchResults | ST |
| ChargeLimit | output | NameSearchResults | LIMIT |
Building and Deploying a Simple Model
The completed model of the CICSAccts application lets you query the CICS database by a customer's last name. To build this model, you will:
- Connect to host using a login command list
- Create entities from host screens
- Create operations for host navigation
- Create recordsets for scrolling data
- Create tables and procedures for abstraction level queries
- Create procedures to retrieve data
- Test and deploy the model
Connect to Host Using a Login Command List
- Open the Host Integrator Design Tool.
-
Click File > New to open the New Model dialog box.
-
Type
MyModelin the Model Name field. This creates a connection profile to the CICS host. Accept the default model location. -
In the Settings box, click Browse and select IBM3270Model. This provides the appropriate default settings for the session type (IBM 3270 Terminal), terminal ID (Model 2 24X80 Extended), and transport type (Telnet). The CICS demonstration host uses port 1097.
Enter the following host connection information:
Field Name Entry Host name or IP address localhost Port 1097 Device (Leave blank) -
From the Settings menu, select Preferences. In the Preferences Setup dialog box, select the option When model file opened connect to host. This configures the Host Integrator Design Tool to connect to the host automatically when the model is opened.
- Click File > Save MyModel.modelx.
You have now finished configuring the Design Tool to connect to the demonstration 3270 application (CICSAccts) running in the Host Emulator on the local machine over port 1097. Every time a new entity is created (host screen is accessed), the Design Tool automatically notes all operations (navigation through the host application). You will learn more about these terms and processes as you proceed through this demonstration.
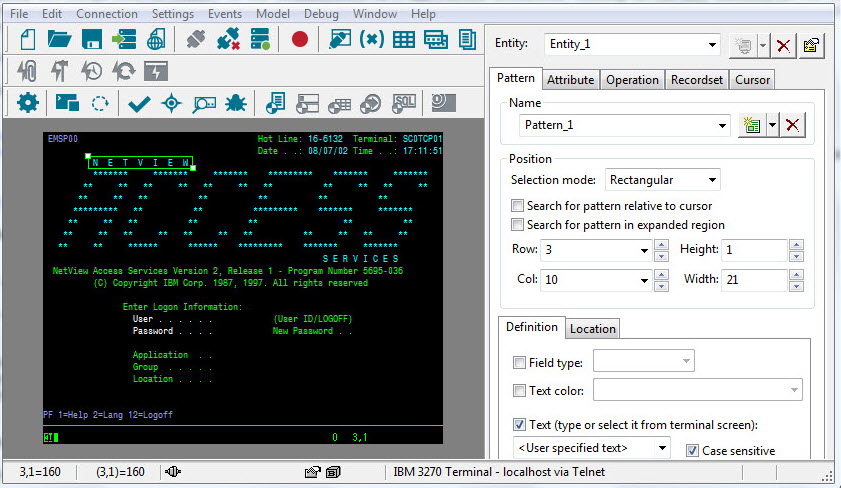
About the Design Tool
The Design Tool is divided vertically into two sections or panes:
- Terminal Window -- The left pane displays the actual host application screen.
-
Entity Window -- The right pane contains the settings used to define the host screens that make up the model.
CICS application navigation tips
Use these navigation tips to negotiate the CICSAccts application example:
- The Page Down key on your keyboard is mapped to the host PA2 (page down) key.
- The Scroll Lock key on your keyboard is mapped to the host CLR (clear) key.
- Pressing Enter returns you to the main screen.
Creating a Login Command List
A login command list provides a quick and reliable login to a host. You can also use login commands to bypass a host login screen.
To create a command list to log on to CICS:
- If you're not already connected, click
 to connect to the model.
 - Click Model > Record > Start Recording.
- Click in the Terminal Window and then press the Scroll Lock key (this is mapped to the host CLR by default).
- In the terminal window, type
accts, and press Enter. - Click Model > Record > Stop Recording.
- Select the Save as login command list option and click Save. The Command List Edit dialog box opens. You will use this dialog box to edit the login command list.
Tip
To open the Command List Edit dialog box, click Model > Properties, and then  .
.
Editing the Login Command List
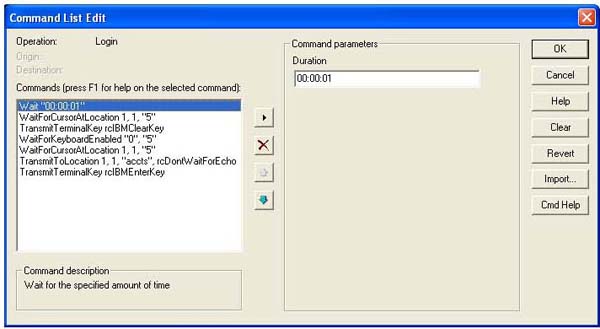
The CICSAccts demonstration application is run from the Host Emulator; to synchronize the Host Emulator login to the application, you need to add an additional wait command to the top of this recorded command list.
To edit the login command list:
- Select the first command in the Commands field,
WaitForCursorAtLocation, 1, 1, "5". If the Row and Column values are not both 1, change the values to 1. - Click Insert
 , then point to Host Events, and click Wait.
 - With Wait "00:00:01" selected, click Move Up
 to move this command to the top of the command list. Your commands should look like the command list in Figure 2.
 -
Click OK to close both the Command List Edit and Model Properties dialog boxes.
Configuring the Login Command List to Load Automatically
The Design Tool automatically executes this login command list whenever you connect to the model.
To configure the login command list to load on connection:
- Click Settings > Preferences.
- In the Preferences Setup dialog box, on the General tab, select Execute login commands, and click OK.
- Save your model.
To test the login command list:
- On the tool bar, click
 to disconnect your current session.
 - Click to reconnect and run the login command list. Each time you open the model, the Design Tool automatically connects and logs you onto the host and displays the Main screen of the host application.
Create Entities From Host Screens
An entity is usually a single host application screen, such as the login screen or the main menu screen of an application. A model is made up of entities (host screens) and the attributes, recordsets, and operations associated with those screens.
Up to this point, you have recorded all navigation through the host application in the login command list. Since the end application does not access data from these initial screens, you do not have to configure each screen in the login sequence as an entity. The first screen you need to define is the Account File Menu screen.
To add a screen as an entity:
- When the first screen, Account File: Menu, appears after connecting to the host, click New Entity
 in the Entity Window. By default, the entity is named
 Entity_1. - Change the entity name to
Main.
Creating a Pattern for Entity Recognition
A pattern is a model element that is used in the screen signature to identify a particular host application screen. Host Integrator uses patterns to distinguish individual entities. Select any static text on the screen, such as field labels, or screen headers and footers, to be designated as a pattern. Each pattern can include up to 259 characters.
Tip
To help ensure that each entity has a unique identifier, it is a good idea to configure at least two patterns to define each entity, one at the top of the screen and one at the bottom.
To create patterns for the Main entity:
-
In the Terminal Window, use the mouse to select the text:
ACCOUNT FILE: MENU
-
On the Pattern tab, click New Pattern
 .
. - By default, the pattern is named
Pattern\_1. Accept this default name. - Click Apply.
The Design Tool has now recorded the position, properties, and signature parameters of the pattern. You can access and edit these settings on the Pattern tab.
Typically, it is a good practice to define at least two patterns per entity, and on most host screens you would select a second string of unique text to use as your second pattern. However, when you defined the requirements for the model, you realized that for this application you must take a different approach because the same host screen is used to both request and display customer information.
When you enter customer information on the screen (Figure 4), the data is returned in the blank area at the bottom of the screen (Figure 5). Compare Figure 4 to Figure 5; all of the text on the top half of the screen remains the same. It is difficult to assign a unique pattern on the first screen because all the static text on the first screen also appears on the second screen.
Figure 4 -- Entity 2 \"main\"
Figure 5 -- Entity 2 \"NameSearchResults\"
Can you treat this as one entity? You could, but that would add complications when creating operations and recordsets.
The simplest solution is to create two entities and use an exclude; Host Integrator "recognizes" the first entity by the presence of specific text, and the second by the absence of that same text.
To use an exclude, select a pattern that exists only on the second screen, and then configure Design Tool to recognize the first screen by the absence of that pattern. In other words, when the pattern is not there, then by default, the first screen is being accessed.
To create a pattern using an exclude:
- In the Terminal Window, click in the SURNAME input area, type
W(uppercase W), and then Press Enter. You are now on the second entity (the same screen as the first entity, but with data). -
Use the mouse to select the entire account information heading:

Figure 6 -- Select this text to create a second pattern
-
On the Pattern tab, click the New Pattern button. Accept the default pattern name,
Pattern\_2. - At the bottom of the Pattern tab, select Screen properties not present as part of the Definition and click Apply.
- Click Yes to dismiss the warning message box.
When you use the Screen properties not present setting, Design Tool automatically initiates the creation of a new entity. Before continuing, you must complete the steps to add this second entity and identify it with patterns.
To add this screen (with data) as a new entity:
- Click the New Entity button in the Entity Window.
- Select the default entity name (
Entity\_2) and replace it withNameSearchResults.
To add patterns for the second entity, NameSearchResults:
-
In the Terminal Window, use the mouse to select the text:
ACCOUNT FILE: MENUFigure 7 - Select this text in the Terminal Window to create a pattern in the second entity
-
On the Pattern tab, click the New Pattern button. Accept the default name.
-
Use the mouse to select the entire account information heading:
Figure 8 - Select this text to create a second pattern in the second entity
This is the same text you used when you identified the Main entity; however, in that instance you configured the Design Tool to make sure that the pattern was not present when identifying the Main entity. In identifying the NameSearchResults entity, you are configuring the Design Tool to verify the pattern is present.
-
On the Pattern tab, click the New Pattern button. Accept the default name and click Apply.
- On the Confirm Operation dialog box, click Discard. Then click Yes to confirm the discard and close the dialog box. (Design Tool automatically creates navigational operations; however, you need to first identify attributes and fields.)
You have now created two entities, Main and NameSearchResults.
The next step is to identify the fields or attributes that you need on each entity. To return to the Main entity, click Disconnect on the toolbar, and then Connect to reconnect to the host, run the login script, and open the Main entity.
Configure Attributes for Data Entry and Retrieval
An attribute is a selected area on an entity that contains data that is accessible through the model. This area might be a data entry field or a text field that changes depending on the choices you make on prior screens. You use attributes to get and set data on entities. Create attributes only for those host fields that need to be accessed; give attributes meaningful names that identify their purpose.
To create attributes:
-
On the Main entity, select the SURNAME field input area.(On block mode applications such as this 3270 application, you can double-click the field to select it.)

Figure 9 -- The defined area of Attribute_1
-
On the Attribute tab, click New Attribute
 to add this as
 Attribute_1. -
Rename
Attribute_1toLastNameand if necessary:- Adjust the start position to row 5, column 17.
- Adjust the end position to height 1, width 12.
-
Repeat this process to include these attributes:
Attribute Attribute Name Start (row,column) End (height, width) SURNAME LastName 5,17 1,12 FIRST NAME FirstName 5,44 1,7 REQUEST TYPE RequestType 9,22 1,1 ACCOUNT AcctNum 9,35 1,5 -
Click Apply.
Next, add these same attributes to the NameSearchResults entity:
To add the attributes:
-
To navigate to the NameSearchResults entity, on the Main entity, click the SURNAME input field and type
W(uppercase). Then press Enter.A Confirm Operation dialog box displays listing the commands needed to navigate to the NameSearchResults entity.
-
Click Approve.
- Repeat the steps to add the same four attributes (LastName, FirstName, RequestType, AcctNum) on the NameSearchResults entity.
- Click Apply and save your model.
Create Operations for Host Navigation
Operations are typically used to navigate between entities, so they have an origin entity and a destination entity. You've already configured the Design Tool to auto-generate operations as you move through the host application. When you navigated from the Main entity to NameSearchResults, you approved the operation [ToNameSearchResults]{.uielements}.
So far, you have only navigated forward through the application. To move backwards by selecting the prior entity you need to create a return operation. This ensures entities can navigate both forwards and backwards in a model.
Open the drop-down list of available entities. The icon preceding the Main entity selection  indicates the home entity. A red house indicates that you have not defined operations to access this entity from your current location.
To create a return operation:
- Click in the Terminal Window and press Enter.
- In the Confirm Operation dialog box, review the new operation, ToMain, and then click Approve.
To review the navigation operations, open the drop-down list in the Entity box. Both entity icons are now available. Select each entity and view the entity's Operation tab.
Tip
If you click random keys while navigating, each key press is recorded in the operation. If you see unnecessary operations, use the Delete button to remove them from your operation command list.
Create Recordsets for Scrolling Data
Recordsets handle scrolling or tabular data. You create recordsets to manage dynamically changing data that spans several host screens. In the Design Tool, you create a recordset by defining the:
- Position and layout of the recordset on the screen
- Methods for scrolling through the recordset data
- Fields of data in the recordset
Defining the position and layout of the recordset
You are going to create a recordset from the data displayed in the list of records on the NameSearchResults entity.
- Select the NameSearchResults entity and click the Recordset tab.
-
With the mouse, select the full scrollable area on the screen. Do not include the column titles when you select the scrollable region.
Figure 10 -- The scrolling region of this screen is selected. When selected, the lines around this area of your screen are green
-
Click New Recordset
 . The Position tab should show the Top of the selection at Row 17, Column 2, and the Bottom at Fixed row, Row 22.
 - By default, the recordset is named
Recordset_1. Change the name toAccountListin the Name box and then click Apply.
Defining the scrolling operation through the recordset data
You view the recordset data by using terminal keys to page down and scroll through the data. Navigational operations are defined within each recordset.
Adding a page-down operation
You'll need to define a page-down operation for the AccountList recordset in the NameSearchResults entity.
To define a page-down operation for the AccountList recordset:
- Select the Operation tab of the NameSearchResults entity.
- To record your operation, from the Model menu, choose Record > Start Recording.
- Click in the Terminal Window and press the Page Down key, which is mapped to host key PA2.
- Click Model > Record > Stop Recording.
- In the Stop Recording dialog box, rename the operation from
ToNameSearchResultstoPageDownand click Save. -
In Step 3, several additional commands may have been recorded. This operation only requires these two commands:
CheckOperationConditions
TransmitTerminalKey rcIBMPA2Key
If other commands are listed, delete them.
-
Click OK to save and close the Operation Edit dialog box.
Using the page-down operation
After you create the recordset operation, you must tell Host Integrator when to use it. The Recordset Operations dialog box contains a predefined set of procedures that the Design Tool uses for specific operations. A page-down procedure displays an entire page of new data. You need to associate a specific operation with this page-down procedure.
To associate a specific operation with a procedure
- From the Recordset tab, click the Operations button at the bottom left of the tab.
- On the Recordset Operations dialog box, open the PageDown drop-down list.
- Select your PageDown operation from the list of options.
- Click Close, and then click Apply.
Terminating the page-down operation
Next, you need to communicate to Host Integrator when to stop scrolling through the NameSearchResults data. To do this, you first create a pattern so Host Integrator recognizes that the end of the data has been reached. You can often use a comment such as END OF DATA for this.
Unfortunately, the CICS application does not display an end-of-data comment. Instead, you can configure Host Integrator to recognize the absence of the text, "THERE ARE MORE MATCHING NAMES," as an indication that it has reached the end.
To create the pattern
- On the NameSearchResults entity, open the Pattern tab.
- Click in the Terminal Window and press Enter.
- In the Surname field, type
W(uppercase W), and press Enter. - Select the text:
THERE ARE MORE MATCHING NAMESand then click the New Pattern button. - Rename the pattern to
MoreNames. - Clear the Use in entity signature check box.
- Select Screen properties not present.
- Click Apply.
Now that you have created the pattern, you must tell Host Integrator to use the MoreNames pattern to signal the end of the PageDown operation.
To signal the end of the PageDown operation
- Open the Recordset tab and click the Termination button at the bottom of the tab.
- Open the Scroll Down tab, clear the Scroll operation results in same recordset data check box in the Scroll termination criteria pane.
- Select Screen contains pattern, and then from the drop-down list, select the MoreNames pattern.
- To configure the Exclude records, on the last screen option select Read until __ blank records are found. Then accept the default setting of
1. - Click Close, and then Apply.
You can now successfully traverse and terminate the AccountList recordset.
Creating Recordset Fields
A field is a single piece of data in a recordset. Defining a field on a recordset is similar to defining an attribute on an entity. For the CICSAccts application, you need the customer's first and last name, middle initial, title, and address, as well as the reason and charge limit on their account.
To add fields to the AccountList recordset
-
From the Recordset tab, open the Fields tab.
-
In the Terminal Window, select account number 20000 on the first row of data (the first row of data is used by default to define what data is contained in this column):

Figure 11 -- Defining the AcctNum field
-
On the Fields tab, click New Field
 .
.A new field called
Rfield_1is created. -
Rename the new field to
AcctNum. -
Select the entire surname field on the first row of the recordset. Then click the New Field button and rename it to
LastName.
Figure 12 -- Defining the Surname field
-
Use the data below to add and define the remaining fields.
Select Default Name Rename to Start End WAGY RField_2 LastName 9 20 MARK RField_3 FirstName 23 29 T RField_4 MiddleInitial 32 32 MR RField_5 Title 35 38 116 BURNSIDE ST RField_6 Address1 67 67 N RField_7 Reason 67 67 1000.00 RField_8 ChargeLimit 72 79 -
Click Apply and save your model.
Create Tables and Procedures for Abstraction Level Queries
You have now created a model of your host application that defines host screens as entities, screen data as attributes, and tabular data as recordset fields. You have also created operations that describe how to navigate from one entity to another. At this stage of the process, the model fully describes the host application layout.
Tables and procedures are functionally interlocked; tables are populated with data by a procedure, and you can access the unstructured data in a way that resembles a structured database table.
Because Host Integrator tables do not contain data, but rather "organize" host data into a database-like view, the only way to access abstracted table data is through a procedure. Procedures define how Host Integrator locates, retrieves, updates, inserts, or deletes data when it fulfills a request from the client application.
The Web application developer needs to know only which procedure to run, along with the appropriate inputs and outputs; there's no need to know how the host application works. For more information, see Tables Overview.
To create a table
-
From the Model menu, click Tables.
-
On the Introduction dialog box, select Don't show me this dialog again and click Finish. You will not be using the Table Wizard to create this table.
-
On the Tables dialog box, click New. On the Create a New Table or Procedure dialog box, select Table and click OK.
-
In the Name field, change Table_1 to
Accounts. -
In the Description field, type
Table of account information. -
Click Insert Column
 six times, to create Column 1 through Column 6. Columns identify the attributes and recordset fields that make up the table.
 -
Using the following chart, rename Column_1 through Column_6. For example, rename Column_1 to
LastNameand so forth. You do not need to enter data in any of the other fields.Default Name Rename to Column_1 LastName Column_2 FirstName Column_3 MiddleInitial Column_4 Title Column_5 Address1 Column_6 AcctNum -
Click Apply to save the Accounts table.
Create Procedures to Retrieve Data
Procedures retrieve data and populate tables.
To create a procedure that retrieves the account information
-
In the Tables dialog box, click New and select Procedure (using the Procedure Wizard). Then click OK.
-
In the Name field of the Procedure Wizard, type
SearchByName. -
In the Description field, type
Search by name. Then verify that the Procedure type option isSelectand click Next. -
Identify the procedure parameter needed to manipulate and return host data and specify which attribute or field to use to filter the records:
a. In the Filter Parameters dialog box, go to the
LastName_ rowand click in the empty Write parameter to cell.b. Open the drop-down list and select Main.LastName to write the filter parameter to the last name attribute on the Main entity.
c. In the Required column, confirm that Required for LastName is selected. You need to enter a last name to proceed.
d. Click Next.
-
Choose the parameters to be returned as output. The data to be returned is in the AccountList recordset on the NameSearchResults entity.
In the Output Parameters dialog box, click in each Read parameter from cell and select the following data sources from the drop-down menu:
Parameter Data Source LastName NameSearchResults.AccountList.LastName MiddleInitial NameSearchResults.AccountList.MiddleInitial Address1 NameSearchResults.AccountList.Address1 AcctNum NameSearchResults.AccountList.AcctNum This maps the procedure fields with the data in the AccountList recordset on the NameSearchResults entity.
-
Click Next.
-
View the Summary, and click Finish to return to the Tables dialog box.
- Review the information in the Tables dialog box for the
SearchByNameprocedure. You can expand Accounts to view the procedure. - Verify that the Home entity is Main. This table begins and ends at the Home entity. Each procedure must have a home entity to ensure that queries and procedures begin from a known point in the host application.
-
Click OK and save your model.
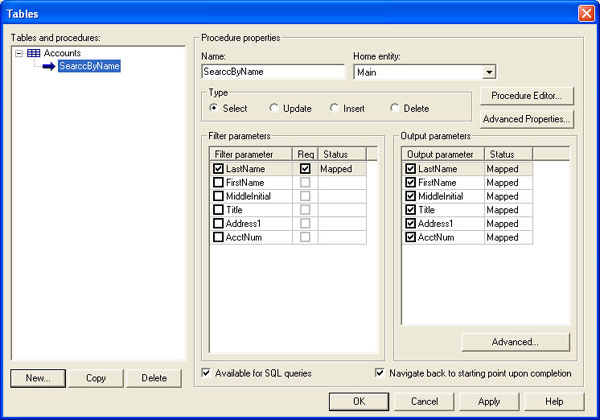
Figure 13--SearchByName procedure details
Test and Deploy the Model
There are multiple utilities you can use to test your model before you deploy it. In this tutorial we are going to use two debug utilities, Procedure Test and SQL Test.
Because the model you created is a simple, two-entity model, comparing the entities and identifying the traversal path is easy. But consider a model that contains hundreds of entities with a multitude of attributes and complicated navigation, and you can understand how all of these testing utilities become important debugging tools:
- Validator checks a model's completeness.
- Signature Analyzer ensures each screen is uniquely identified.
- Navigator reviews the model's traversal path.
- Procedure Test confirms procedures run correctly.
- Model Debug Messages diagnoses problems such as synchronization with the host by showing the model's behavior while interacting with a terminal datastream.
- SQL Test verifies that SQL results are correct.
To run a procedure test
- From the Debug menu, click Procedure Test. Since you have only one table and one procedure, they are selected by default.
- In the Procedure Filters box, type
W(uppercase W) in the Value field (associated with the LastName filter.) - Click Execute. Seven entries should be returned and displayed in the Procedure Outputs box.
- Click Clear and enter
K(uppercase K) to test your procedure again. - Click Execute. You should see one entry under Procedure outputs.
- Click Close.
To run an SQL test
- From the Debug menu, click SQL Test.
-
In the SQL statement box type the following SQL command:
SELECT * FROM accounts WHERE lastname LIKE W -
Click Resolve to resolve the SQL statement to a procedure.
-
Click Execute.
Seven records are returned and displayed in the Output recordset box.
-
Click Close and save the model.
The Host Integrator supports a subset of the SQL 92 standard for SELECT, UPDATE, INSERT, and DELETE statements. Some of these commands are used in a slightly different manner. For more details, see SQLSyntax.
Testing Web services
In Host Integrator, Web services are automatically provided by the session server as an embedded SOAP stack after a model package is deployed using the Design Tool. As the provider of a Web service, you publish the WSDL document to give developers access to your Web service. With the WSDL-generation URL, developers can use utilities to generate specific files to locate and consume the Web service.
This location lists the available Web services WSDL documents:
http://<session server>:9680/vhi-ws
Optionally, you can access the WSDL for a specific model by using the model name. For example:
http://<session server>:9680/vhi-ws/model/<model name>?wsdl.
Testing your service is an important step before you run your process in a production environment. Testing is an easy two-step procedure:
After you deploy the model to the Host Integrator Server, a message box informs you that the model is successfully deployed.
Figure 14 -- Deployment successful message
-
Click Test to launch the Web Services Explorer, a browser-based test tool, where you can test the Web service.
-
In the Actions view of Web Services Explorer, enter the parameters of the WSDL in order to test the service and click Go.
Tip
To test Web services that are protected by WS-Security, Basic Authentication, or HTTPS, use a third-party development environment, such as Microsoft Visual Studio.
Although the way that Web services are implemented in Host Integrator is beyond the scope of this tutorial, you can read more about them in About Verastream Web Services.
Extending Your Model with Event Handlers
Event handling extends the capabilities of Host Integrator models by interrupting the interpretation of a model and turning control over to user-supplied procedural code. For example, you can use event handlers to:
- Convert cryptic host application codes to user-friendly descriptions
- Convert formats for currencies or dates
- Secure access to sensitive data
- Create other functions that might otherwise require custom client-side programming
You can also use event handlers to increase Host Integrator error-handling capabilities. For example, you can add an event handler at the point an error occurs and then implement event-handler code that intercepts the error, takes control, and corrects the error.
Although event handlers are beyond the scope of this tutorial, you can read more about this powerful feature in About Event Handlers.
About Deploying Host Application Models
To move into production testing, you need to deploy your model to the Host Integrator server that handles the communication between your custom application and the model, and between the model and the host application. When deploying models, use either:
- Design Tool Deployment - If you are deploying one model to one server (local or remote), with one model configuration, use the deployment options on the Design Tool's File menu.
- Command Line or Script Deployment - If you are deploying a model to one or more production servers, use deployment commands from a command line or in a script. This enables you to automate the model's deployment to each Host Integrator server.
For more information about using these different deployment methods, see Deploying Models.
Deploying MyModel.modelx
You are using your workstation as the development, testing, and production environments; therefore, you will deploy your model to the local session server, localhost:
- Open your model in the Design Tool.
- To deploy your model, click File > Deploy to Local Server.
- When the dialog box informs you that you have successfully deployed your model, click OK.
- Close the Design Tool.
Creating a Web Builder Project and Generating a Web application
After you have completed, tested, and deployed the model, you are ready to create a project from the Host Integrator model. For the CICSAccts example, you will use Web Builder to generate Web pages from the model.
Web Builder generates projects ranging from simple screen-based rejuvenation to full procedure-based integration. A rejuvenation Web application uses the model's entities, attributes, and recordsets as the basis for creating the Web front end. An integration project uses procedures to create a Web application or component interfaces, JavaBeans, and .NET class libraries.
You can use Web Builder to create an HTML 5 Web application that can be used either out of the box or customized by your Web application developer. Screen-based rejuvenation may be adequate for some projects, but, in this tutorial, you will use the model's procedures to integrate the CICSAccts application into a more sophisticated application.
Note
The steps you follow to generate a project are the same on either a .NET or Java platform. Select the type of project you want to build based on your platform and whether you want to generate a Web application or component interface.
To build an HTML 5 Web application For CICSAccts
- Open the Design tool and then choose File > Web Builder.
- In Web Builder, click New to create a new project.
- Select HTML 5 Web Application as the type of project to create.
- Select MyModel as the Host Integrator model name.
- Enter
MyModel_Applicationas the project name. -
Click Properties and then Build.
When the Build Project dialog box displays a
BUILD COMPLETEDmessage, your Web application automatically runs. (You can run the project manually in the Web Builder by selecting your project and clicking Run.) -
When the Web application displays, click
 to open the available Procedures.
 -
Click Search by name, enter a
Win the LastName text box, and then click Execute.The resulting Web page looks like the one below. Close the application and Web Builder.
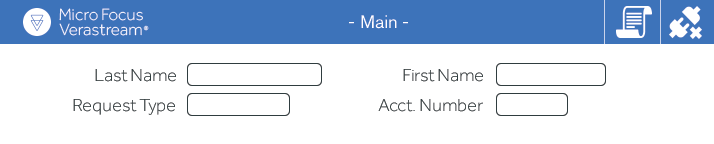
Figure 15--HTML 5 Web client generated by Web Builder
Deploying the Project to the Enterprise
In a work environment, after you have developed the new Web or client/server application and the application is tested, you can deploy it to the enterprise using the customer's preferred hardware platform and network configuration.
For specific details on deploying a project, review:
Congratulations!
Using Verastream Host Integrator, you have created an easy-to-use Web application that accesses the CICSAccts host application. You have:
-
Defined the business needs for the project.
You need a clear understanding of the business problem to be solved by your solution.
-
Developed the model requirements and mapped the data.
In the "real" world, you would work with system administrators to understand the user's computing environment, programmers to learn what programming languages are preferred, and host application users to understand how the host application functions. This would lead to setting the model requirements and mapping the host application data. During this exercise, you were given the model requirements and mapping information.
-
Built and deployed the model.
Using the Design Tool, you created a model of the host application, which was automatically deployed to your local Host Integrator Server along with the automatically generated Web service. You have:
- Created patterns to uniquely identify each entity
- Identified operations to navigate through the host application
- Configured attributes for data entry and retrieval
- Used recordsets to handle scrolling data
- Created tables of host data
- Developed procedures to query and retrieve data from those tables
-
Created a Web project using Web Builder.
You generated a Web application to test the procedures in your model, and delivered this Web application as a simple front-end to the host application. You also have access to a Web service to deliver to Web programmers for a more complex application that integrates host data through the model.
-
Deployed the project to the enterprise.
Because you did not move the CICSAccts application into production, you didn't have to perform this step.
Although your project will be more complex than this straightforward example, the steps you perform and the utilities you use are the same each time you create, deploy, and implement a Verastream Host Integrator model.