Using SSH: Overview
You can configure SSH connections when you need secure, encrypted communications between a trusted host and your PC over an insecure network. SSH connections ensure that both the client user and the host computer are authenticated; and that all data is encrypted. Passwords are never sent over the network in a clear text format as they are when you use other protocols, such as Telnet.
- Data Encryption Standards
- Data Integrity
- Digital Signatures
- How does SSH Work?
- SSH Authentication Options
- Using Model Variables for SSH Authentication
- Public Key Authentication
- Enter Username and Password
Data Encryption Standards
Encryption protects the confidentiality of data in transit. This protection is accomplished by encrypting the data before it is sent using a secret key and cipher. The received data must be decrypted using the same key and cipher. The cipher used for a given session is the cipher highest in the client's order of preference that is also supported by the server. You can use the cipher list on the Advanced VT SSH dialog box to specify which ciphers the SSH connection should use.
Verastream Host Integrator supports the following data encryption standards:
- AES (also known as Rijndael) (128-, 192-,or 256-bit) CBC mode and CTR mode
- TripleDES (168-bit) CBC mode
- Blowfish CBC
- Cast 128
- arcfour 128
- arcfour
Data Integrity
Data integrity ensures that data is not altered in transit. SSH connections use MACs (message authentication codes) to ensure data integrity. The client and server independently compute a hash for each packet of transferred data. If the message has changed in transit, the hash values are different and the packet is rejected. The MAC used for a given session is the MAC highest in the client's order of preference that is also supported by the server.
Verastream Host Integrator supports the following MAC standards:
- SHA256
- SHA1
- SHA512
- MD5
- RIPEMD160
- RIPEMD160 openssh.com
- SHA1-96
- MD5-96
If your SSH server on the host supports it, you always have the option of selecting None when choosing a MAC or data encryption standard.
Note
The values for both the MAC and data encryption standards that you can select are dependent on whether the Only show FIPS validated values is enabled. This option filters the values available.
Digital Signatures
Digital signatures (user key and host key algorithms) are used for public key authentication. The authenticating party uses the digital signature to confirm that the party being authenticated holds the correct private key. The SSH client uses a digital signature to authenticate the host. The SSH server uses a digital signature to authenticate the client when public key authentication is configured.
Verastream Host Integrator supports the following digital signature algorithms:
- ECDSA
- RSA
- DSS
The known_hosts file
Every time an SSH client connects to a host, it stores a host key for that host. These stored host keys are referred to as known host keys or just known hosts. In OpenSSH, these known hosts are stored in /etc/ssh/known_hosts and in .ssh/known_hosts in each user's home directory.
VHI uses the known_hosts file to verify the identity of the server the model is going to connect to.
Typically, SSH adds the remote host's public key to the user's known_hosts file when first connecting to a host. However, VHI does not handle this automatically and this will need to be done manually from the command line for VHI to be able to access a host.
By default, VHI uses the known_hosts file, located in directory ~/.ssh. You can specify a different file by using predefined model variable KnownHosts.
See Using Model Variables for SSH Authentication.
How does SSH work?
These are the basic steps involved in creating a SSH channel to transmit data securely. It is assumed that the SSH Server is trusted and present in the known_hosts file.

-
Establish a secure connection
The client and server negotiate to establish a shared key and cipher to use for session encryption, and a hash to use for data integrity checking.
-
Authenticate the server
Server authentication enables the client to confirm the identity of the server. The server has only one chance to authenticate to the client during the authentication process. If this authentication fails, the connection fails.
-
Authenticate the client
Client authentication enables the server to confirm the identity of the client user. By default, the client is allowed multiple authentication attempts. The server and client negotiate to agree on one or more authentication methods.
-
Send data through encryption session
Once the encrypted session is established, all data exchanged between the SSH server and client is encrypted.
-
A channel is created and a terminal emulation using the terminal type specified in the configuration dialog box is started
Users now have secure remote access to the server and can execute commands through the secure channel.
More information
SSH Authentication Options
You can enable authentication in two ways; interactively using the Design Tool or using model variables in the Session Server and Design Tool.
To authenticate using model variables, see Using Model Variables for SSH Authentication. This is the preferred option.
If you have not configured authentication using model variables in the Design Tool, you are prompted to specify the authentication values:
-
Password
Specify the login username and password for that user on the SSH server host. The password is sent to the host through the encrypted channel.
-
Public key and Private key
Specify the username, passphrase, and location of the public and private key files.
Relies upon public/private key pairs. Public keys and private keys are pairs of cryptographic keys that are used to encrypt or decrypt data. Data encrypted with the public key can only be decrypted with the private key; and data encrypted with the private key can only be decrypted with the public key.
To configure public key authentication, each client user needs to create a key pair and upload the public key to the server. If the key is protected by a passphrase, the client user is prompted to enter that passphrase to complete the connection using public key authentication. Public keys are not sensitive information and may be known to anybody, whereas the private key is protected very carefully by a strong passphrase.
Caution
If you are using utility ssh-keygen to create the private and public key for SSH, be aware that the newer ssh-keygen versions default to an OpenSSH format to generate private keys. This is not supported by VHI. The public/private key pair must be in PEM format. Verify that the header of the private key contains the text, RSA PRIVATE KEY.
You can convert keys with OpenSSH private key format using ssh-keygen to the old PEM format. Use the command ssh-keygen -m PEM -t rsa to generate the files id_rsa and id_rsa_pub in the correct format.
-
SSH Agent
Specify the username.
SSH agent is a program to hold private keys used for public key authentication (ECDSA, RSA, DSA). Host Integrator connects to the agent for authentication.
The SSH agent:
- Stores keys securely in encrypted form
- Enables you to only specify a username when connecting using SSH. Host Integrator connects to the SSH agent, and the agent takes care of the needed authentication. You do not have to specify a password, key, or passphrase.
If you plan to authenticate using public keys, before you configure Host Integrator:
- Verify that the SSH agent you are using is available and configured on either your Windows or Unix system
- Start the SSH agent and specify the location of the private key file. When the keys require a passphrase that should be entered as well. The agent is now running as a daemon at the background.
Note
The key data must be in OpenSSH format. Remove any new lines, comments, or other data. Whatever tool you use to create the private key, must be used to export the key to OpenSSH format. If the public key is in SSH2 (SECSH) format, run the following OpenSSH command to convert the certificate from SSH2 to OpenSSH: ssh-keygen -i -f ~/.ssh/id_dsa.ssh2.pub > ~/.ssh/id_dsa.pub
On each of the authentication dialog boxes you can enable the option Remember values. When selected, the values you entered are assigned to the associated model variables.
Using Model Variables for SSH Authentication
You can specify authentication credentials using model variables. Model variables are placeholders for data and are very useful when specifying fixed values, such as host user IDs and passwords.
A list of default variables are listed when you create a new model. If you selected Remember values when setting values using the Design Tool, the values are assigned to the associated model variable.
Special character ~ can be used to specify the home directory, independent of the platform.
For example, ~/.ssh/id_rsa.pub refers to the public key in the users .ssh home subdirectory.
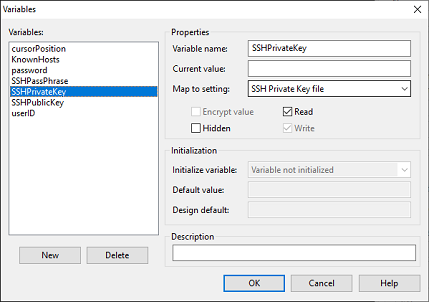
| Variable name | Map to setting |
|---|---|
| userID | Host User Name |
| password | Host password |
| SSHPublicKey | SSH Public key file |
| SSHPrivateKey | SSH Private key file |
| SSHPassPhrase | SSH passphrase for the private key |
| SSHKnownHosts | File with public keys of SSH servers to connect to |
Setting model variable values in the Administrative Console
Model variable values that are set using the Design Tool are stored in the model file. To remove this sensitive data from the model file and store it on the Session server:
- After setting authentication variable values in the Variables dialog box, test the model.
- If successful, remove the values for the password, username, and passphrase variables.
- Deploy the model to the Session server.
- In the Administrative Console, open the Properties page for the session pool associated with the model and re-enter the model variable values. If you need to provide a unique model variable value for each session in the pool, create a model variable list that contains a set of values for the model variables in the model on which your session pool is based.
If the Session server is not able to connect because the values are not set, an error message is written to the Session server log file: An error occurred in communications - SSH password authorization failed (username/password).
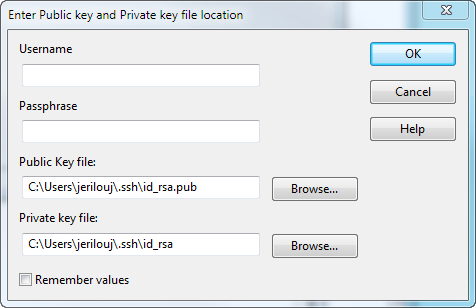
Public Key Authentication
Enter your VT host credentials to log on to the host. This dialog box appears if you are using SSH public key authentication to connect.
-
Username - Enter your VT host username to log on to the host.
-
Passphrase - Enter the passphrase to decrypt your private key. If your private key is not encrypted, leave this field blank.
-
Public Key file - Enter or browse to the location of your public key file.
-
Private Key file - Enter or browse to the location of your private key file.
Enter Username and Password
You must supply authentication credentials to establish a connection to the host.
- Supply a username to log on to the host.
- For the connection to be established, supply the needed password.
This dialog box appears if you have not specified values for the model variables.