Deeper Dives
Setting up the Environment The Template Folder
The Default Templates
The default templates are Generate with ACCEPT from SYSIN, and Generate with Linkage for xbind. These templates differ in the way that they receive the URL-encoded input. When operating in an Apache Web Server environment, you will have an executable which is created with the compilation of the Bridge Program together with the COBOL-IT Web Services program. This executable is deployed to the cgi-bin folder of the Web Server, and receives the incoming data through an ACCEPT from SYSIN. When operating in a Browser environment, with the xbind listener, you will have a shared object deployed, which includes the compiled objects of both the Bridge Program and the COBOL-IT Web Service program. This shared object receives the incoming data through the Linkage Section of the Bridge Program, which is launched by the listener xbind.
Customizing Templates
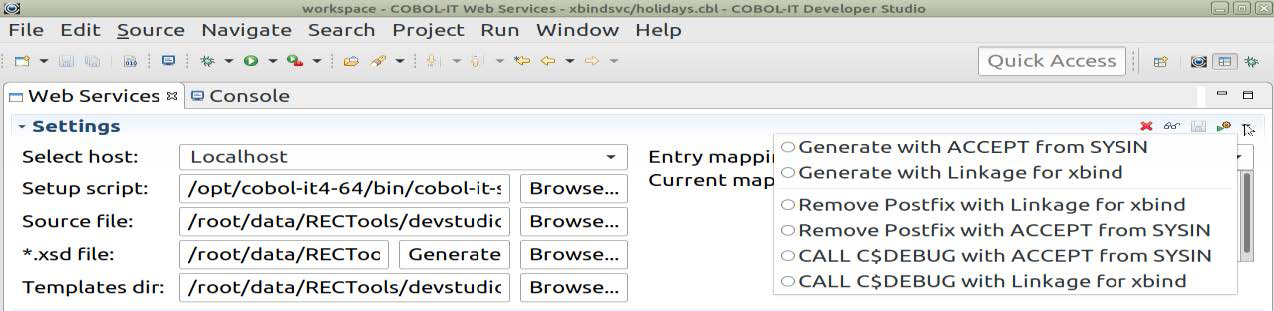
Templates are identified in the Bridge Program Generator by their TEMPLATE name. The first of the default templates has a template name of Generate with ACCEPT from SYSIN.
       <TEMPLATE name="Generate with ACCEPT from SYSIN">
       <ID-DIVISION>
       …..
This is what you see in the Bridge Program Generator dropdown box:

Note that the Template name is different than the file name. In this case, we see our two default templates, which will be generated into the Templates Folder after being used.
In the Navigator Window, you can see the actual file names differ from the more descriptive Template names seen above:

To create a Customized template, first generate the custom templates into your template folder. Then, make your changes to the default template. Before you save the new template, change the Template Name. To change the template name, open the template in a Text Editor. On the first line of the default xbind Template, you will see:
<TEMPLATE name="Generate with Linkage for xbind">
Changes to the default template could included Debugging DISPLAY UPON SYSERR statements, or a CALL “C$DEBUG” statement, or the addition of a procedure that is not included in the default template. After you have made your changes, return to the first line, create a new TEMPLATE name, and save the file to a new file name in your Templates Folder. Note that if you make changes to the default template, and do not change the Template name, your changes will be overwritten the next time the default template is used.
Selecting a customized template
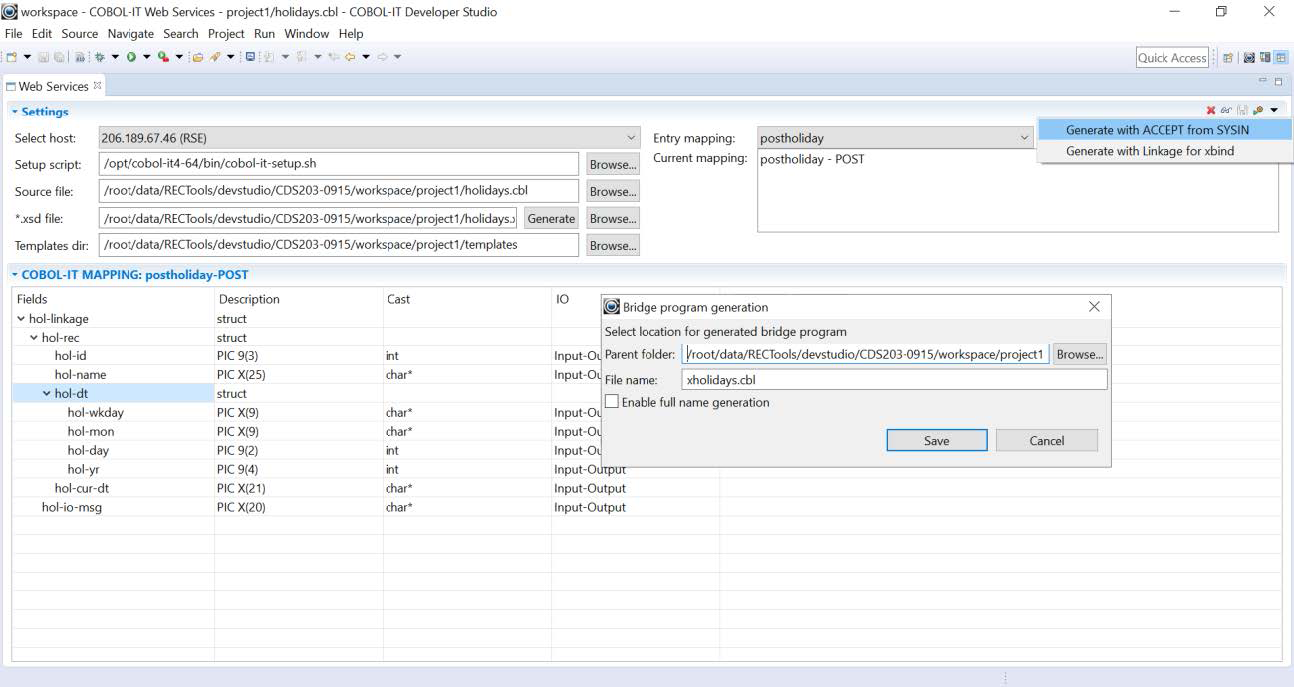
When you have created customized templates identified with descriptive Template names, and stored the customized templates in your templates folder, you will be able to select your customized templates for the generation of your Bridge Program:
As with the default templates, the default behavior will be to generate a program that prepends the letter 'x’ to the source file name. As we have seen, in our sample, the source file holidays.cbl is paired with the Bridge Program xholidays.cbl.
Entry Mapping
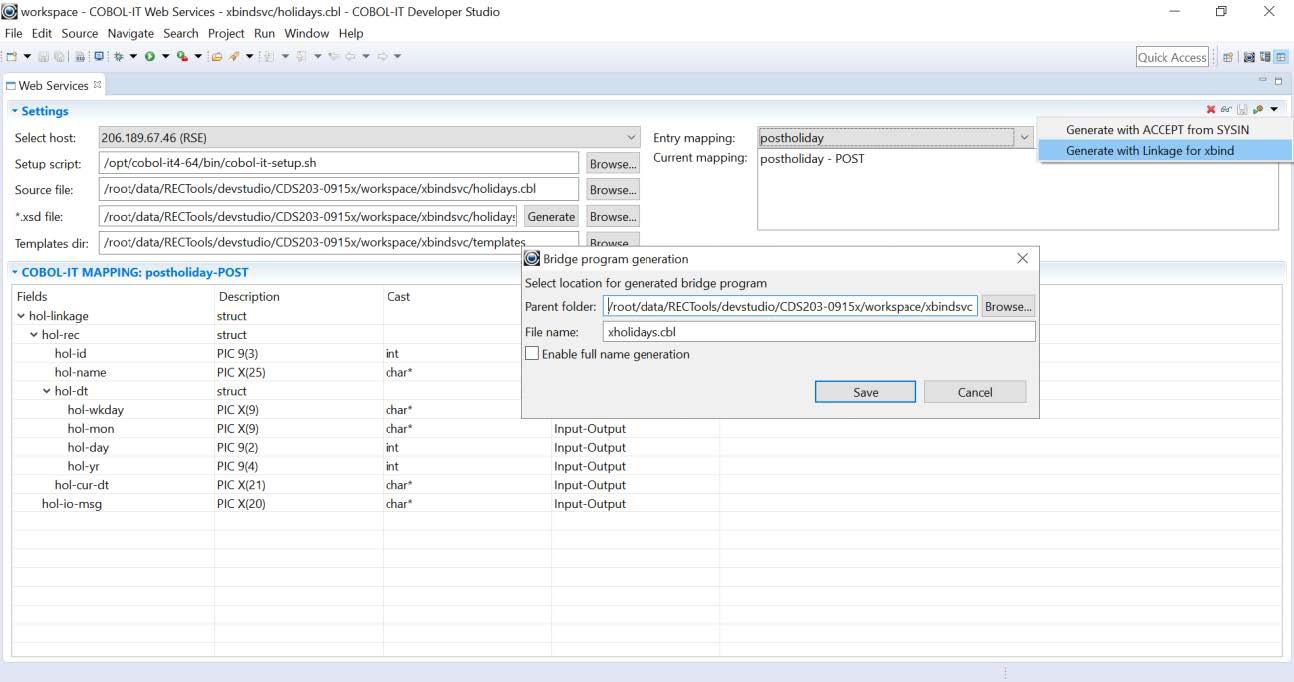
Generating the Bridge Program
The Bridge Program is generated from within the COBOL-IT Web Services perspective after the generation of the XSD which records the Entry Points, and Linkage Sections for each of the Entry Points, and after the Mappings have been completed. By default there are two options:
- Generate with ACCEPT from SYSIN
- Generate with Linkage for xbind
However, the Generate Bridge Program interface will also detect the presence of customized templates in the Templates Folder, and allow them to be selected.
The two default options reflect the two ways in which the COBOL-IT Bridge Program receives the message.
About the xbind solution
xbind takes a port number and a module name as input. The program will bind itself to the specified port where it waits for incoming connections. When a message is received, xbind will fork a sub process of itself to handle that message while the main process will continue to listen for new messages. The word ‘bind’ in this context means that incoming connections are queued in an input queue in case that they arrive faster than the program can process them.
xbind is a COBOL-IT utility, and uses the COBOL-IT runtime API to launch the named program. There are a few important considerations when using this implementation:
First, xbind launches the COBOL-IT Bridge Program, and passes the message through to the Linkage Section of the Bridge Program. As a result, when working with xbind, you must use a Bridge Program generator that receives the message through the Linkage Section.
Second, xbind requires that the COBOL-IT license be installed, and that the full COBOL-IT setup script be executed prior to being launched, and as it makes use of COBOL-IT libraries.
Finally, xbind is designed to launch a shared object. As a result, when building the Web Service, you must compile the Bridge Program, and web service program together using the -b compiler flag.
>cobc -b xholidays.cbl holidays.cbl
This creates a single shared object from the two programs, and provides the ability to of the Bridge Program to CALL an ENTRY point in the web service program, which is required, if you design your COBOL-IT Web Service to be able to handle calls to each of the POST, GET, PUT and DELETE functions.
When implementing through an HTML page, you will see that the HTML page is written with form action=http://localhost:9735 … to trigger interaction with xbind, which must be previously launched to listen on port 9735. You will also notice that the target program is run in the background. Programs being deployed as Web Services are best run in the background, as they will not be associated with a Terminal, and DISPLAYs can create unpredictable behaviors.
In our shell script:
./xbind 9735 xholidays &
About the Apache Web Server solution
Useful Commands
The Apache HTTP server is the most widely-used web server in the world. In order to use the COBOL-IT Web Services solution, it is helpful to have some guidelines about installing the Web Server, and verifying that it is running correctly. Some useful commands include:
| Command | Behavior |
|---|---|
$ sudo ufw app list |
Lists applications that have registered their profiles with UFW upon installation. Verify that OpenSSH is listed as an Available application. |
$ sudo ufw allow OpenSSH |
Allow SSH connections. |
$ sudo ufw enable |
Enable the firewall. Type y at the prompt. |
$ sudo ufw status |
Verify that OpenSSH is ALLOWed from Anywhere. |
Commands to install the Apache Web Server:
| Command | Behavior |
|---|---|
$ sudo apt-get update |
Updates the local package to reflect the latest changes. |
$ sudo apt-get install apache2 |
Install Apache and all required dependencies. |
$ sudo ufw app list |
List existing application profiles. The goal is to enable access to Apache through the firewall. |
$ sudo ufw allow ‘Apache Full’ |
Allow incoming traffic for the Apache Full profile. |
$ sudo ufw status |
Verify that Apache Full ALLOWs HTTP traffic from Anywhere. |
$ sudo systemctl status apache2 |
Verify that Apache is running. |
$ http://your-servers-public-IP-address |
Request a page from Apache. If you don’t know it:$ sudo apt-get install curl$ curl -4 icanhazip.comEnter your IP address into your browser’s address bar. You should see the default Apache web page. |
Further useful commands:
| Command | Behavior |
|---|---|
$ sudo systemctl stop apache2 |
Stops the web server. |
$ sudo systemctl start apache2 |
Starts the web server when it is stopped. |
$ sudo systemctl restart apache2 |
Stop and then start the web server. |
$ apache2 -v |
Version information on apache Ex: Server version Apache/2.4.18 (Ubuntu). |
$ curl http://127.0.0.1 |
Output in HTML printed on screen. |
Running an executable in the cgi-bin folder
When using a Web Server, such as Apache, the Bridge Program and Web Service program must be compiled together, creating an executable, which must be launched from within a shell script in the cgi-bin directory. There are a few important considerations when using this implementation.
The Web Server (Apache, for example), must be up and running.
Where your program requires Writing or Reading a file, the Web Server must have privileges to access those files in those directories. In our samples, we have the set the COB_FILE_PATH to /tmp and the COB_ERROR_FILE to /tmp/coberrorfile. This was done for expediency where we could be sure that the Web Server would have privileges to read and write the /tmp folder.
The shell script you are executing in the cgi-bin Folder should locate the COBOL-IT license using the COBOLIT_LICENSE environment variable. The shell script should also duplicate the settings made in the running of the cobol-it-setup script.
Finally, none of the previous environments established in your development environment will be recognized. So, if you require runtime environment variables for the COB_ERROR_FILE, COB_FILE_PATH, or COB_EXTFH functionalities for example, they must be included in the shell script executing in the cgi-bin Folder. The shell script that you are executing in the cgi-bin Folder should be set with executable privileges for all. >chmod 755 cit.sh or >chmod 777 cit.sh works. The executable that you have copied into the cgi-bin Folder, and which is referenced by the shell script must also be executable by all.
The shell script that we are executing has a first line of:
#!/bin/bash
There are a number of scenarios whereby if you omit this line, or mistype it, the effect can be that your shell script will not work correctly.
Your executable should not perform any DISPLAYs, and it would be a common standard to require that it be run in the background.
First, the COBOL-IT Bridge Program and Web Service program are compiled together, creating an executable. The message is received via an ACCEPT from SYSIN statement in the Bridge Program. As a result, when working with a Web Server, such as Apache, you must use a Bridge Program generator that receives the message through ACCEPT from SYSIN.
About the Wildfly (JBoss) solution
WildFly (JBoss), is an open-source application server, that is developed by Red Hat. WildFly is written in Java, and is based on pluggable subsystems, which provide a maximum amount of agility on a lightweight framework.
Detailed instructions are available for download on the how to install WildFly on your Linux platform. The Download instructions include instructions on installing pre-requisites (OpenJDK), downloading, installing and configuring WildFly. This includes instructions on making modifications to the wildfly configuration file.
The launch.sh shell script is copied into the /opt/wildfly/bin folder and made executable. The systemd unit file is copied to the /etc/system/system folder, and the daemon is reloaded.
This is a short list of useful commands, which can be performed by a user with sudo privileges.
Commands to install WildFly:
| Command | Behavior |
|---|---|
$ sudo systemctl start wildfly |
Starts the WildFly service. |
$ sudo systemctl status wildfly |
Check the output for a status of active (running). |
$ sudo systemctl enable wildfly |
Enables the service to be automatically started at boot time. |
$ sudo ufw allow 8080/tcp |
Allows traffic on port 8080. |
$ sudo /opt/wildfly/bin/add-user.sh |
Create a user who will be able to connect using the administration console. When prompted, select a for Management User. Then follow prompts to create a user-name and password. |
$ http://< your domain or ip address .:8080 |
Opens the default WildFly page. |
$ http://localhost:9990/console |
The WildFly administration console. Sign in using the user-name and password you have created. |
$ sudo systemctl restart wildfly |
Restart the wildfly service if you have made changes to wildfly.service, wildfly.conf or launch.sh files. See documentation for details. |
spring-resteasy.war, and the XProgram bean
There are a few important considerations when using this implementation:
The Wildfly Application Server must be up and running. The User must have sudo privileges and must have access to the Wildfly Web Console.
Our spring-resteasy sample is accessible through github here.
In the spring-resteasy quickstart example, we have added an XProgram bean. The bean is initialized with a program execution working directory and with a path to a shell script to execute. The process method of the bean accepts a string as an argument, executes the configured command line program and returns the program execution output. In the java source code, you will find:
    <!-- Xprogram bean -->
    <bean id=”xProgramBean”
    class=”org.jboss.as.quickstarts.resteasyspring.XProgramBean”>
    <!—Program execution working directory -->
    <constructor-arg index=”1” type =”java.lang.String”
    value=/vagrant/cobol/webservices/xholidays/run.sh” />
    </bean>
As a result, you should create the full path /vagrant/cobol/webservices/xholidays on your server.
In the xholidays Folder, create run.sh, as seen below. run.sh must first locate the COBOL-IT license, then run the cobol-it-setup script, and finally run the xholidays executable, which has been created with the command:
>cobc -x xholidays.cbl holidays.cbl
When debugging, use:
>cobc -g -ftraceall -x xholidays.cbl holidays.cbl
When setting COB_FILE_PATH, append a slash / to the end of the path name.
Locating files in the /tmp/ folder ensures that the Application Server will have privileges to Create files, Read Files, Write Files, and Delete files in the named folder.
run.sh
       #!/bin/bash
       export COBOLIT_LICENSE=/opt/cobol-it4-64/citlicense.xml
       COBOLITDIR=/opt/cobol-it4-64
       PATH=$COBOLITDIR/bin:${PATH}
       LD_LIBRARY_PATH="$COBOLITDIR/lib:${LD_LIBRARY_PATH:=}"
       DYLD_LIBRARY_PATH="$COBOLITDIR/lib:${DYLD_LIBRARY_PATH:=}"
       SHLIB_PATH="$COBOLITDIR/lib:${SHLIB_PATH:=}"
       LIBPATH="$COBOLITDIR/lib:${LIBPATH:=}"
       COB="COBOL-IT"
       COB_ERROR_FILE=/tmp/jcoberrplus
       export COB_FILE_PATH=/tmp/
       export COB_FILE_TRACE=Y
       export COB COBOLITDIR LD_LIBRARY_PATH PATH DYLD_LIBRARY_PATH
       SHLIB_PATH LIBPATH COB_ERROR_FILE
       ./xholidays
Deploying spring-resteasy.war to the Server
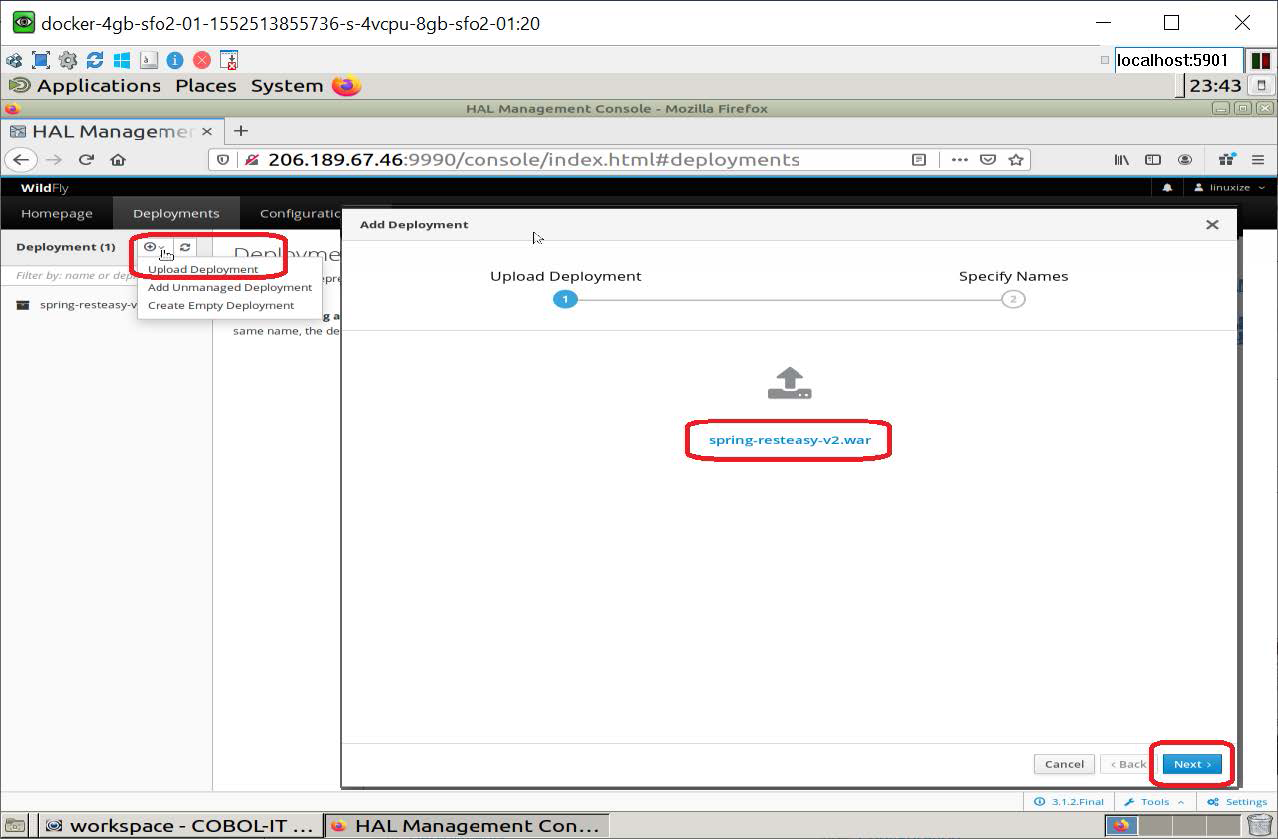
In order to run this sample, you will have to deploy spring-resteasy.war to the Server.
Enter http:// < your ip address >:9990/console/index.html into your browser. You will be prompted for the User and Password you have created:
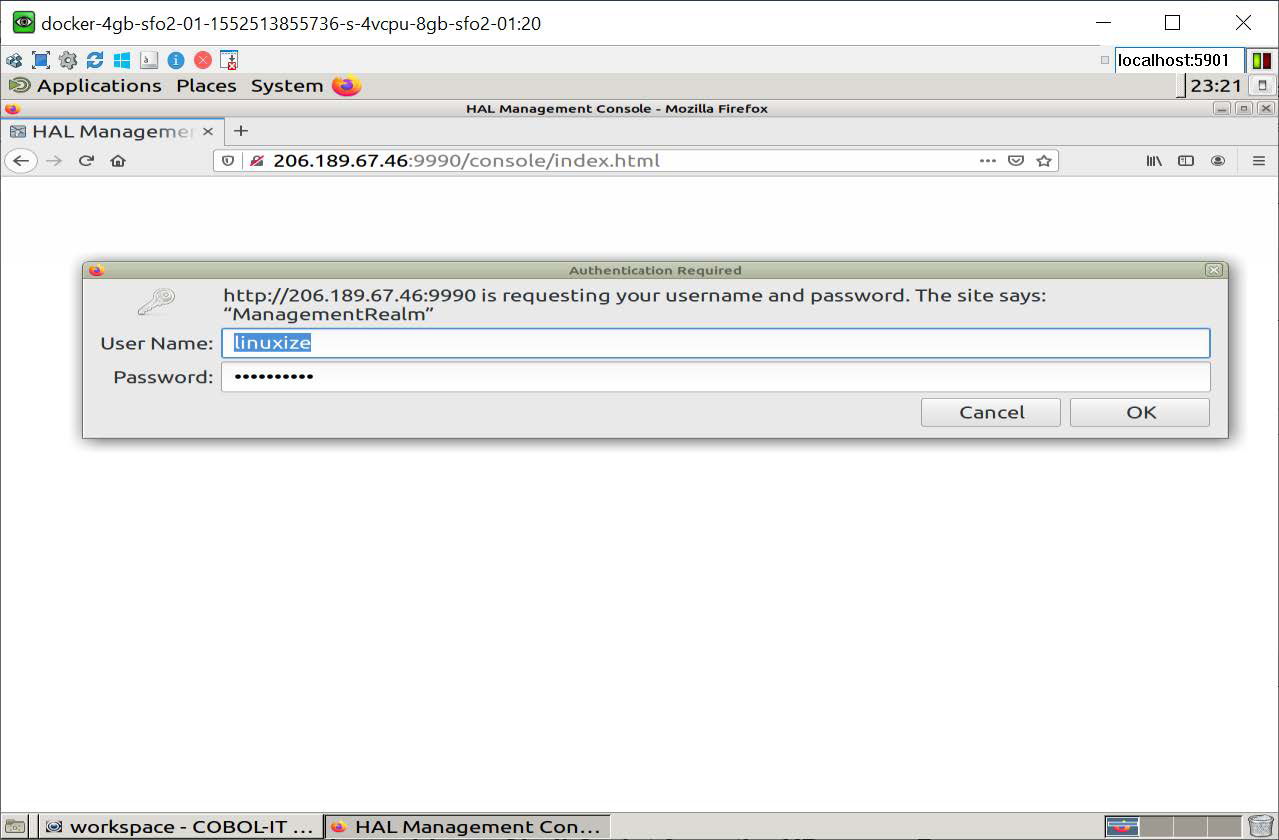
This will open the HAL Management Console. On the HAL Management Console, select the Deployments tab to open the Deployments dialog window. From the Dropdown box, select Upload Deployment. In the Add Deployment dialog screen, use the Drag a File link to open a File Browse interface. Locate your file, and click Open in the Browse interface to prepare your file for deployment. Click Next to continue.
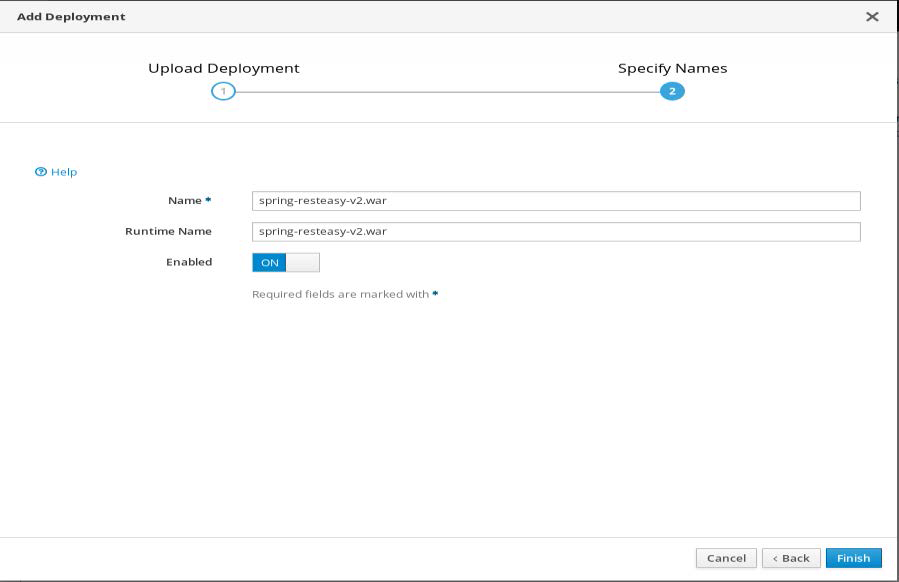
Provide your application with a name and set Enabled to On. Click Finish. Your application is deployed, and enabled, and appears in the Navigator Window on the left.
Launching a Shell Script from the XProgramBean
Where your program requires Writing or Reading a file, the Web Server must have privileges to access those files in those directories. In our samples, we have the set the COB_FILE_PATH to /tmp/ and the COB_ERROR_FILE to /tmp/jcoberrplus. This was done for expediency where we could be sure that the Application Server would have privileges to read and write the /tmp folder.
The shell script you are executing should locate the COBOL-IT license using the COBOLIT_LICENSE environment variable. The shell script should also duplicate the settings made in the running of the cobol-it-setup script. Finally, none of the previous environments established in your development environment will be recognized. So, if you require runtime environment variables for the COB_ERROR_FILE, COB_FILE_PATH, or COB_EXTFH functionalities for example, they must be included in the run.sh shell script.
The run.sh shell script should be set with executable privileges for all.
>chmod 755 run.sh or >chmod 777 run.sh works.
The executable that you have copied into the xholidays Folder, and which is referenced by the shell script must also be executable by all.
The shell script that we are executing has a first line of:
#!/bin/bash
There are a number of scenarios whereby if you omit this line, or mistype it, the effect can be that your shell script will not work correctly.
Your executable should not perform any DISPLAYs, and it would be a common standard to require that it be run in the background.
First, the COBOL-IT Bridge Program and web service program are compiled together, creating an executable. The message is received via an ACCEPT from SYSIN statement in the Bridge Program. As a result, when working with an Application Server, such as WildFly, you must use a Bridge Program generator that receives the message through ACCEPT from SYSIN.

Debugging COBOL-IT Web Services
When running COBOL-IT Web Services, you have a number of debugging options:
-
When you build your shared library or executable, depending on the environment in which you are running the Web Service, you can change the compile options so that they include debugging and file-tracing debugger options. In our example, we compile with
-g -ftraceall, and setCOB_ERROR_FILE = coberr.txtin our shell script. This will have the effect of generating a statement trace in the bridge program and web service program, as they are executed. -
You can enhance a template with Debugging
DISPLAY…. UPON SYSERRstatements. The output will be written to theCOB_ERROR_FILE. -
You can enhance your shell script by setting the runtime environment variable
COB_DEBUG_IDto 12345 (for example) and create a template that includes aCALL C$DEBUGstatement. When theCALL C$DEBUGstatement is executed, the runtime will pause, and, in the COBOL-IT Developer Studio, you can initiate a Debug Attach session, and resume debugging in the COBOL-IT Developer Studio.