Manage Users
Use this section to add, edit, or remove users from the Administrative Console and set permissions.
Note
The Authentication of browser users does not guarantee access to a particular Client Manager service.
Before a user can successfully connect to a Client Manager, the userid must be added to the service's configuration file. This page allows an administrator to grant permissions on a per user basis. Permissions can be set as pre-defined roles (such as Administrator), or, can be customized to include access to specific menu commands in the Administrative Console.
To add a user ID and assign permissions
-
From the Client Manager page, select Actions > Manage Users.
-
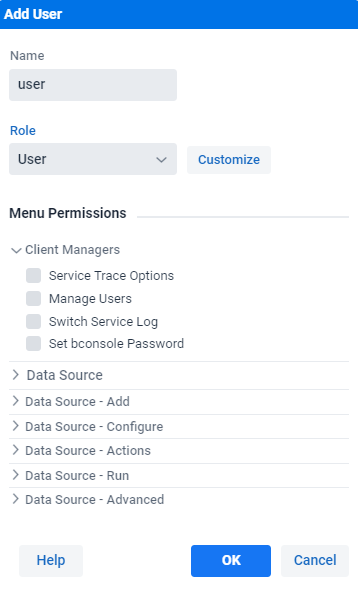
On the Manage Service User IDs page, select +Add and enter the user ID in the Add User input field as seen below.
-
From the Role list-box, select the role that best fits the level of usage.
- Administrator: Has full privileges to all menu items. This includes configuration, customizing data sources, and starting/stopping client runs.
- Operator: Can manually start and stop client runs.
- User: Can view, but not modify properties and operations in the Administrative Console.
-
If you want to customize the user ID's permissions, select Customize and continue the following steps. If you're done, select OK.
-
When Customize is selected, customize the permissions in the Menu Permissions section.
The menu commands are arranged in groups that correspond to the Administrative Console menus in the user interface.
-
Select OK to close the Manage Service User IDs dialog box.
Note
You cannot limit access to the Dashboard, Statistics or Documentation menu items as these items are accessible to all users.
Tip
After you've created a customized user ID, you can copy its permissions and assign them to a new user ID. This is useful when you need to create multiple user IDs with the same permissions.
To copy permissions to a new user
-
From the Manage Service User IDs page find the user permissions that will be copied and select the Copy icon
 associated to that user.
 -
By selecting the Copy icon
an Add User pane will load with the copied permissions.The copied permissions appear as Custom in the Roles menu and the username will display as Copy of....
-
Enter a username for the new user and select OK.
To remove a user
-
Select the specific user from the User List.
-
Do one of the following:
Select Settings > Delete
-or-
Select the corresponding Delete icon
 , and select Yes when prompted to delete the specific user.
Note
You cannot delete the default user ID or any currently active user IDs.