Deploying the Java Client as a WS-I Compliant Web Service
Deploying a Java wrapper for non-WS-I-compliant Web services requires that you have the proper environment configured on your computer. There are other options available, but these examples use Eclipse 3.6 (Helios) as the Java IDE.
Requirements
- You must have Java installed. This example uses JDK 1.6.0_16 and assumes that Java and Javac are in your system path.
- JAX-WS Runtime. This example uses version 2.1.7 available here.
- Apache Tomcat. This example uses 6.0.29.
- VHI 6.5 with the CICSAcctsDemo model deployed and a Web service generated.
Basic steps
- Annotate the wrapper class
- Create and deploy the Web application
- Use the new Web service in Process Designer
- Deploy and test the wrapped service
After you write the wrapper class (Writing a Java Client Wrapper for a RPC-encoded Web Service), the next step is to deploy the class as a WS-I-compliant Web service. While there are several ways of doing this, this example relies on JSR 224: Java API for XML-based Web Services (JAX-WS) 2.0.
Using annotations, JAX-WS provides a relatively simple way to create a Web service from a Java object. Download the distribution from the link in the Requirements section, then unpack it using the instructions on the Web site. The runtime JAR files are in the jaxws-rilib folder.
Annotate the wrapper class
This is the source code for the wrapper class:
// sample source code
package com.attachmate.wrappedservices;
import java.rmi.RemoteException;
import javax.xml.rpc.ServiceException;
public class ServiceWrapper
{
    CICSAcctsDemoSoapBindingStub stub;
    public ServiceWrapper()
    {
        try
        {
            CICSAcctsDemoSessionServiceLocator locator = new
            CICSAcctsDemoSessionServiceLocator();

            stub = (CICSAcctsDemoSoapBindingStub)locator.getCICSAcctsDemo();
        }
        catch (ServiceException afe)
        {
            afe.printStackTrace();
        }
    }
    public GetAccountDetailRecord[] getAccountDetail(int acctNum)
    {
        GetAccountDetailRecord[] retVal = null;
        try
        {
            retVal = stub.getAccountDetail(acctNum);
        }
        catch (RemoteException re)
        {
            re.printStackTrace();
        }
        return retVal;
    }
}
ServiceWrapper.java source file
- `import javax.jws.WebService;`
- `import javax.jws.WebMethod;`
- `import javax.jws.WebParam;`
-
Add this annotation before the class definition:
@WebService(serviceName="CICSWrapperService", targetNamespace="http://wrappedservices.attachmate.com.CICSWrapper" -
Add the
@WebMethodannotation before each class method you intend to expose as a Web service operation. -
Add the
@WebParamannotation before each parameter the method accepts. In getAccountDetail, the@WebParamlooks like@WebParam(name="acctNum").
Tutorial on annotations
Each annotation has other attributes (not used in this example), that provide more fine-grained control of the Web service. You can walk through a tutorial on JAX_WS annotations that explains these parameters here.
Annotated ServiceWrapper class sample code
This is the sample code for the annotated ServiceWrapper class:
    // sample source code
package com.attachmate.wrappedservices;
import java.rmi.RemoteException;
import javax.xml.rpc.ServiceException;
import javax.jws.WebService;
import javax.jws.WebMethod;
import javax.jws.WebParam;
@WebService(serviceName="CICSWrapperService", targetNamespace="http://wrappedservices.attachmate.com.CICSWrapper")
public class ServiceWrapper
{
    CICSAcctsDemoSoapBindingStub stub;
    public ServiceWrapper()
    {
        try
        {
            CICSAcctsDemoSessionServiceLocator locator = new CICSAcctsDemoSessionServiceLocator();
            stub = (CICSAcctsDemoSoapBindingStub)locator.getCICSAcctsDemo();
        }
        catch (ServiceException afe)
        {
            afe.printStackTrace();
        }
    }
    @WebMethod
    public GetAccountDetailRecord[] getAccountDetail(@WebParam(name="acctNum")int acctNum)
    {
        GetAccountDetailRecord[] retVal = null;
        try
        {
            retVal = stub.getAccountDetail(acctNum);
        }
        catch (RemoteException re)
        {
            re.printStackTrace();
        }
        return retVal;
    }
}
Create and deploy the Web application
After you compile the classes, you need to assemble a standard Web application that you can deploy in Tomcat.
-
Create a folder named WEB-INF.
-
In this folder, create two more folders named classes and lib.
-
Copy the compiled wrapper class, along with its support classes generated by WSDL2Java as described in Writing a Java Client Wrapper for a RPC-encoded Web Service into the lib folder.
-
Copy the jars required for the support classes to the same folder.
These are the same AXIS JAR files described in Writing a Java Client Wrapper for a RPC-encoded Web Service:
axis.jar log4j-1.2.8.jar commons-logging-1.0.4.jar commons-discovery-0.2.jar jaxrpc.jar wsdl4j-1.5.1.jar -
Place the JAX-WS Runtime JAR files in the lib folder created above. Alternatively, you can copy the JAR files to the Tomcat lib directory to make them available globally.
-
Create a Web deployment descriptor file, -web.xml- in the root of the WEB-INF folder. This is the contents for the wrapped CICSAcctsDemo service:
Sample web.xml file
<?xml version="1.0" encoding="UTF-8"?> <web-app version="2.4" xmlns="http://java.sun.com/xml/ns/javaee" xmlns:xsi="http://www.w3.org/2001/XMLSchema-instance" xsi:schemaLocation="http://java.sun.com/xml/ns/javaee http://java.sun.com/xml/ns/javaee/web-app_2_4.xsd"> <display-name>CICSWrapperService</display-name> <listener> <listener-class>com.sun.xml.ws.transport.http.servlet.WSServletContextListener</listener-class> </listener> <servlet> <servlet-name>CICSWrapperService</servlet-name> <display-name>CICSWrapperService</display-name> <servlet-class>com.sun.xml.ws.transport.http.servlet.WSServlet</servlet-class> <load-on-startup>1</load-on-startup> </servlet> <servlet-mapping> <servlet-name>CICSWrapperService</servlet-name> <url-pattern>/CICSWrapper</url-pattern> </servlet-mapping> <session-config> <session-timeout>60</session-timeout> </session-config> </web-app> -
In the same folder, create a JAX-WS RI deployment descriptor file named -sun-jaxws.xml- file. See http://download.oracle.com/docs/cd/E17802_01/webservices/webservices/docs/2.0/jaxws/jaxws-war.html).
This is the contents for the wrapped CICSAcctsDemo service: // sample sun-jaxws.xml file
<?xml version="1.0" encoding="utf-8"?> <endpoints version="2.0" xmlns="http://java.sun.com/xml/ns/jax-ws/ri/runtime"> <endpoint implementation="com.attachmate.wrappedservices.CICSWrapper" name="CICSWrapperService" url-pattern="/CICSWrapper"/> </endpoints> -
Zip the WEB-INF into a compressed file named CICSWrapperService.war. The structure of the WEB-INF folder should look like this:

-
Drop the WAR file into the Web application folder of a running instance of Tomcat; it is automatically deployed. If Tomcat is launched in a console window the following displays, signifying a successful deployment:
INFO: Deploying web application archive CICSWrapperService.war
Jan 26, 2011 10:08:04 AM com.sun.xml.ws.transport.http.servlet.WSServletContextListener contextInitialized
INFO: WSSERVLET12: JAX-WS context listener initializing
Jan 26, 2011 10:08:05 AM com.sun.xml.ws.model.RuntimeModeler getRequestWrapperClass
INFO: Dynamically creating request wrapper Class com.attachmate.wrappedservices.jaxws.GetAccountDetail
Jan 26, 2011 10:08:05 AM com.sun.xml.ws.model.RuntimeModeler getResponseWrapperClass
INFO: Dynamically creating response wrapper bean Class com.attachmate.wrappedservices.jaxws.GetAccountDetailResponse
Jan 26, 2011 10:08:05 AM com.sun.xml.ws.transport.http.servlet.WSServletDelegate <init>
INFO: WSSERVLET14: JAX-WS servlet initializing
Use the new Web service in Process Designer
The steps you follow to use the Web service are basically the same steps you follow to test and deploy any other Web service in Process Designer.
-
Open the Process Design Studio and create a new project.
-
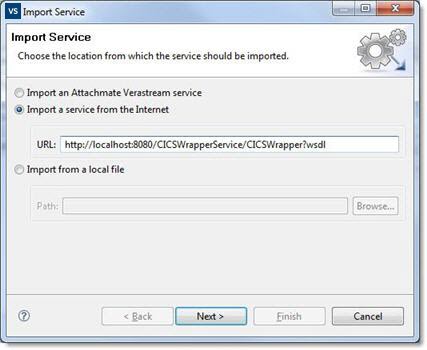
Select Import a service from the Internet and choose
http://localhost:8080/CICSWrapperService/CICSWrapper?wsdl. This URL address assumes that Tomcat is running on the default port of 8080. Click Next. -
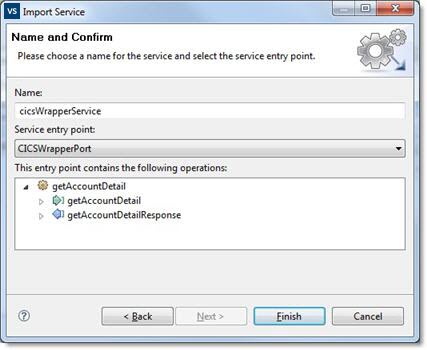
Complete importing the service using the values below:
-
Modify the default project to call the -Get Account Detail- operation.
-
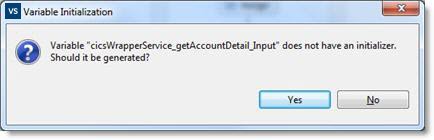
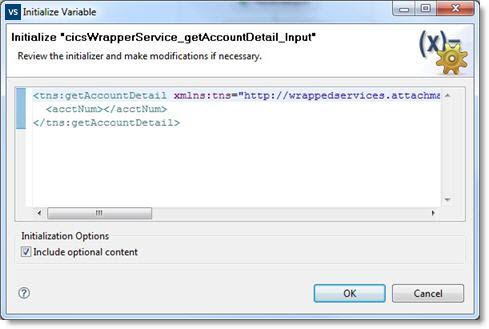
When you are prompted to generate an initializer, click Yes.
-
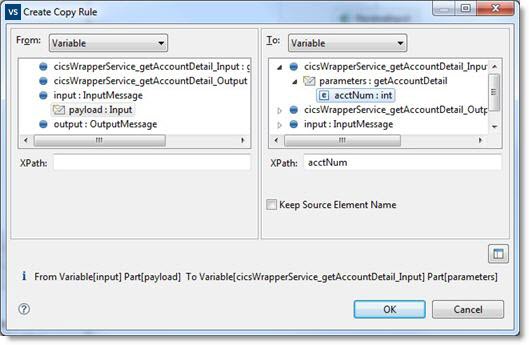
Verify that the Include Optional Content setting is selected. Do not clear this option.
Deploy and test the wrapped service
The instructions for deploying and testing the wrapped service are the same as those you'd use with any Process Designer Web service. See online help topic, How to Deploy Your Service.
- From the File menu, select Deploy to Process Server.
- Enter the name of the Process Server, and if required, supply the needed credentials.
-
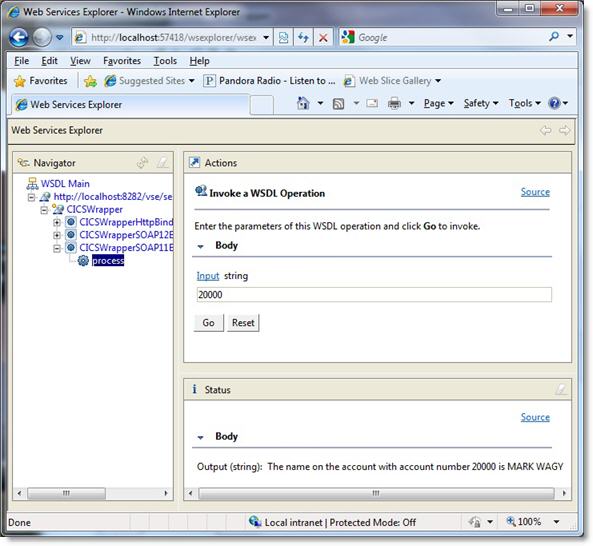
When the deployment completes, click Test Service to launch the Web Services Explorer where you can test your service.
More information